Practical ideas from FARM SHOW MagazineSubscribe · Free issue · Send us your shop tip
Subscribe to FARM SHOW
Issues / Vol. 42, No. 3 (2018)

Vol. 42, No. 3 (2018)

Money-Saving Repairs & Maintenance Shortcuts · Printed section pp. 32–35

35 selected entries · Complete text of selected entries

This issue’s section includes reader tips and feature-length shop stories. Held items and editorial notices are not reproduced.

Archive text: prices, coupons, availability and contact details reflect the original publication, not current offers. Reader methods are not universal instructions; follow manufacturer guidance and proper safety practices.

Reader shop tips

From the archive · Full text
Reader shop tip

Venna Trepasso

Venna Trepasso, Sebastopol, Miss.

“A steering knuckle broke on a 1962 Massey Ferguson diesel tractor and the repair shop wanted about $500 to replace it. Instead, I welded a plate under the knuckle to stop it from popping out. The fix has worked for 2 years with no problem.”

From the archive · Full text
Reader shop tip

Maurice Mccutchan

Maurice Mccutchan, Aledo, Ill.

“When taking an old machine apart, if there are rusted bolts with slot heads, I weld a heavy washer into the slot on the bolt, using my mig welder. The combination of heat on the bolt, and the heavy washer that I can easily grip with my vise grips, lets me remove the bolts with ease. The same washer can be used 5 or 6 times.”

From the archive · Full text
Reader shop tip

Karl Spees, MD

Karl Spees, MD, Port Angeles, Wash.

“Aerosol spray paint cans which have paint left inside but won’t spray anymore are a common problem. Here’s what to do: “Place the canister in a freezer until it is very cold. Double-bag the cold paint canister in a clear plastic bag. Move to an area where spilled paint won’t damage anything. Place a pointed-punch between the rim and can top. Close both plastic bag openings around the pointed-punch shaft. Gently poke a hole in the can top. At this point, the paint propellant left in the can will boil, changing from a liquid to a gas, potentially making a mess inside the bags. Once the propellant is exhausted, enlarge the hole and punch a second hole on the opposite side. Pour the paint into a pan for application with a brush. It won’t be a perfect job but in the right situation, you might just have enough paint to finish a job without buying another can.”

From the archive · Full text
Reader shop tip

Richard Weetman

Richard Weetman, Stewart Valley, Sask.

“To keep nozzles on aerosol spray cans open for future use, I wipe paint off the nozzle after each use and put a smear of grease on it. It keeps the nozzle ready to go for up to a year. I’ve used this method for some 30 years on cans that I use to mark hogs a day ahead of loading.”

From the archive · Full text
Reader shop tip

Dennis Strahle

Dennis Strahle, Eagle, Mich.

“I was in the shop late one evening and turned on the acetylene. Gas promptly spewed out at me from a crack in the hose next to the head where the hose flexes. The rest of the hose was in good condition. A little investigation showed that the hose outer diameter fit nicely inside of a 1/2-in. copper tube and that the copper tube fit nicely into my PEX crimp tool. I cut off the original brass crimp on the cracked hose, cut away 6 in. back to fresh hose, slid on the piece of 1/2-in.copper pipe, and crimped it. I liked the fix so much I did the same thing on the oxygen hose, too. Should be good for many years and saved the cost of a new hose.”

From the archive · Full text
Reader shop tip

Philip Cook

Philip Cook, Athens, Wis.

“A recent issue had a suggestion from a reader to freeze wet paint brushes between uses rather than cleaning them. That’s probably okay with oil base paint but I wouldn’t recommend freezing a brush when using water base paint. Freezing will likely destroy the integrity of the paint. A better approach is to wrap the bristles or roller with a dampened paper towel and wrap it in plastic. Make sure it’s airtight.”

From the archive · Full text
Reader shop tip

Richard Mast

Richard Mast, Sugar Grove, Va.

“In your book, Great Shop Ideas - Volume III, a reader says he uses used motor oil in his chainsaw as bar oil. Engine oil and chain oil are very different oils. Using engine oil on a chainsaw bar will ruin the bar. I know because I tried the same thing with new engine oil. Chain oil has a sticky additive which keeps oil from slinging off the end of the bar. With motor oil, you will not have enough lubrication so it will not cut as well and the bar will wear down.”

From the archive · Full text
Reader shop tip

D.Pribil

D.Pribil, Windsor Mill, Md.

“I store 50 and 100-ft. long extension cords inside 5-gal. plastic buckets. I cut a 2-in. dia. hole near the top to run the plug-in end of the cord through, tying a knot in the cord to hold it in place. The rest of the cord just gets coiled up inside. A very convenient and handy way to store cords.”

From the archive · Full text
Reader shop tip

Ed Metcalf

Ed Metcalf, Lakeview, Ark.

“A neighbor of mine was having trouble disassembling the driveline on a log splitter. I advised him to try KROIL penetrant oil and it worked great. KROIL is great stuff. You can order direct from KANO Labs (www.kanolabs.com; ph 615 833-4101).

From the archive · Full text
Reader shop tip

Ryan Van Der Bill

Ryan Van Der Bill, Sioux Falls, S. Dak.

“When you need to work on a bike and don’t have a bike shop mount, you can use 2 ropes to suspend it from the ceiling. Use a taut-line knot so you can easily adjust the ropes for elevation. This allows you to spin the pedals and wheels while adjusting the brakes, chain, and so on.”

From the archive · Full text
Reader shop tip

Abe Snake

Abe Snake, Peebles, Ohio

“If you are the owner of an AMC or Chrysler-produced vehicle equipped with a 4.0L fuel-injected 6-cyl. engine that hasn’t already had coolant leak into the crankcase, don’t be smug. There is ample evidence in the salvage yards that this problem is very prevalent and likely to occur at some point.

“If damage has not yet occurred, there is a prudent and reasonably-priced way to possibly avoid the problem. Just add a can of K-Seal coolant additive to your vehicle’s cooling system now. For $20 you can avoid a $2,500 to $4,000 repair. That’s cheap insurance.

“If you already have coolant in your oil, but no structural damage, put a quart of motor flush in your oil and run up to normal temperature, and then drain and replace oil, then put K-Seal in coolant and run at normal temps for 20 to 30 min. Look for white bubbles or streaks on the dipstick. If you see some, add another can of K-Seal before giving up. If you don’t see any, you might be okay. Congrats!”

From the archive · Full text
Reader shop tip

Carlton Dubberly

Carlton Dubberly, Waycross, Ga.

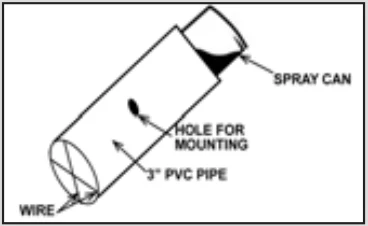
“I came up with a neat way to store aerosol spray cans and other small containers on the wall of my shop. Just cut a 3-in. dia. pvc pipe to about 4 in. long. Drill a 3/4-in. dia. hole about halfway along the length of the pipe so you can screw the pipe to the wall. At one end of the pipe, run wire from one side to the other to make a barrier that will keep cans from sliding out. Attach to the wall at about a 30-degree angle and put in a can.”

From the archive · Full text
Reader shop tip

Roman Bontrager

Roman Bontrager, Myerstown, Penn.

“Years ago I was was working construction and we removed an x-ray machine from a medical office. The frame and rails attached to the ceiling. I took them down and reinstalled them in my shop. The two main rails are 10 ft. long and so are the two crossrails. I mounted a 1/2-ton electric chain hoist to the cross rail carriage, thus allowing me to pick up anything in that 10 by 10-ft. area. Works great for welding projects, lawn tractor maintenance, and other miscellaneous jobs.”

From the archive · Full text
Reader shop tip

Gary Swensen

Gary Swensen, Yankton, S. Dak.

“In the winter it can be almost impossible to pump grease when it’s cold and the grease gun is left outside. I solve the problem by heating the grease gun up with a torch for a few seconds, which gets the grease flowing like summertime. Just make sure to wear welding gloves since the gun can get really hot.”

From the archive · Full text
Reader shop tip

Michael Myers

Michael Myers, Kirbyville, Texas

“I bought an old screw-type bottle jack cheap at a flea market and find that it’s real handy to use in my shop. One time I wanted to spread some metal pieces apart but found there wasn’t enough room to use a scissor jack. So I made an adapter for my cordless drill by welding a short bolt crossways onto a nut driver that fits into the drill chuck. That way I can just lay the jack on its side and use the drill to operate it.

“I’ve used the same jack to pull the steering wheel off a tractor.”

From the archive · Full text
Reader shop tip

James Spalding

James Spalding, Finley, Ky.

“Instead of running electric fence wire across a gate opening, I run the wire through a 3/4-in. dia. pvc pipe and then bury the pipe underground. Short elbow sections attached to both ends of the pipe extend up to the surface and keep water out.”

From the archive · Full text
Reader shop tip

Jack Henning

Jack Henning, Watertown, S. Dak.

“At 81 years old I’m no longer able to crank start my 1930 McCormick-Deering 10-20 tractor, so I mounted the starter ring gear off an IH 806 gas tractor on the 10-20’s belt pulley. I made a mounting bracket for the ring gear and bolted it to the tractor frame. I made sure to point the 806 tractor’s starter toward the tractor seat so the belt pulley turns in the right direction.”

From the archive · Full text
Reader shop tip

Warren Grant

Warren Grant, Albany, Ga.

“I’ve always had trouble pushing new races back into place when a bearing goes bad. To solve the problem, I take a Dremel tool fitted with a small cut-off blade and cut through one side of the old race. It makes the race flexible enough that I can push a new race in and then remove the old one with little effort. Every time I change out a race, I save it so that I’ll have various sizes on hand.”

From the archive · Full text
Reader shop tip

David Norman

David Norman, Bay St. Louis, Miss.

“I keep hydraulic floor jacks in 4 different pickups. I gave each jack an extra 2 in. of lifting height by welding a 4-in. length of 2-in. square tubing onto it. I removed the pin that secures a steel cup to the jack lift arm and welded the tubing on. Then I drilled a hole in the tubing, placed the cup on top of it, and reinserted the pin.

“The extra 2 in. of lift can often eliminate the need to use spacers when changing a flat tire.”

From the archive · Full text
Reader shop tip

Ryan Van Der Bill

Ryan Van Der Bill, Sioux Falls, S. Dak.

“Instead of trying to stuff a tool’s electric cord inside the tool case box, just wrap the cord neatly around the outside of the box. You might have to cut a small groove in the plastic where the box folds up in order to run the cord through.”

From the archive · Full text
Reader shop tip

Dick Steckler

Dick Steckler, [email protected] (as printed)

“An owner of a 2011 Case-IH Farmall D40 recently reported that plastic fenders on the tractor had cracked. He replaced one and the other was starting to crack. I’ve found that you can usually prevent a crack like that from worsening by drilling or cutting a small round hole at the point of the crack. This reduces stress at that point and usually stops the crack from going further.”

Shop feature stories

From the archive · Full text
Feature story

Another Nifty Torch “Striker”

Featured source: Ray Beardslee

“I agree with John Stuber in the last issue of FARM SHOW that torch strikers are a pain in the neck. They don’t work very well as they get older and I have reduced grip strength in my hands due to my age,” says Ray Beardslee, La Mesa, Calif., who came up with his own push-button “striker”.

“I went to my scrap pile and found an old barbeque grill with a piezo-electric ignitor that still worked fine. I also found an old spark plug.

“I built a bracket to hold the two items on the handle of my torch cart. The ignitor is wired to the plug so all I have to do is push the button and hold my torch by the spark plug. No batteries or electric source needed!

“If you try this idea, just make sure the ignitor and plug are both grounded on the bracket or else you will be the one getting sparked.” Contact: FARM SHOW Followup, Ray Beardslee, 7885 El. Paso St., La Mesa, Calif. 91942.

From the archive · Full text
Feature story

Mobile Air Splitting Manifold

Featured source: Gary Swensen

“One day two of my sons each had projects going outside where they needed compressed air, sharing one large line from the compressor in my shop. When I asked if I could use the hose to air up my trailer tires, they both said ‘No!’ at the same time,” says Gary Swensen, Yankton, S. Dak.

“So that’s when I got the idea for a mobile air splitter that we could carry outside and connect air lines for multiple projects. One large line goes in the end of the splitter and 6 lines out are fitted with quick couplers.

“This kind of manifold needs to be built extremely heavy-duty. I used a large piece of heavy-gauge pipe with ends welded in place and holes drilled in the sides for the pipe fittings. I added a handle to make it easy to carry and added a couple small legs to hold it off the ground. No more sharing and swearing, and no need to run separate air lines for each project.” Contact: FARM SHOW Followup, Gary Swensen, 1408 Sunrise Drive, Yankton, S. Dak. 57078 (ph 605 660-3489; [email protected]).

From the archive · Full text
Feature story

Wheel Guards For Welders, Toolboxes Push Debris Away

Featured source: Bryan Dubas

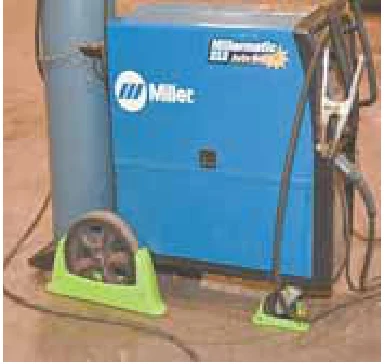
“Our new Path Pro wheel guards snap onto the wheels found on welder carts and rolling toolboxes. They push small obstacles such as cords and welding leads out of the way, to keep the cart or toolbox from getting hung up on debris as you move around your shop,” says Bryan Dubas, Fullerton, Neb. The polypropylene wheel guards are designed for use on solid level surfaces. They come in 2 halves that bolt together using 2 pre-drilled holes. To install them you just lift the wheel up and snap the guard onto the bottom. Wheel guards are available in diameters from 4 to 10 in. and widths from 1 to 3 in. Prices range from $15.99 plus shipping for a pair of 4 by 1-in. wheel guards, to $49.99 plus shipping for a welder set that includes two 4 by 1 1/2-in. and two 10 by 2 1/2-in. guards. Contact: FARM SHOW Followup, The Caster Master, 101 Broadway St., Fullerton, Neb. 68638 (ph 308 550-0151; [email protected]; www.thecastermaster.com).

From the archive · Full text
Feature story

Broken Items Become A Handy Tool Cart

Featured source: Patrick Binns

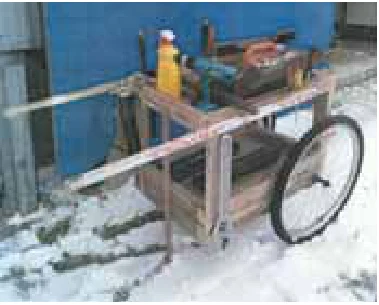
“My tools were never where I wanted them and I got tired of running back and forth,” says Patrick Binns, who built a tool cart using parts from broken items. The cart’s bicycle tires roll easily over all types of terrain. Binns mounted the tires to a frame built mostly from a couple of broken pallets. To make it a true DIY project, Canadian-style, Binns used broken hockey sticks, two for handles and a third attached vertically to the front to create a support leg. Binns says the cart has been useful for all types of projects in his shop and around his rural Prince Edward Island property. At 3 ft. long and 2 ft. wide, it holds everything from socket sets, grease guns and a bucket of bolts to work on machinery, as well as a hammer, drill and other tools for carpentry work.

Contact: FARM SHOW Followup, Patrick Binns, Murray River, P.E.I. Canada ([email protected]).

From the archive · Full text
Feature story

Axle Extensions Convert Deere To Wide Front

Featured source: Harold Mulder

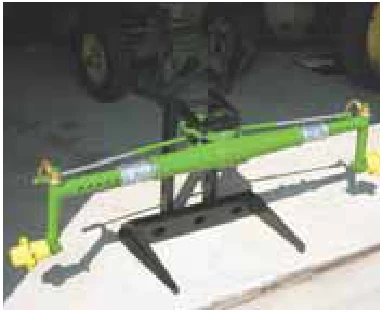
Front axle extensions can turn rare Deere “vegetable tractors” into an even more rare, wide-track style. Harold Mulder ran across a Beet and Bean tractor with its skinny, 42-in. diameter rear wheels, long rear axle and wide front axle.

“A quick call to Vicki Eller at John Deere Archives verified it was a genuine vegetable tractor,” says Mulder. After bringing the tractor home, he began to research Beet and Bean tractors. He learned that an optional front axle extension kit once was available to widen the track of the front wheels to match the track of the rear wheels. This made it possible to straddle 2 beds when cultivating or planting.

“After searching for a pair of these front axle extensions for more than 8 years, I decided a niche market might exist among other Deere vegetable tractor collectors for the extensions,” says Mulder. He sells his kits under the company name TMS, LLC. He credits his tool and die maker background for being able to put a kit together for himself and to offer it to other collectors. His kit is intended for use with all Deere, 2-cylinder, lettered and numbered, Waterloo-built vegetable tractors manufactured from 1947 to 1960.

“My AB3841R (original part number) kits are machined to OEM specifications,” says Mulder.

“Each kit includes an extension housing, tie rod and lock bolt. The extension housing is made from 8625 alloy steel, and the tie rod is made from 1045 carbon steel.” The price per kit is $225 each or 2 for $400.

Shipping is extra. Mulder prefers receiving calls in the evening. Contact: FARM SHOW Followup, Harold Mulder, 906 Central Ave. N.W., Orange City, Iowa 51041 (ph 712 737-4467; [email protected]).

From the archive · Full text
Feature story

Chainsaw Stand Eliminates Clutter

Featured source: Dave Neil

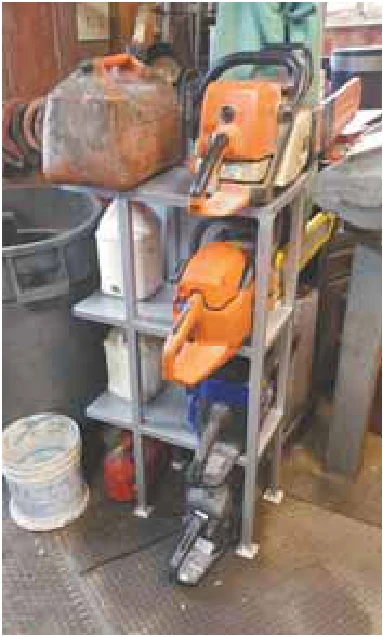
“My four chainsaws and the oil and fuel needed for them were cluttering up my shop floor, so I built a chainsaw stand to keep everything organized. It cleared up a lot of floor space,” says Dave Neil, New London, Iowa. The 38-in. tall stand is 2 ft. wide and 1 ft. deep. Neil used 1-in. square tubing for the frame and 1/16-in. thick sheet metal for the shelves and a partially-enclosed back side.

“I store the saws on one side of the shelves and the oil and fuel cans on the other side. The chainsaw bars extend through a gap out the back so they’re always out of the way,” says Neil. Contact: FARM SHOW Followup, Dave Neil, 2920 Quaker Ave., New London, Iowa 52645 (ph 319 367-5690).

From the archive · Full text
Feature story

Custom-Made Gaskets Are Just A Click Away

Featured source: John Baker

“Thanks to the internet and PayPal, I was able to grow a tiny custom gasket-making business into one that supplies customers in the U.S., Canada, Britain, Australia and many other parts of the world,” says John Baker, owner of Gaskets-To-Go. More surprising than the unique nature of Baker’s business is the fact it’s located in the province of Pathum Thani, Thailand. The Minnesota native settled there nearly 25 years ago. His business was born when his cousin in Washington State asked him to source gaskets for old outboard motors that were unavailable in the U.S.

“I asked around and found a couple local suppliers, and things just grew from there,” Baker says. Now he supplies gaskets made of copper, metal reinforced composites, multi-layer steel, felt, embossed steel, rubber and fiber.

“No order is too small or too large,” Baker says enthusiastically.

“There are no tooling charges, no set-up charges and no minimum order. We can make gaskets from a drawing, a blueprint, an old gasket, a cardboard template, or even a scan of an old gasket. We can supply gaskets for vintage car, truck, tractor or industrial equipment.” Baker also produces custom molded and extruded rubber, plastic and bakelite parts. He can also supply springs, stamped or machined parts. Recently he began producing polyglass tail lights for cars and trucks. He says there’s really no limit to the types of parts he can supply. Pricing is given within 2 to 3 days and orders are usually complete for shipping in 2 weeks, although larger quantity and complex orders may take longer. Molded parts require a 200-piece order because of the tooling involved. Shipping costs and delivery to the customer vary on the mode of transportation. Baker says he’s tapped into a wealth of manufacturing available in Thailand over the years because he gets unusual requests and “never says no”. He has sourced custom-made automobile pumps built without drawings, made brass covers for dynamos and generators, and produced a head gasket for a 1930’s-era Bamford diesel engine. Other rare requests included multiple gaskets for a Rolls Royce Merlin Mk35 airplane engine, exhaust gaskets for a vintage Lancaster automobile, and copper sandwich gaskets for a 1930 French Moteurs Berard industrial engine. Baker says his website provides answers to just about every question customers have about his business, and he’s happy to provide references as needed. Contact: FARM SHOW Followup, John Baker, Gaskets-to-Go, Phaholyothin Soi 66, 135/39 Soi Decharoen 1, Moo 10, Tambol Kukot, Amphur Lumlukka, Pathum Thani 12130, Thailand (ph (+6681) 985 1218; www.gasketstogo.com).

From the archive · Full text
Feature story

Cheap Fix For O-Ring Leak

Featured source: Ben Wagner

Ben Wagner faced a $2,000 bill to fix a leak around the dipstick on his 7.3 Power Stroke Ford truck until a friend shared a tip. All he needed was a 20-gauge shotgun bore brush and a piece of string.

“My Ford dealer said he needed to pull the engine to remove the oil pan to do the job,” says Wagner.

“That’s because when you remove the flange nut on the dipstick bulkhead, the bulkhead will drop into the oil pan. Instead I used the brush and string to retain the bulkhead.” Wagner and his friend aren’t the only ones using this idea to save money. Videos on YouTube walk viewers through the process (see video at FARMSHOW.com). The fix starts with removal of the starter. Wagner then removes the 10 mm bolt that fastens the dipstick to the side of the valve cover and removes the dipstick.

“I tie heavy braided fishing line to the end of the brass barrel cleaning brush and push the brush into the dipstick opening,” explains Wagner.

“Once it is in far enough to give me resistance when I pull back on it, I remove the flange nut from the threaded neck of the bulkhead.” Once the flange nut has been passed over the bore brush and string, Wagner is able to jiggle the bulkhead loose, yet retaining it with the bore brush. The common cause of leakage at the dipstick is a leaking O-ring. As the O-ring gets oil on it, it can swell up and jump out of the groove. As the bulkhead is loosened, the O-ring may fall off and be easily removed, just as the flange nut was.

“If the O-ring or parts of it stick, I use a dental pick to clean out the groove,” explains Wagner.

“Once I get the O-ring off, I use carburetor cleaner to clean off the bulkhead. You want to get it as grease-free as possible.” Once the bulkhead is clean and dry, Wagner slips a new O-ring over the string and brush and the neck of the bulkhead. After working it into the groove, he pulls the bulkhead back into place with the neck at the original angle and threads on the flange nut.

“You want to snug up the flange nut, but the bulkhead is machined brass, so don’t over-tighten,” says Wagner.

“Replace the fastening bolt, dipstick and starter, and you’re done.” Contact: FARM SHOW Followup, Ben Wagner, 56 Gornick Lane, Whitehall, Mont. 59759 (ph 406 287-2268 or 406 490-9114; [email protected]).

From the archive · Full text
Feature story

How To Make A Low Cost Temporary Table Saw

By By Mark Newhall, Editor
Featured source: Paul Tierney

My friend Paul Tierney, Bloomington, Minn., is a jack-of-all-trades who can do everything from artistic metalwork to sculptures to remodeling. He recently took on a rush job helping a client remodel a small restaurant and bar. The job called for ripping a big pile of cedar planking but he didn’t want to haul his table saw down to the job, and he didn’t want to haul the cedar back to his shop. So he came up with an idea for a temporary table saw. He took a sheet of plywood and cut a slot into it with his hand-held circular saw. Then he set the saw flat over the slot with the blade sticking through it and bolted the saw’s baseplate to the plywood with four countersunk bolts. Then he flipped the plywood over so the blade extends out the top. To keep the saw running continuously, Paul wrapped a metal bracket around the trigger and made a small wood wedge that slips under the bracket to apply pressure to the trigger. When he wants to stop the saw, he just pulls out the wedge. On top of the table he used spring clamps to hold a saw guide in place. And he drew measured gauge lines on top of the table so it’s easy to rip the cedar at different widths.

“It was a good solution to a short-term problem. The saw held up just fine to a bunch of cutting,” says Paul. Contact: FARM SHOW Followup, Paul Tierney, 10020 Pleasant Ave. S., Bloomington, Minn. 55420 (www.pauletierney.com).

From the archive · Full text
Feature story

Where To Buy Custom Radiators, Oil Coolers

Featured source: Will and Ryan Garrett

Brothers Will and Ryan Garrett followed their father into the business of repairing radiators. Later, it was their desire for working “outside the box” that got them into custom manufacturing. Fifteen years later Radiator Supply House produces custom aluminum and steel radiators, steel tanks, oil coolers and charge air coolers. They also make A/C condensers and shrouds for cars, trucks and commercial equipment. For ag and commercial customers, RSI builds steel tank radiators to replace plastic models. The Garretts say they can restore just about any radiator including those from ageless iron equipment such as tractors, combines or stationary engines. The metal radiators and heavy-duty constructed cores they make replace short life-span plastic and light construction oil coolers. Charge air coolers and oil coolers are built with a bar and plate design core. The company also produces Icebox radiator and intercooler direct-fits for Cummins 4BT, 7.3 Powerstroke or popular Willys Jeep, Landcruiser, re-builds or Rat Rods. One of their most unique creations was for a ’57 Chevy with a twin turbo LS1. All special order units are hand made to custom specifications. Contact: FARM SHOW Followup, Radiator Supply House, 1460 47th Ave., Sweet Home, Ore. 97386 (ph 877 365-9602; www.radiatorsupplyhouse.com).

From the archive · Full text
Feature story

Shop-Built Boring Tool

Featured source: Brian Lough

Maryland handyman Brian Lough built his own line-boring machine because he couldn’t justify the cost of a commercial model. He needed it to enlarge the bore of the pin holes on his 12-in. used excavator bucket.

“I knew I could make something fairly simple that would work just fine using a drill, a scissor jack, and other parts in my shop,” says Lough. The other parts include C-channel, 1 1/2-in. bearings, bearing mounting blocks, a bit setting tool, pvc centering cones, a 1 1/2-in. shaft coupler with key stock, and a short shaft turned down for a 1/2-in. drill motor. He fabricated the boring bar from a 1 1/2-in. keyed shaft with 1/2-in. square holes spaced 5-in. apart. Set screws are rotated 90-degrees from the square hole to lock the boring bit. Lough secured the bearings with pieces of 1-in. square bar 4 1/2-in. long, threaded on the bearing end and welded to the part on the opposite end. He welded one edge of the bar so when boring was complete he could tap on the opposite side of the weld to break it loose. Then he ground the weld flush so he could re-use the bar. Lough says small metal plates could be welded to a part to extend the reach of the mounting bar.

“I fabricated a bit-setting tool that uses a feller gauge to determine the advance needed for the next cut,” Lough says. His lathe tool was made from 1/2-in. square HSS stock shaped with a round nose so it would cut in both directions. The cutting edge height was reduced 1/4-in. so it cuts to the centerline axis of the bore. Lough’s machine can also be used for repairing out-of-round holes. In that application he installs a sleeve with the correct inside diameter, or welds the inside of the bore, then cuts it to the correct diameter. Lough says anyone welding before boring needs to make sure all grease is removed or that area will harden and not cut correctly.

“This setup worked great for what I needed, and although I don’t have any formal drawings on building another one, I’ll be happy to help anyone who wants to build their own. It took me about 30 hrs. to put the tool together and I spent about $125 for the bearings, shaft, shaft coupler and screw jack. A commercial tool would’ve cost about $2,000,” Lough adds. Contact: FARM SHOW Followup, Brian Lough, 5860 Smallwood Church Road, Indian Head, Md. 20640 (ph 301 246-9092; [email protected]).