Practical ideas from FARM SHOW MagazineSubscribe · Free issue · Send us your shop tip
Subscribe to FARM SHOW
Issues / Vol. 42, No. 2 (2018)

Vol. 42, No. 2 (2018)

Money-Saving Repairs & Maintenance Shortcuts · Printed section pp. 32–35

31 selected entries · Complete text of selected entries

This issue’s section includes reader tips and feature-length shop stories. Held items and editorial notices are not reproduced.

Archive text: prices, coupons, availability and contact details reflect the original publication, not current offers. Reader methods are not universal instructions; follow manufacturer guidance and proper safety practices.

Reader shop tips

From the archive · Full text
Reader shop tip

Bob Payne

Bob Payne, Coldwater, Miss.

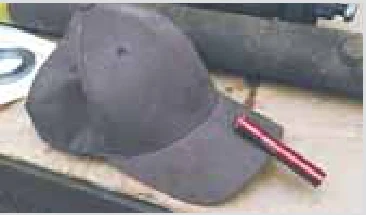
“When working under or inside a machine, visibility can be a problem - even in a well-lit shop. I’ve tried different kinds of strap-on lights and really like the Streamlight 66318 light, which clips onto the bill of a cap. It uses one AAA battery that lasts for a couple hours or more of continuous use. It’s great to have bright LED light right where you’re looking. You can buy it on Amazon.com for $18.21 with free shipping.”

From the archive · Full text
Reader shop tip

H.D. Weaver

H.D. Weaver, Baird, Texas

“I read where a reader had trouble with the control cable freezing in cold weather on his front end loader controls. I had the same problem on my New Holland skid steer loader’s throttle cable. I finally figured out the problem was caused by rainwater freezing in the housing. So I poured a little antifreeze into it. Problem solved.”

From the archive · Full text
Reader shop tip

Ted Lacey

Ted Lacey, Hay Manager, Trent, S. Dak.

“You can make an air preheater for gas or diesel tractors by taking heated air off the outside of the muffler and directing it through a pipe to the air cleaner. The preheated air goes down into the carburetor, keeping it from icing up and preventing frost build-up. The photo shows the setup that’s been on my Case 930 tractor for about 25 years. It does take some time for the manifold to warm up. It has worked like a charm ever since I installed it, and it should last a lifetime. The idea would work on many tractor models.”

From the archive · Full text
Reader shop tip

Wayne Beggs

Wayne Beggs, Lincolnton, Ga.

“I got tired of always having to pump up my wheelbarrow tire, not to mention the cost of replacing the tube. So I installed an old 16-in. steel wheel off an old piece of equipment. No more flat tires.”

From the archive · Full text
Reader shop tip

Glenn Wilson

Glenn Wilson, Crittenden, Ky.

“I store log chains in 5-gal. buckets with the hooks hanging on the edge of the bucket. Makes it easy to grab and go and you don’t have to search for the ends.”

From the archive · Full text
Reader shop tip

Bob Payne

Bob Payne, Coldwater, Miss.

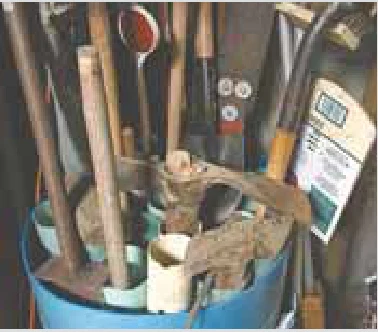
“To store long-handled tools, I cut the top off a plastic 55-gal. barrel and fill it with pieces of 4-in. dia. thin wall pvc pipe. The pipe holds the tools separate from each other. For D-handle tools, I just stick the D part down into the bucket between the pipes.”

From the archive · Full text
Reader shop tip

James L. Fetzer

James L. Fetzer, Maiden Rock, Wis.

“To remove the oil filter from my 2015 New Holland T4.75 tractor, I first have to remove the two fuel filters. Afterward, I have to call my neighbor – who is a service technician – to get the air bled out of the fuel system. It takes 2 hrs. to get the tractor running again. The company says this tractor is easy to service. I wish a company rep would come out to help with the next oil change.”

From the archive · Full text
Reader shop tip

Jay Taylor

Jay Taylor, Hinton, W Va.

“In answer to the fellow who said the headlights on his 2000 Dodge Ram come on and won’t go off until he unhooks the battery, I think he may have put a single contact bulb into a double contact socket. What happens is that the single contact bulb bridges the contacts.”

From the archive · Full text
Reader shop tip

Anthony Siciliano

Anthony Siciliano, Redding, Ct.

“The axle on my 1993 Scag mower broke in half. Since it was welded into the mower’s frame, a replacement part would have cost $1,000. I cut out the old welds, removed the axle, and got a piece of 1-in. cold-rolled bar stock. I cut it to length and took it to a friend who has a large lathe. All we needed to do was to cut grooves on both ends to accept retaining clips to hold the wheels on. Then I welded it into place. After reassembly, it was good to go for another 24 years. Total cost was $25.”

From the archive · Full text
Reader shop tip

James M. Driss

James M. Driss, Lindley, N.Y.

“I had a manifold leak on the exhaust of my 2003 Ford F-150. To find the leak, I taped the nozzle on my shop vac to the tailpipe so it’s blowing into the exhaust system. Then I splashed soapy water over the manifold and found the leak. It was cracked and would stop leaking when hot, which made it tough to find.”

From the archive · Full text
Reader shop tip

Roger Gutschmidt

Roger Gutschmidt, Gackle, N. Dak.

“The grain tank gearbox on my Deere combine, which moves grain from the clean grain elevator chain to the bubble-up auger in the hopper, failed a few years ago. A new one cost more than $2,000. The housing is aluminum and the two bevel gears inside are made of steel. The gears, bearings, and shafts inside run in 80/90 gear lube. There is a seal on one end that is always in the grain. If this seal fails, dust gets inside the gear case and before long it is full of sludge and makes the bearings go out.

“When that happens, the gears shift to the side and wear a groove in the aluminum housing and the belt that drives it comes off the pulley and you’re done combining for the day. If you fix it yourself, you’re looking at $2,500 in parts. If a Deere technician fixes it, it will cost $3,500 to $4,000.

“My tip to avoid the problem is to lower the fold-down bubble auger and find the star-shaped drive wheel below it. Take that off and then the oil seal is easily accessible. Examine it for any kind of damage. If it looks bad, pry it out with a screwdriver and pound in a new seal. Also, check the oil in the case with the dip stick. If it looks dirty at all, dust is getting inside and that will tell you the seal is failing. Replacing a $10 seal will save you a lot of money in down time and repair costs. Also, running the hopper to overflowing – or using a hopper topper – puts tremendous stress on this gearbox, the clean grain elevator chain, and the bearings, not to mention the final drives, transmission, and tires. It might look cool to have a heaping full hopper but you’re not doing your combine any favors.”

From the archive · Full text
Reader shop tip

Brandon Parks

Brandon Parks, Geno’s Garage, Cumming, Ga. (www.genosgarage.com; ph 800-755-1715)

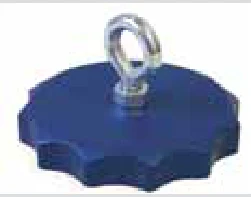
“The oil filter in 2013-2018 Ram Cummins heavy-duty pickups is notoriously difficult and messy to remove. Our oil filter cap-off tool threads onto the top of the filter, allowing you to easily pull the filter straight out without spilling any oil. The cap is threaded on the inside and comes with a screw-in finger loop on top.

“The problem is that on Ram Pickups you either have to remove the air filter assembly to get access from above, or go through the fender well area with the wheel removed.

“When you pull the filter out, you have to twist and turn so oil spills all over. This tool threads onto the filter, sealing it so you can get the filter out without spilling a drop.” Sells for $29.95 plus S&H.

From the archive · Full text
Reader shop tip

Frank Heraghty

Frank Heraghty, Claremore, Okla.

“I had trouble trying to hold up a big extension ladder and guide it while raising the upper half of the ladder at the same time. So I came up with a simple and cheap solution. I inserted a 1-in. dia. pipe through one of the rungs towards the bottom of the ladder. A 10-in. long, L-shaped handle is welded onto one end of the pipe. A rope wound around the pipe leads up and over the top part of the ladder, then back down to its bottom rung. Four or five cranks of the handle will raise the top ladder about one foot.”

From the archive · Full text
Reader shop tip 1 of 2

Brian Lough

Individual tip 1 of 2 from this reader’s published contribution.
Brian Lough, Indian Head, Md.

“When repairing items with J-B Weld epoxy or other adhesives, I first apply a layer of epoxy. Then I place strips of storm window screen onto the epoxy to add strength to the repair. For even more strength, you can add an additional layer of screen diagonally to the first one. Prior to using the epoxy, I clean all surfaces with acetone to remove any contaminates.

“I used this idea a couple of years ago on an old tractor that I was restoring. It had a cast iron engine with a cracked block. I was worried that expansion and contraction of the metal might cause problems so I cleaned the cracked area, then used a die grinder to rough up the metal around the crack and applied a layer of epoxy. Then I placed a screen over the epoxy and added another layer of epoxy on top of it. Problem solved.

From the archive · Full text
Reader shop tip 2 of 2

Brian Lough

Individual tip 2 of 2 from this reader’s published contribution.
Brian Lough, Indian Head, Md.

“To keep penetrating oil from dripping away from seized or rusted fasteners and mechanical parts, I place cotton balls on the seized part and then saturate them with penetrating oil. This technique allows the oil to continuously penetrate into the part instead of dripping away.”

From the archive · Full text
Reader shop tip

Roy Phlipot

Roy Phlipot, Scott, Ohio

“When applying caulk or silicone, wear rubber gloves and coat them with liquid hand soap. Then use your finger to smooth out the caulk or silicone. It won’t stick to the gloves.”

From the archive · Full text
Reader shop tip

Jerry Lanser

Jerry Lanser, Longmont, Colo.

“I have a 4 by 8-ft. freestanding workbench which works great, but there was never enough room to store commonly used tools close by.

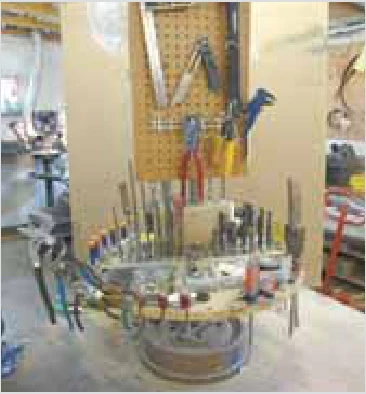
So I built a storage carousel that keeps my tools readily accessible, yet I can quickly move it out of the way if necessary. I keep the carousel on a nearby table.

“An old truck brake drum serves as the base. I welded an 11-in. length of 3/4-in. dia. pipe vertically to the center of the base, then inserted a 45-in. long, 3/4-in. dia. solid vertical rod onto which I had welded three 10-in. angle iron wings. The wings support a 3/4-in. thick by 24-in. dia. plywood tray.

“I drilled a series of different size holes about 1/2 in. from the outside edge of the tray in order to store screwdrivers and pliers, etc. The inner part of the tray holds an assortment of items, including tape measures, a drill bit rack, knives, pencils and other general use items. I located the tray at least 12 in. above the table so larger screwdrivers won’t drag on it.

“I also placed a layer of pegboard on either side of the vertical bar. The pegboard can either be attached to the rod or allowed to spin independently of the bar and tray.”

From the archive · Full text
Reader shop tip

Randolph Walker

Randolph Walker, Charlotte Court House, Va.

“After about 15 years of use, my Marlow irrigation pump wouldn’t prime any more. When I took it apart I discovered that not only was the seal on the impeller shaft bad, but also the shaft itself was so badly pitted that a new seal wasn’t going to solve the problem. The shaft and impeller is a one-piece unit and is quite expensive to replace.

“After cleaning the shaft thoroughly, I put a liberal coating of J-B Weld epoxy on the pitted part and continued to rotate the shaft by hand until the epoxy began to harden. After letting the patch thoroughly cure for a couple of days, I ran the pump at idle and used a file and sandpaper to work the epoxy down so the new seal would be air tight. I made this repair more than 20 years ago and it’s still working great.”

From the archive · Full text
Reader shop tip

Jill Tuttle

Jill Tuttle, Charlestown, N.H.

“I use ordinary plastic cups to keep the plugs on outdoor extension cords out of the weather. I cut a hole in the bottom of the cup, then slide the cord through until the plug is inside the cup. Then I tape a lid onto the cup.”

From the archive · Full text
Reader shop tip 1 of 2

John Stuber

Individual tip 1 of 2 from this reader’s published contribution.
John Stuber, DeSoto, Mo.

“I use a lot of blades for utility knives and keep the blades in a jar. To prevent them from rusting, I spray clothes dryer lint with WD-40 and then place the lint in the bottom of the jar. The same idea works good for storing other small metal parts.

From the archive · Full text
Reader shop tip 2 of 2

John Stuber

Individual tip 2 of 2 from this reader’s published contribution.
John Stuber, DeSoto, Mo.

“Instead of buying a magnetic holder for my nuts and bolts, I make my own using a small can and magnets removed from discarded microwave ovens. A typical microwave oven has about 4 good magnets in it. I use contact cement to glue each magnet to the bottom of the can.

“I’ve used this idea to make several magnetic holders so I can store nuts and bolts for various projects that take an extended period of time to finish. That way the parts are always there when I come back to the project.”

From the archive · Full text
Reader shop tip

Ted Kalvitis

Ted Kalvitis, Romney, W. Va.

“Congratulations to the FARM SHOW reader who beat a proposed $1,800 repair bill when the clutch cross-shaft on his Kubota tractor seized in the bell housing. While he realized success with a mixture of acetone and transmission fluid, the method I’ve been using in my mobile tractor repair business works well when a more permanent arrangement is called for.

“I simply drill a small hole in the bell housing until the drill reaches the cross-shaft. This is easy to determine because the shaft is much harder than the cast bell housing. After extracting all the cuttings, I then thread the hole and install a grease fitting. Sometimes it takes some heat to get the grease moving. I warn my customers not to over-grease the fitting so that excess grease doesn’t get on the clutch surface.

“I mentioned my idea to the service manager at a Kubota dealership where they customarily split the tractor in half to gain access to this shaft – at a $2,000 cost for labor. He just stared at me for a very long moment before the conversation resumed.”

Shop feature stories

From the archive · Full text
Feature story

Hydraulic Unlock Tool For Skid Loaders, Tractors

Featured source: Steve Boling

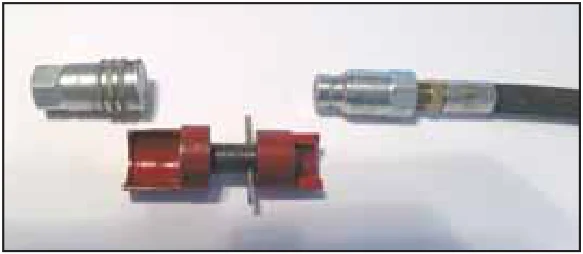
“Our new hydraulic unlock tool for skid loaders is designed to snap onto the male or female end of a hose that’s under pressure. It lets you quickly relieve the pressure for easy hose hook-up by just turning a screw,” says Steve Boling, Boling Machine Shop, Lentner, Mo. The tool makes use of a center screw with a roll pin. A male hose coupler hooks up to one end and a female coupler to the other. Turning the roll pin one way causes the screw to push against the plunger inside the coupler, which opens a valve to relieve pressure on the hose. According to Boling, thermal expansion in hydraulic hoses is a particularly big problem during hot summer weather, especially if the hose is exposed to sunlight which can cause the oil to expand.

“When enough pressure builds up inside the hose you can’t hook it up to the tractor. The only solution is to hit the end of the hose with a hammer, or unscrew the hose end to relieve the pressure.” Hooking up auxiliary equipment to a skid loader requires two hoses, one male and the other female, and the unlock tool is designed accordingly, says Boling.

“We also offer a different model for Pioneer hose ends, which are designed for tractors where only a male hose is required.” Each hydraulic unlock tool model sells for $49 plus S&H. Contact: FARM SHOW Followup, Boling Machine Shop, 2357 Shelby 418, Lentner, Mo. 63450 (ph 660 699-3717; [email protected]; www.bolingmachine.com).

From the archive · Full text
Feature story

Where To Buy Custom-Cut Gears

Featured source: Lyle Mack

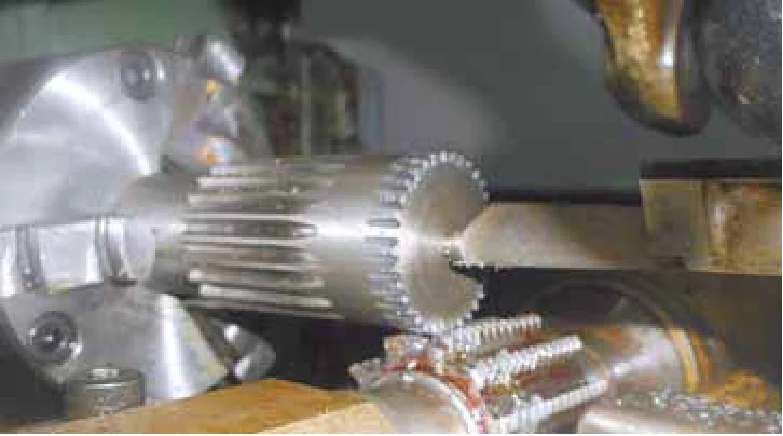
Lyle Mack loves gear making so much he’ll even help you make your own. The young machinist set up LM Gear and Machine on his family’s farm to make gears, sprockets, and splined shafts.

“I got started a while back while building my own tractor, including the gears and shafts,” explains Mack.

“I got so busy making the tooling for gears that I never finished the tractor.” What he has done is build a business of his own. He can make a wide range of spur, helical, worms and worm gears, rack and pinion systems, and bevel gears of all sizes. He can work in any material in sizes from 1 to 15-in. diameter. He works in metric, standard and non-standard scales . Mack has also built up a nationwide network of contacts and resources in custom machining.

“I’m ready to try anything, and I won’t laugh at any idea,” he says.

“I like to work with do-it-yourselfers, people with an idea, but who don’t know what size gears are needed based on horsepower and material, I can help them. If I can’t, I know a lot of small shops I can direct them to.” If readers want to make their own gears, Mack is happy to help. He refers wannabe gear makers to “Gear Design Simplified” by Franklin D. Jones and Henry Ryffel.

“Another recommendation is ‘Gears and Gear Cutting’ by Ivan Law,” says Mack.

“There are tons of resources on the internet, but those two cater to people getting started.” He notes that lots of machine shops will charge a lot for calculations and won’t work with crude drawings.

“If you can come up with your own calculations, you can avoid that,” says Mack.

“When people need a specific gear or spline they can spend a lot of time trying to find one. It’s often easier to make it yourself. It’s not as hard as people think.” Mack will not only help with the math needed, he’ll help find the lowest cost way to fix the problem of a busted gear or splined shaft. He understands that if a specialty gear breaks on an older machine, a replacement may not be available.

“If a person wants to get a machine going again, we’ll figure out a way,” he says. Part of being able to do the job is having the right equipment. Mack is still “gearing up” with more expensive equipment, like a special mill to cut spiral, bevel gears. In the meantime, he is making the chucks and tooling he needs to get jobs done and has cut worm gears and bevel gears on his milling machine.

“A lot of shops will rent tooling for specialty internal splining,” notes Mack. I’ve made internal splines and can produce internal gears and special shapes. I also have sources for off-the-shelf gears of most any design.” Prices vary with the job, from a minimum of $50 for the simplest gear work on up to several hundred for milling jobs. He describes his business goal as doing precise work at a farmer’s price.

“If a farmer doesn’t want to spend $700 on a single gear, I’ll try to mill it for him,” says Mack.

“It may not be quite as precise, but it will get him up and running and should last for quite a few years.” If a part is needed, he suggests sending the damaged piece. However, he can work from basic drawings or even a crude sketch to replicate the part.

“I love helping people restore older equipment or make a prototype of something new,” he says.

“I’ll consider most anything from little gears on older equipment to gears for pedal cars.” Mack is even willing to consult with people wanting to start their own shops like he has done. It is his way of paying back for the help and advice he has received. Contact: FARM SHOW Followup, Lyle Mack, 5993 Buchanan Trail West, Mercersville, Penn. 17236 (ph 717 593-9476).

From the archive · Full text
Feature story

He Rebuilds Governors For Farmall Tractors

Featured source: Bob Lenz

“I make parts for the throttle shaft and new oversize hardened weight pins for Farmall governors,” says retired farmer and governor repair specialist Bob Lenz.

“I started out repairing the governor on my old Farmall H and before long other people heard I was good at it, so over the years I’ve probably done 80 or more rebuilds.” Lenz says he’s worked with customers from Washington State to North Carolina and two Canadian provinces.

“I had a booth at the Red Power Roundup in Des Moines in 2017 and met a lot of good folks there. I also have an ad in Red Power magazine, which generates quite a few calls.” Lenz works on governors for some tractors that are more than 75 years old.

“I’ve done rebuilds for the H, M, Super H, Super M and Super M-TA, along with the W, 100 and 50 series Farmalls.” Lenz says a defective governor will cause a tractor to lose power and respond sluggishly when under a load.

“I’ve re-built some governors for pullers, setting them 10 to 20 percent over, depending on what the association will allow,” Lenz says. Most of the units he works on are from owners restoring tractors who want their rebuilt engine to operate the best it possibly can. Lenz disassembles the governor, cleans all the parts, installs all new bearings, balances the weights and installs new shafts if they’re needed. He changes the clevis and pin assembly to a ball joint linkage, an upgrade that takes out any play in throttle response. Some reboring and drilling is needed to achieve a “like new” condition.

“Rebuilding is time consuming work, but I built my own test stand and have the system down real well at this point,” Lenz says. His pricing varies depending on the amount of work he needs to do, but he says it’s still less than new or rebuilt parts that may cost $600 or more on the open market.

“I enjoy the work, it’s a great way to make good use of my time. I enjoy talking to my customers,” Lenz says.

Contact: FARM SHOW Followup, Bob Lenz, 624 Capistrano Ave., Carroll, Iowa 51401 (ph 712 792-3065 or 712 790-9965; [email protected]).

From the archive · Full text
Feature story

Shop On Wheels Has It All

Featured source: Glen Wasmuth

Glen Wasmuth takes his tools to the job, whether in the shop or around the yard. His shop on wheels is loaded with tools of all sizes, from wrenches and bits to grinders, cutting torches, drill presses and welders, not to mention parts and other supplies. Even the bench top serves double duty.

“The biggest challenge in building it was getting the 3/8-in. steel for the top of the bench the way I wanted, with one long edge square and the other rounded,” says Wasmuth.

“I took it to a local manufacturer of stock trailers. He had a huge brake and rolled the front of the bench for me.” The 2 edges work like a giant anvil for Wasmuth, letting him hammer tin or light metal round on the front side. He left the back edge square for hammering 90-degree angles. The bench is 10 ft. long with a 30 by 72-in. work area in the center with 2 shelves beneath it. He used 1/4-in. steel plate for the bottom shelf and 3/16-in. plate for the middle shelf, connecting all 3 surfaces by welding them to angle iron.

“If I was doing it over, I would have made the shelves adjustable,” says Wasmuth. The front end has a 6-ft. tow bar with a caster wheel assembly using 8-in. wheels salvaged from a combine pickup reel. The drill press and cutting torch are mounted over it, as are drill bits and a propane tank for the torch.

The rear axle, mounted under the back end of the work area, rides on 12-in. wheels from a Deere rod weeder.

“The front wheels swivel more than 90 degrees, which allows me to spin the bench in its own length,” says Wasmuth. The bench has its own breaker box with individual breakers for the welder, 5 hp. compressor, and cut-off saw. It is designed to plug into available circuits in the shop and out of it with a 50-ft., heavy-duty cable. In the shop, Wasmuth uses a 30-amp welder plug on one wall. Welder plugs at either end of the bench for his mobile MIG welder and 2 separate circuits add to versatility.

“We can use the MIG and the AC welder at the same time,” says Wasmuth. A 20-drawer mechanics chest holding parts and tools sits at the rear end of the work area. More storage drawers ride on the first shelf under the work surface. An adjustable shop light mounted over the work surface ensures jobs are well lit, while a rack over the mechanics chest carries welding helmets and angle grinders. The all-steel workbench weighs in at more than a ton. It can be rolled around the shop floor by a single person or towed around the yard. It can also serve as a dead weight when needed.

“I can turn the front wheels sideways, hook a come-along to it and straighten metal on an implement,” says Wasmuth. Although it appears that every square inch of space is dedicated to a tool or accessory, Wasmuth admits that he had no plan to follow when building it.

“I bought a kit of drawers and parts from a bolt company and set the height of the upper shelf to fit them,” he says.

“I knew I wanted room on the lower shelf for the air compressor and welder, so I set the lower shelf for that. Otherwise, I just started building.” Contact: FARM SHOW Followup, Glen Wasmuth, Box 454, Battleford, Sask. Canada S0M 0E0 (ph 306 843-7357; [email protected]).

From the archive · Full text
Feature story

They Specialize In Replacement Seals

Featured source: Dustin Yoder

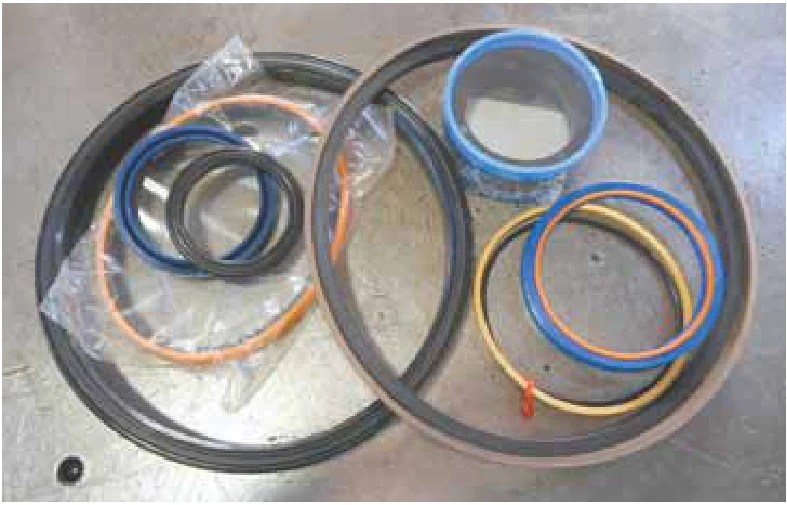
If you need a replacement seal, be it an O-ring, oil seal, rod wiper, piston seal, U-cup or other, Yoder Hydraulics probably has it in stock. If not, they can get it.

“We have thousands of seals in stock in English and metric sizes,” says Dustin Yoder, Yoder Hydraulics.

“They also come in a variety of materials. The most common is nitrile rubber, but we also carry Viton, CSE and Buna seals.” Hardness of the seal varies by application and is measured in durometers. Yoder notes that different manufacturers often require different hardness levels and types of material.

“It seems like every cylinder uses a different seal,” he says. The best way to make sure you get the right seal is by sending in the old one. This allows Yoder to identify the material and measure the size. The next best way is to call with the inside and outside diameters, as well as the thickness of the seal. He suggests including the application, and whether it will be used with a pump, motor, or cylinder.

“There may be a better quality material that will be more durable and last longer,” says Yoder.

“Sometimes we can even diagnose what the problem is that caused the seal to fail.” He notes that seal failure can be from normal wear or may be a sign of other problems.

“It may be internal pressure that is forcing a bypass of the seal or it may be contamination in the oil,” says Yoder. A defective cylinder rod can also cause problems, as can lack of use.

“If you don’t use the cylinder or pump, the seal can simply dry out and get brittle,” he says.

“There are also instances where the motor or cylinder get too hot and causes the seal to get brittle and crack,” he adds.

“Sometimes a seal can go bad even if it is the best choice for that application. However, if there is a better seal for the application, we’ll recommend it.” Contact: FARM SHOW Followup, Yoder Hydraulics, 12317 Dover Rd., Apple Creek, Ohio 44606 (ph 330 857-0001; [email protected]).

From the archive · Full text
Feature story

“Restoration Ready” IH Tractor Parts

Featured source: Randy Wyant

Precision Tractor Parts offers hard-to-find, U.S.-made parts for older International Harvester, Farmall and Cub tractors.

“We manufacture all our own parts using U.S.-made components, so we can control quality all the way through,” says Randy Wyant.

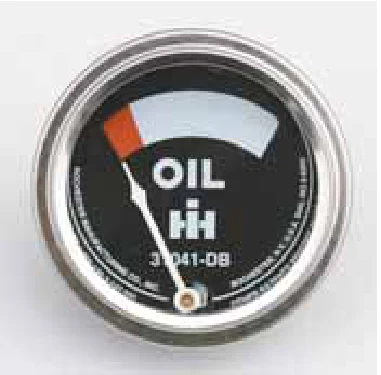
“We do headlights, taillights, fuel lines, choke rods, controls for pto and hydraulics. We manufacture them all, even wiring harnesses.” Wyant says the company is licensed by IH. In the case of Rochester gauges, it gets the gauge housings from Rochester and then assembles the stainless steel bezels and glass.

“Rochester Gauges was the original gauge supplier to International Harvester through the 1930’s, 40’s and 50’s,” says Wyant.

“Our gauges have the correct part number to match the year of the tractor you are restoring. If you are striving to complete an original restoration, our gauges are the most accurate and original available on the market today.” The line, which includes 20 categories, continues to expand, according to Wyant.

“We have started doing pto covers for IH equipment in the past 6 months,” he says.

“We will be adding battery boxes this winter. We now have the dies made to stamp the embossed IH emblem into them. We keep adding products as we go.” Adding products doesn’t happen overnight. Wyant explains that it takes time to find a pristine part, such as a fuel line, that is unhampered and very straight. Only then can it be duplicated.

“We just started making IH 450 diesel fuel lines,” says Wyant.

“We waited a year to find something suitable, and now we are making them.” Wyant suggests FARM SHOW readers looking for parts have the year, make, model and serial number handy when they call.

“There were changes in parts over the years that can be matched to serial numbers,” says Wyant.

“It helps a lot to have that information handy. The serial number is as important as anything else. We’ve never had anyone send back a fuel line that didn’t fit if we had the tractor’s serial number.” Parts can be ordered online or by phone. Contact: FARM SHOW Followup, Precision Tractor Parts, 111 East Eighth St., Gibson City, Ill. 60936 (ph 800 245-3774; [email protected]; www.precisiontractorparts.com).

From the archive · Full text
Feature story

He Produces New Shares For Old Plows

Featured source: Steve Rea

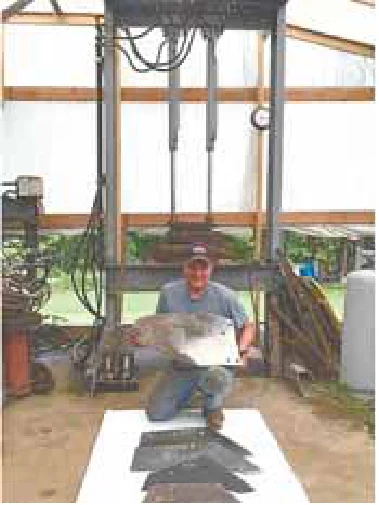
Steve Rea and his company, Ploworx, produce tough-to-find fitted plowshares, moldboards, landsides and other parts for old and outdated plows. Rea says his company is one of the few anywhere in the U.S. or Canada to manufacture new, low-draft yet high-performance replacement parts for plows and tillage equipment.

“We currently have parts for the more popular Deere, I-H, Minneapolis-Moline, Massey-Ferguson, Ford-Ferguson, Dearborn, A-C, Case and Oliver brands. We custom-make conventional blacksmith shares and moldboards, shins, landsides and other tillage parts using forged carbon steel.” Ploworx has no affiliation with any of the OEMs, but the products it offers are made with tooling purchased from Crescent Forge and Shovel, a well-known company that closed in 2012. Rea says there’s a big market for his products by Amish farmers, as well as people involved in competitive plowing, hobby farmers, and plow collectors. Rea has verified how well his products work through field testing. In 2014 he ran independent tests on various equipment and learned that the older fitted style bases he produces require about 1/3 to 1/2 the power needed by plows equipped with throwaway-style bases. He says the quality of plowing with his equipment is superior at lower speeds, which is important to farmers using draft horses and people inolved in competitive plowing. Rea has also made design improvements to several products, including a new version of the old Oliver sod bottom. That design, which shows more curvature for better soil twist as it rolls off the moldboard, works on Oliver 219 and 419 plows, on the Ford 101, and the Minneapolis-Moline plow. Ploworx moldboards are also drilled for extensions that help improve trash coverage. Prices for shares are in the $125 range, plus shipping. Ploworx carries an inventory of many shares and Rea says he’s willing to do short manufacturing runs if needed. Parts made from patterns are available in 3 to 4 weeks, but custom products require more time. His business also hard-faces plow shares, rebuilds cast-iron shares, repairs moldboards and helps people locate older replacement plow parts and hard-to-find bolts and hardware. Contact: FARM SHOW Followup, Ploworx, 13909 Duck Creek Road, Salem, Ohio 44460 (ph 330 332-9386; www.ploworx.com).

From the archive · Full text
Feature story

New Bolt Extractor Kit

Featured source: Larry Schmedding

Larry Schmedding with Agri-Tool & Supply in Greenacres, Wash., recently sent FARM SHOW photos of a new kit he came up with to remove broken bolts.

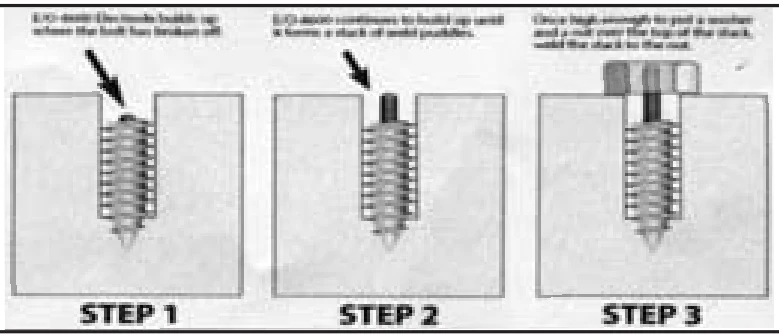
“I’ve been taking out broken bolts this way on my own for more than 30 years. My kit covers most all sizes of broken bolts and comes with step by step directions,” says Schmedding. The kit contains a special welding electrode called Perfect Pass #E/O-8600 Blue - an all position AC/DC coated electrode that can weld any carbon steel such as tools, axles, springs and gears. The electrode builds up where the bolt has broken off, and continues to build up until it forms a stack of weld puddles. Once the stack is high enough, you weld a washer and a nut over the top of it.

“The welding electrode is designed to produce crack-free deposits with very high mechanical properties,” says Schmedding.

“The kit lets you purchase 3 different sizes of electrode welding rods at a reasonable price, rather than having to buy a 5-lb. package containing the 3 different sizes.” Contact: FARM SHOW Followup, Agri-Tool & Supply, P.O. Box 612, Greenacres, Wash. 99016 (ph 800 321-5460 or 509 928-1872; [email protected]).

From the archive · Full text
Feature story

Spray Can Tool Cleans Clogged Tips

Featured source: Bill Samsel

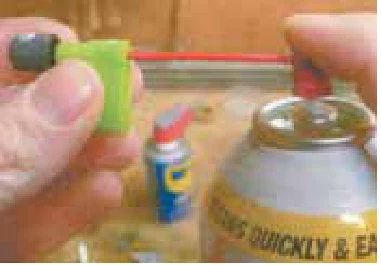
“In the process of restoring a vintage car, I used a lot of aerosol spray cans to paint newly repaired parts. I got tired of the applicator tips plugging up. So I came up with an inexpensive product that saves a lot of frustration, time, and product,” says Bill Samsel, Missoula, Mont. His Spray Can Tool is designed to adapt most common spray can applicator tips to the applicator straw on an aerosol can of carburetor cleaner or other pressurized cleaning solvent, such as WD-40. The idea is to use the carburetor cleaner to quickly flush out the can’s clogged paint applicator tip. The spray can tool consists of a small poly adapter with two hollow “towers” of different diameters on top and corresponding holes on the bottom. The operator removes the clogged paint applicator tip from the spray can and fits it on one of the towers. Then he inserts the straw applicator of the cleaning solvent in the corresponding bottom hole and presses the solvent applicator tip to flush out the clogged material.

“The spray can tool, teamed with carburetor cleaner, works great on everything from spray-on bed liners for pickups to spray-on foam insulation, sealant spray, undercoating and so forth,” says Samsel. Samsel made a mold for the tool and says he has already manufactured a few thousand units, which he’s now trying to market. It sells for $3, including shipping.

“I want to find out how much interest there is in my idea,” he notes, Contact: FARM SHOW Followup, Bill Samsel, 20864 Coriacan Lane, Missoula, Mont. 59808 (ph 406 726-3718; [email protected]).