From the archive · Full text
Reader shop tip 1 of 2
Charlie Matthews
“Another solution for the unvented fuel container is to determine where the vent should be, drill a 1/8-in. hole and stick a golf tee in it.
Money-Saving Repairs & Maintenance Shortcuts · Printed section pp. 32–35
29 selected entries · Complete text of selected entries
This issue’s section includes reader tips and feature-length shop stories. Held items and editorial notices are not reproduced.
“Another solution for the unvented fuel container is to determine where the vent should be, drill a 1/8-in. hole and stick a golf tee in it.
“The next time you need to remove the mower deck from under your riding mower, turn it upside down, wire brush it and then spray it with those leftover, almost empty cans of spray paint you’ve been saving. Color doesn’t matter - your mower doesn’t care. This will accomplish three things: Reduce rusting, help keep grass clippings from sticking, and get rid of those cans you probably weren’t going to use anyway.”
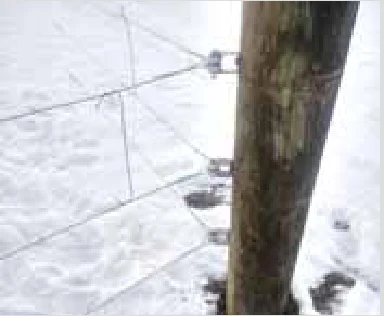
“I got tired of changing corner insulators on posts over the years. I thought there had to be a better way of doing it. I’ve used the wrap-around post insulator but over the years they get little pinholes in them, and then you have a short in your wire that’s hard to find. I wanted something simple and durable. I came up with an idea I’ve been using for about a year now and it holds up great.
“I made a die for my pipe bender. I used 1 1/4-in. flat stock, made a U-shape, and put three 3/8-in. holes in it. One is to lag or bolt to the post. You can use a 3/8-in. by 3-in. galvanized lag screw or a carriage bolt. The other holes are for the pin that holds the insulator in the bracket and put the pin through. If insulators break or crack, just loosen the fence, pull the pin, slip in a new insulator, then tighten up the fence and it’s done. Very simple and it works for ceramic or plastic insulators.”
“A $35 Inkbird Temperature Controller controls a fridge that had the thermostat fail (www.amazon.com). To keep it cold, I turn the fridge all the way up and plug it into the cooling side of the Inkbird. A replacement part for the fridge was $200.
“To keep it warm in our 55-degree shop to brew beer, I put a magnetic heater in there, away from the plastic, and plug it into the heat side of the Inkbird.”
“I have patched leaks in my stock tank and stock tank float with JB Weld. It’s good stuff.”
“When my Suburban died, I didn’t know if it was an electrical or fuel problem. So, I took the air cleaner off and had someone try to start it while I held a propane weed burner over the throttle body inlet, letting it release propane. When the engine started, I let it run a little, then I cut the propane off, and the engine died. So, I figured out it was a bad fuel pump.
“Suburban fuel tanks are hard to install because you need to reach above and make all the connections before lifting it back in place. There is a lot of potential for stressed connections that you won’t know are damaged or leaking until the tank is back in place. So instead of that, I took up the carpet in the cargo area of the Suburban, and after I pulled the fuel tank, I determined how big an access panel I’d need to make to check all of the connections on the top of the tank. After making sure no electrical or fuel lines were in the way of the cuts, I cut out a rectangular access in the steel floor. It made connecting the fuel line and electrical connectors much easier. I patched up the floor by using sheet metal strips to support the patch, securing them with short self-tapping screws, then ‘siliconed’ the gap where the cuts were made.
“When I use spray foam, I don’t always need the whole can. When that happens, immediately after I’m done spraying the foam, I unscrew the plastic nozzle, spray some brake cleaner into the end that screws into the can, and blow it clean with compressed air. Then I do it one more time to get it really clean of foam residue. I also spray brake cleaner in the top of the can where the foam comes out into the nozzle and hit that with air as well. Then I tape the nozzle to the can for next time. You can do this cleaning process again each time you use a little more foam. It sure saves money on throwing half-filled cans away and you’re not tempted to spray foam in places you’ll later wish you hadn’t, just because you didn’t want to waste half a can.”
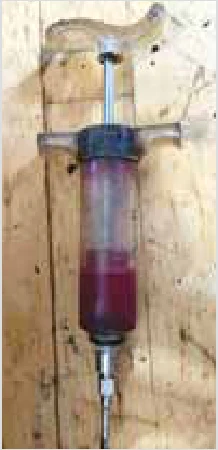
“I regularly oil or grease the moving parts of things I’m working on, especially small engine equipment, including bolt threads. A solution I came up with for applying grease in small amounts is to use a livestock syringe that I bought at the farm supply store. I pump it full of grease with my grease gun. I ground down the sharp point at the end of the needle since that is not needed. You’ll want to get the largest gauge needles you can find since grease is too thick for small ones.”
“I’ve tried many kinds of moisture and corrosion-proof wire connections on my trailers and farm equipment, but they all failed, especially under harsh conditions. Soldering makes a good connection, but the flux corroded the connections over time. When using shrink-tube with multiple wires, there is always a gap for moisture to enter between the wires and corroded the connections. I solved the problem by wire-nutting the wires together using a wire-nut one size larger than required. Then the wire-nut is filled with glue using an electric glue gun, making sure that the glue surrounds each wire. The glue is non-corrosive and seals the connection from moisture. Also, it makes a very strong connection. I’ve been using this method for over 10 years without any failures.”
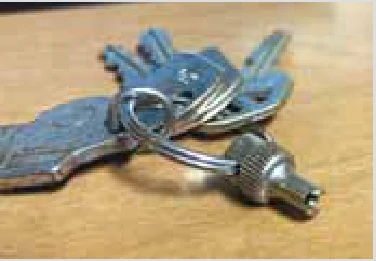
“I found a tire valve stem cap that has the valve core tool on it. I simply drilled a hole in the valve core tool and added it to my keychain. Now whenever I want to let air out of a tire or find a loose valve core, I have the tool right with me.”
“I’d taken a wall section out of an old corn crib and planned to mount a garage door on it. Rain was coming and I needed a quick fix. In 15 min., the job was done.
“I set out some 1 by 6’s for a frame and attached an old tarp to it. I attached the track I planned to use for the sliding garage door, to the wall and used old trampoline springs for rollers.
“I put it in place 6 mos. ago and it worked great through the winter. It was meant to be temporary, but I’m not sure when I’ll replace it.”
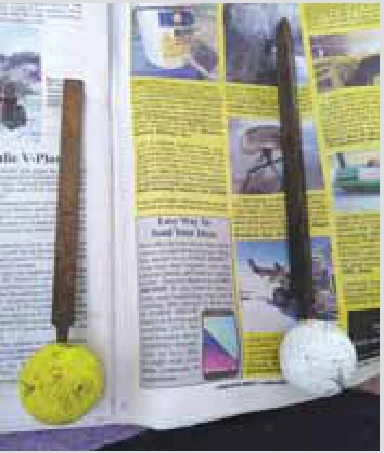
“This isn’t a new idea, but I wanted to let readers who haven’t tried it know how well it works. Files rarely have handles so I just drill a 1/4-in. hole in a golf ball and mount the file into it. Makes a perfect handle that works so well you won’t believe it. Gives you total control over the file. Now I enjoy using my files.”
“When I want to snap a chalk line across a piece of wood, I used to get frustrated when that stupid hook on the end would come off. So, I hit on the idea of using a C-clamp and just loop the chalk line through it. Works great.
“I recently set up a post and beam trellis using big 10 by 10 wood posts. The problem was when you push the post into the hole, it scrapes down the side, knocking dirt down under the pole. I solved the problem by standing a 2 by 4 in the hole and then putting the end of the pole against the board. It slides right down into the hole with no problem and then I pull out the 2 by 4.
“Here’s another one. When working on an engine, I place a board across the top to hold tools and I put a rag under the work area, turning up the edges to catch dropped nuts and bolts. No more searching for small parts on the ground.”
Dan Nahlers, the owner of Dan’s Custom Welding Tables, LLC., in Gibbon, Minn., says he’s been making multi-hitch plates for several years.
“I put one together to use at my place,” he says.
“I figured if it worked well for me, someone else might find it handy too.”
Two hitch arms stick straight out from the hitch plate at a 45-degree angle, with one at the top of the plate and the other underneath it at the bottom of the plate.
“You can hook a regular wagon or something similar on the bottom arm,” Nahlers says.
“The one above it works for gooseneck trailers. Just lift them up by the hitch and back them to wherever they need to go.
“The two other hitches, stored in arms on top of the plate, can both be interchanged with the bottom one,” he says.
“So, if you’re backing a hay rack or grain wagon into a shed, you use the one already on there.”
The heavy-duty hitch plate is 3/8-in. thick and framed out with 2 1/4-in. square tubing.
They’re also powder-coated and come in any color.
Items included with a multi-hitch plate are four male receiver hitches, two hitch pins, one clevis, two 2 5/16-in. balls, one 2-in. ball, and one mounted chain hook.
Each arm is extendable.
“Most of the time, you’ll want the arm extended all the way out, and it works fine,” he says.
“Plus, you’ll always have good visibility from the cab to see exactly what’s going on.”
Nahlers also offers a fifth-wheel camper attachment as well as a pintle-hitch attachment for larger and heavier equipment.
The multi-hitch plate retails for $1,459 and he ships them all over the country. The fifth-wheel camper attachment is $105, and the pintle-hitch attachment is $120.
Contact: FARM SHOW Followup, Dan Nahlers, Dan’s Custom Welding Tables, LLC., 65728 300th Street, Gibbon, Minn. 55335 (ph 507-276-4400; [email protected]; www.danscustomweldingtables.com).
Kenny Vandeventer’s skid steer flips its trailer ramps up or down as it drives on or off the trailer. The automation is strictly mechanical with no hydraulics, electronics or remotes involved.
“I racked my brain for many years to figure an alternative to manhandling the ramps,” says Vandeventer.
“I had the trailer in the shop one winter to pack some bearings, and the light came on.” Vandeventer’s solution was to take advantage of the dovetail-type ramps with their flipover lower sections and permanently mounted uppers. He mounted a 9-in. roller chain sprocket to the side of the rear end of the trailer. A 2 1/2-in. sprocket is mounted on a 3/4-in. steel shaft at the joint of the left-hand ramps. The shaft runs through both sets of ramps and is fixed to the lower ramps. A third and smaller sprocket pulls the roller chain down from the large sprocket to run along the side of the upper ramp. It also adds tension to the chain. He mounted activator bars at the top of the upper ramp and about 4 ft. forward on the trailer. When the ramps are down, the forward bar rides about 5 in. above the bed, while the rear bar rests on the upper ramp. A length of channel iron runs from the forward bar to a bolt welded to the sprocket. A 1-in. wide steel strap connects the two activator bars. When the rear wheel of the skid steer backs over the forward bar, the arm moves the large sprocket about 3 in. The gear ratio translates this to a half revolution of the drive sprocket and shaft. At the same time, the activator bar on the upper ramp is raised up off the bed about 5 in. after the front wheel of the skid steer has passed over it. When the skid steer is driven off, the front wheel depresses the rear bar, which pulls the channel iron shaft forward, reversing the direction of the sprocket and roller chain and returning the forward bar to its 5-in. height.
“If you back on fast, the lower ramp slams into place,” says Vandeventer.
“Drive off fast and it slams back down.” Contact: FARM SHOW Followup, Kenneth Vandeventer, 3139 Indiana Rd., Ottawa, Kan. 66067 (ph 785-241-0613; [email protected]).
With a rotating spout that pours from the bottom, SureCan offers a new design in fuel cans that makes it easier to use for filling tanks on everything from a lawnmower to a tractor.
“No more spilling gas or dealing with difficult-to-use caps required by the EPA to prevent harmful environmental emissions,” says Kevin Jackson, director of marketing for the Utah-based company.
“The SureCan is made of six layers of HDPE for durability. The first layer is EVOH which creates a barrier so you don’t smell the gas and it protects hydrocarbons from leaking through,” he says, adding it also has a spring-loaded flip lid seal cap to make filling the can with fuel easier.
Designed by a cabinet maker who was frustrated with spilling gas when filling his ATV, the biggest challenge was creating a valve with a perfect seal for the flexible, rotating UV-protected nylon spout. SureCan also features a thumb release trigger to control the flow.
Instead of holding a heavy can while pouring, SureCan can be set down on a mower or tractor as the fuel is being dispensed. The flexible nozzle rotates down more than 180 degrees.
The U.S.-made can was named a top product by television’s Shark Tank.
“Our biggest market has been lawn care professionals, but it’s great for anyone,” Jackson says, including homeowners, outdoorsmen and farmers. It also meets OSHA and MSHA standards for use at industrial, construction and mining sites.
The 5-gal. $60 SureCan comes in three colors for gas, diesel and kerosene. The company also offers 2-gal. gas cans ($50) and clear utility cans ($60) with 8-in. spigots handy for everything from water to DEF.
SureCan is available at big box stores or through the business’ website.
Contact: FARM SHOW Followup, SureCan, 2727 N. Washington, Blvd., Suite 201, North Ogden, Utah 844414 (ph 801-827-0500; [email protected]; www.surecanusa.com).
As he approaches 80, FARM SHOW reader Gary Thomsen has learned he needs to adapt his equipment and maintenance/repair strategies to make them safer and more efficient. Recently, he built a hoist for his lawnmower to improve the repair process.
“I bought a deer hoist from Sportsman’s Guide and used it several times to lift my riding mower, but I quickly realized it was starting to bend,” says Thomsen.
“I found some scrap metal at our personal ‘supply depot,’ which others know as the local dump,” Thomsen explains. The metal serves as a support for the tractor hoist and fits into a receiver hitch he found attached to a tractor.
With these updates, Thomsen can now position his riding mower completely vertically with minimum hassle. This makes it significantly safer and more accessible than before to clean the deck and change out its blades.
The dump has served as a source of inspiration for other projects for Thomsen. His latest invention is a cart for pulling his backyard sprayer.
“My shoulders and back won’t take lugging a sprayer around anymore, so I took an old golf bag cart I found, attached a length of 10-in. dia. duct with four small bolts, and problem solved. Pulling this is much easier on my 79-year-old body than carrying the weed sprayer around.”
Going forward, Thomsen anticipates working on many more projects inspired by reclaimed materials.
“I keep a lot of what people call junk, but I have discovered there is junk, and there is ‘good junk’,” says Thomsen.
“My wife and I have a book of items we have repurposed already. As we get older, we need to be more inventive.”
Contact: FARM SHOW Followup, Gary F. Thomsen, 2742 Kenwood Rd., Arion, Iowa 51520.
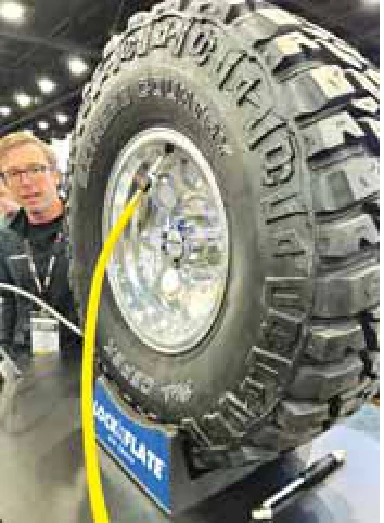
The LockNFlate Air Chuck locks onto tire valves leaving your hands free while pressurizing a tire. Recently introduced by LockNLube, maker of the lock on grease coupler (Vol. 38, No. 3), the air chuck uses a similar locking method.
“It can’t pull off and won’t strip threads,” says Jay Boren, LockNLube.
To activate the air chuck, depress the thumb lever and push it onto the tire valve. Releasing the lever causes the 6-jaw, spring-loaded collet to close on the threads. As the collet jaws close, a sleeve slides forward over the collet for a leak-free connection.
The air chuck fits standard Schrader valves’ threads. It has a rated pressure of up to 150 psi. The female end has 1/4-in. NPT threads and screws onto any standard threaded air hose.
FARM SHOW tested the LockNFlate air chuck. It worked as promised. It locked on and provided an airtight connection, freeing up the hands while the tire filled.
The LockNFlate is available in open and closed flow models.
“Open flow is designed for use with hand/foot-controlled valves and automatic tire inflators, allowing air to flow freely without engaging the valve stem,” says Boren.
“Closed flow is designed for auto and manual tire inflators, portable pressure gauges and constant pressure systems.”
It’s priced at $49.95 with a target market of garage and industrial air line systems.
However, it may be well worth the money in a busy farm shop.
Contact: FARM SHOW Followup, LocknLube, 12 Commerce Ave., Suite #3, West Lebanon, N.H. 03784 (ph 603-795-2298; [email protected]; www.locknlube.com).
David Feldman has owned several Deere 125 and 130 series lawn tractors during his lifetime. Often, after about 600 hrs. of use, a device on the camshaft, which allows the Briggs and Stratton motors to start more easily by reducing compression, breaks.
“If it stalls and rolls backward, the motor turns backward and breaks the device,” says Feldman.
“The compression release stops working, and the starter won’t turn the engine over past the built-up compression.”
The replacement part and installation costs were $250 so he decided to fix the problem himself.
First, he removed the small cover in the center of the engine screen to access the interior motor shaft and upper nut. Then, he hooked an old 1/2-in. ratchet extension over the nut so he could drive it with his electric drill.
“You still need someone to sit on the seat, push the pedal, and turn the key as the safety overrides need to be satisfied,” he says.
“Spin the motor over with the drill to help the starter and it turns fast enough to overcome the compression. It works fine and saves a few hundred dollars.”
Feldman adds that every make of motor is a little different so his device would need to be configured according to the original motor type.
Contact: FARM SHOW Followup, David Feldman, 28000 Pleasant Valley Rd., Sweet Home, Ore. 97386 (ph 541-818-8198).
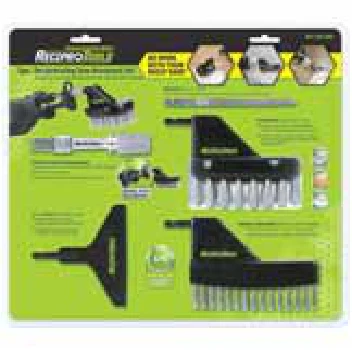
With ReciproTools® universal adapter and attachments, you can use your reciprocating saw for much more than just cutting. There are more than a dozen accessories for scraping, filing, scrubbing, sanding and cleaning grout. The $15 universal quick-change adapter works with all reciprocating saw models and 1/4-in. hex shank accessories. The quick-connect adapter works for fast and easy tool changes and allows for six-position tool rotation.
Accessories range from $5 for a 2-in. scraper or rattail rasp or file to $7 for steel brushes, sanding pads, etc. You can purchase a 5-piece accessory kit with the universal adapter for $27. Contact: FARM SHOW Followup, ReciproTools, 34837 Innovation Dr., Ronan, Mont. 59864 (ph 406-528-4350; [email protected]; www.reciprotools.com).
Imagine needing only one tool to dismount a tire that needs repair. The Golden Tire Tool gets the job done with minimal fuss and less downtime.
The Golden Tire Tool removes a tire in less than five minutes, says Tom Ableman, General Manager of All Tire Supply in Houston, Texas.
The first step is deflating the tire, followed by spreading a mount-dismount compound around the tire and wheel, which softens the bead.
Once you use a hammer to break the bead, the tire detaches from the wheel. That’s when the Golden Tire Tool goes to work.
The product is made in the U.S. to handle tires from 17 1/2 to 24-in. wide.
The specific benefits of the demounting tool include eliminating the need to lift the tire and rim to remove the bottom bead, which can prevent strain or injury.
It’ll also save time on a tubeless tire, which can be demounted in as little as eight seconds and remounted in less than 20 seconds. Super Singles may require additional time.
Some tubeless tires can even get demounted without removing the wheel from the vehicle when you use the Golden Tire Tool.
“You only need one tool to demount tires when you use a Golden Tool,” Ableman says.
The TNT Golden Tire Tool retails for $513.10 on the company’s website. Murphy’s 8-lb. Concentrated Compound is $16.90. Contact: FARM SHOW Followup, Tom Ableman, All Tire Supply, 7820 Pinemont Drive, Houston, Texas 77040 (ph 888-339-6665; [email protected]; www.alltiresupply.com).
When Carl Stoloski needed to replace some outbuilding doors, he initially planned on using an old school track and pulley system for rolling the new doors open and closed.
“When you buy track and the necessary hardware, you don’t get much for the money,” he says.
“I thought I could use what I had instead.” First, he cut the track to the length he needed, then welded 6-in. brackets every foot to secure it with lag screws above the doorway. On the doors, he used three stair-stepped thinner pieces of metal to give a stylish look. He drilled a hole in them for the track wheel axles to slide through and then put everything together on the track. When it was in place, he tacked a small weld on the pin to hold it secure.
“If you have trouble with a wheel or axle, just knock them out and slide a new one in. One or two scrap doors give you plenty of wheels and track.” Stoloski says the door systems work well and look sharp enough to use either indoors or outdoors. Contact: FARM SHOW Followup, Carl Stoloski ([email protected]).
Pat Burrington says he couldn’t justify spending a bundle of money on a high-capacity press brake for his welding shop, so he built one himself.
“I built it several years ago when steel wasn’t nearly as costly as it is today, so my investment was probably a third of what it would’ve cost to buy one,” Burrington says. He made the frame and side pieces for the 100-ton brake using 40 ft. of 12-in. wide by 1-in. thick flat bar steel, stacked vertically for added strength.
“I water jetted all the critical pieces like the slides and notches, then flux core welded it all together,” Burrington says. He bought the 7-in. dia. press cylinders, hoses and hydraulic pump from the Surplus Center in Lincoln, Neb. A friend gave him a 3-hp. electric motor and pump, which produces 2,500 psi of working pressure, to operate the press.
“I didn’t think I could fabricate the upper and lower dies, so I bought those from a manufacturer’s rep I met at the Fabtech trade show in Chicago. Those worked perfectly, and I’ve used them to bend all types of metal, even water flumes and custom high-strength cardboard boxes. I even made a set of dies to punch in/out the pins and bushings on my Deere MC crawler track instead of having the dealer do it,” Burrington says. For a total cash outlay of about $4,000 plus his labor, Burrington says his custom-built press brake was a worthwhile investment that’s paid for itself many times.
“Better yet, if anything goes wrong, which it rarely has, I know exactly how to fix it and don’t need to call for repairs,” he adds. Contact: FARM SHOW Followup, Pat Burrington, Rapid Creek Cutters, 130 Garnet Dr. Hwy 93, Stevensville, Mont. 59870 (ph 406-642-3155; www.rapidcreekcutters.com).
Climbing onto a pickup bed doesn’t get easier with age unless you have a folding step like Tim Reisenauer. The step plate is attached to a standard receiver hitch crossbar, which in turn is bolted to the underframe of the truck.
“I used a footrest from a discarded wheelchair for the step,” says Reisenauer.
“It folds up and out of the way when not needed.”
The step is hinged to a steel tube that slides into a slightly larger receiver tube. It, in turn, is butt-welded to a flat steel plate. Two square U-bolts attach the plate to the receiver hitch crossbar.
“If I want to remove it quickly, I just pull the pin that secures the tube on the step to the receiving tube on the steel plate,” says Reisenauer.
“I can remove the entire step and mounting bracket by removing four nuts.”
Contact: FARM SHOW Followup, Tim Reisenauer, 217904 E 59th Ave., Kennewick, Wash. 99337 (ph 509-586-3975).
Scott Ravenkamp needed a welding table in his shop. He had previously used the main frame of a 40-ft. rod weeder to add a loft to his shop, so he had the rest of the components from the weeder to work with.
“I used the rockshaft from the weeder and the arms it was attached to make the table,” says Ravenkamp.
“The rockshaft was 6-in. dia. steel tubing that I used for the legs with 3 by 5-in. tubing framing the steel grate that I used for the top. I welded nuts into the grate to match bolt holes in the bases of my vises.
“I can bolt the vises in place or quickly remove them if I want a smooth top,” says Ravenkamp. Contact: FARM SHOW Followup, Scott Ravenkamp, 52570 883 Rd., Verdigre, Neb. 68783 (ph 719-740-0705; [email protected]).
Tim Descoteaux of Morris, Conn., purchased a Deere 2520 tractor in 2013 and realized he needed more space on it to haul tools and other equipment. Running back and forth from his barn to a spot on his property made it more difficult to finish a task.
“I started BigToolRack to get more out of my compact tractor, Descoteaux says.
“I’ve always had a passion for tractors and farm and landscaping equipment.”
Descoteaux was constantly going back and forth moving all his tools. He looked around to see if there was a product that could help him carry what he needed on the tractor. Descoteaux couldn’t find anything that worked for him, so he started building a prototype out of metal and wood. He then kept tweaking it to get to what would eventually become the BigToolRack.
As interest in the product grew, Descoteaux says he got serious about the BigToolRack and left his full-time job in 2017.
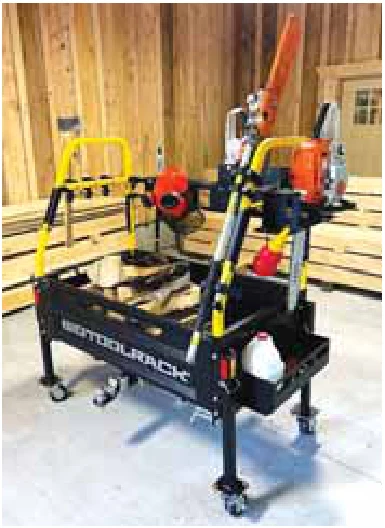
The BigToolRack allows farmers and property owners to carry their power tools, hand tools, and anything else needed to get a job done. It doubles as a carryall and a ballast weight box. It can be used to carry rakes, shovels, grass seed, straw, and fertilizer.
The BigToolRack is built to work with compact and subcompact tractors. It comes with a counterweight that allows you to hang suitcase weights on the rack to give you the additional ballast you’ll need when moving heavy loads with a loader.
“The system easily attaches to a tractor’s three-point hitch and still lets you tow a trailer once it’s attached to the tractor,” he says.
“There’s a click-on wheel system that converts the rack into a roll-away storage system to neatly store tools in your garage or barn when it’s not in use.”
He says the wheels telescope up and down so it can work as a tool cart whether it’s on or off the tractor.
They recently invented an attachment that will allow the BigToolRack to hook onto the front of the tractor. That’s ideal for people working with a backhoe or a tractor with something already attached to the back.
The smaller model, called the YardRack, is made out of ballistic nylon and steel.
The larger racks, called the Ultimate Rack, are made of 11-ga. steel sidewalls and a floor bed to withstand the rigors of the job. Commercial-grade, 2-ga. 1/4-in. steel is used in the support spine and handles payloads of up to 600 lbs.
The racks are 100 percent powder-coated to protect them from the elements. The heavy-duty 4-in. caster wheels on retractable legs are held in place with agriculture-grade pins.
The Ultimate Rack sells for $2,189, the Ultimate Rack with quick-hitch combo is $2,499, and the Ultimate Rack Skid Steer Quick Hitch Combo is $2,799.
The YardRack package, including the mounting kits, retails for $299.99.
For farmers with ATVs, the ATVSportRack sells for either $489.99 or $499.99, depending on the connecting kit you prefer.
BigToolRack offers a 10 percent military discount for active duty and veterans. The best place to shop for a BigToolRack is on the company website.
Contact: FARM SHOW Followup, Timothy Descoteaux, BigToolRack, 71 Benedict Road, Morris, Conn. 06763 (ph 844-287-7225; [email protected]; www.bigtoolrack.com).
The Bead Bazooka seats tire beads with a high-pressure blast of air. Gaither Tool Co., maker of the Bead Bazooka, recently introduced a new and improved version. The new generation handheld blasters are half the size of the earlier version but serve up twice the power. Company recommendations include aiming the tip at a 30 to 45-degree angle a few inches away from the gap. Properly prepared, one blast of air sets the bead. Gaither offers three models. The 3-liter BBL3L2 is designed for ATVs, motorcycles, cars and light commercial vehicles. The 6-liter BB6L2 is designed for use with motorcycles, cars, light trucks and heavy commercial vehicles. The 10-liter BB10L2 is intended for use with cars, light trucks, heavy commercial and light agricultural vehicles. All three feature trigger release, 3-way control clusters, and recoil-reducing barrels. Net weights vary from 11 to 18 lbs. Prices for the three models range from $363 to $518. Contact: FARM SHOW Followup, Gaither Tool Co., 2255 W. Morton Ave., Jacksonville, Ill. 62650 (ph 217-245-0545; toll-free 800-452-5010; [email protected]; www.gaithertool.com).