From the archive · Full text
Reader shop tip 1 of 2
Bruce Buckmaster
“To remove a seized pulley from a shaft, I heat the pulley and melt wax from a candle onto the heated pulley shaft. Then I can remove the pulley easily.
Money-Saving Repairs & Maintenance Shortcuts · Printed section pp. 32–35
40 selected entries · Complete text of selected entries
This issue’s section includes reader tips and feature-length shop stories. Held items and editorial notices are not reproduced.
“To remove a seized pulley from a shaft, I heat the pulley and melt wax from a candle onto the heated pulley shaft. Then I can remove the pulley easily.
“I had problems with flat tires on my hay rake. So I had the tire shop send the wheels and tires off to be foam-filled. After that, the tires lasted until the cords inside started showing.”
“I put a jack from Tractor Supply on my home-built wood splitter to hold the front up when it’s not connected to a tractor. I should have done that 30 years ago.
“I recently installed GFCI outlets in my shop to protect against electrical shocks. Peace of mind.”
“I installed a Pertronix electronic ignition and coil on my 1954 Ford 800 tractor and it worked out great. That old tractor has never run so well (www.pertronix.com).
“Fuel shut-offs on Ford 800’s always start leaking and replacements are getting expensive. You can remove the stop pin, replace the O-ring, and then tap in a small screw to take the place of the stop pin. This also makes it easier to repair the next time it leaks.”
“I use silicon caulk to seal air lines and fittings on air compressors. After assembling with Teflon tape, I just apply with my finger around the leaky area. It works.”
“I cut a lot of wood for our boiler every year. At the end of the season, I sharpen all the chains and gauge all the rakes prior to storing, but sometimes they rust during the off season. To stop this, I started dunking all my chains in Lucas transmission anti-slip oil. It’s really thick so it will cling to the chain even when they’re hanging on a nail. It also makes sure the chain has immediate oil once it’s on the bar, reducing wear on both bar and chain.
“Also, I always keep an old bar for each saw around in case I need to go after stumps
or am working in a fence row. Keeps my good bar from unnecessary wear. When I’m not using the old bars, I coat them with a little oil and then store them inside old wool socks. The wool has a lot of padding to protect the bar in my tool bucket, and keeps moisture away as well.”
“To remove stubborn bearing races from hubs/drums in medium and heavy-duty trucks, I stuff wet rags in the well of the hub backed up against the race, then weld a bead around the race where the tapered bearing rides. When the weld cools, it shrinks naturally and the bearing taps out easily. I will already have the new race in a freezer cooling off. The residual heat from the welding process helps install the new race. I put a dab of bearing retainer around the race on installation to help install and retain. Also, I sometimes add bearing retainer compound to tighten up a loose race.”
“I liked the idea in your last issue about sticking labels to a tire pressure gauge that list the tire pressures for various vehicles. I kind of do the same thing except that I stick labels on the fender over each tire. I do this on my tractor, log splitter, wood chipper, trailer and yard dump cart. That way I can use any tire pressure gauge to fill the tires.”
“Here’s how I remove a 3/4-in. broken stud. First, I drill a 1/4-in. pilot hole in the end of the stud. Then I take a 1/2-in. right hand drill bit and run it in reverse to back the stud out. You might have to sharpen the bit for reverse direction. This has worked well for me many times.”
“I broke a hoe handle. To repair it, I used a hacksaw to cut a slot lengthwise in a 12-in. long piece of pvc pipe and slipped the broken ends of the handle into either end. I applied waterproof glue inside and secured the pipe to the handle with two radiator clamps. Now it’s good as new.
“I got tired of long-handled tools sliding around in the bed of my pickup so I made some brackets out of 1/2-in. wide flat metal and mounted them over the wheel well, attached with screws to pickup box. Problem solved.”
“Both diaphragms on my Danner sewer system air pump ruptured. The replacement cost for a new pump was $450 plus labor. Instead, I found a repair kit on Amazon for $15. Did the job myself and it runs good as new.”
“The power steering on my 2002 Sebring sedan was getting difficult to use. It would ‘stick’ at lower rpm’s. I talked to a friend who had the same problem with a 2007 Toyota Tacoma. His dealer wanted $1,200 to replace the rack and pinion but instead my friend simply replaced the power steering fluid and that solved the problem. So I replaced the fluid in my Sebring and solved my own problem, too.
“I hope this helps out someone else. It’s easy to forget about the easy solutions sometimes.”
“A couple of matchsticks saved me $940. That’s what my Ford dealer wanted to charge me to fix a miss in my 2000, 7.3-liter Power Stroke engine. We had already replaced the valve cover, gasket and more on the left side of the engine, but the diagnostics insisted the problem was there. The dealer wanted to replace the computer.
“I could hear the miss on the right side, so I decided to check it out. I took the valve cover off and took the wiring harness out and then plugged it in without the valve cover in place. It ran fine.
“The problem was the electric plug on the inside of the valve cover. It has 2 little clips that snap in place, but over time they had gotten loose, probably from engine heat.
“I wedged a couple of matchsticks (after removing the heads) behind the plug. The problem was solved. It’s been 3 years, and it’s still working fine.”
His new Paint Brush Scrubber makes it easier to clean paint brushes, rollers and pads. The small, wooden tool has a grooved washboard surface. Brushes are cleaned by scrubbing them back and forth at a 45 degree angle, which separates the bristles without getting your hands dirty. The scrubber has a semicircular cutout on one side for cleaning paint rollers. The Paint Brush Scrubber sells for $9.99 plus $4 S&H.
“Mounting four 8-in. pneumatic wheels on a pallet makes it easy to move my gas-powered compressor and generator around my shop. I mounted a pair of caster wheels on one side and fixed wheels on the other.
“The compressor and generator bolt onto the pallet so I can grab onto either one to push the unit around the shop. Or, I can use a loader tractor to move the unit out to the field or load it onto a trailer or pickup.”
“Anyone who has ever used a 3-jaw puller knows how frustrating the experience can be. However, wrapping the jaws with a vise grip chain changes the whole experience.
“First, get the puller behind the bearing any way that it will stay. Wrap the chain around the jaws as shown without tightening it too much, and then loosen the puller slightly. The jaws will now tighten around the shaft behind the bearing. You can move the jaws around the shaft until they’re equally spaced.
“Next, tighten the vise grip chain as much as possible and then re-center the puller bolt, if it’s not already centered. Now you can pull off the bearing with a lot less frustration, because the puller won’t fall off and it’ll have a lot more gripping power.”
“When working away from home I often need to use a cordless drill, but it can be a frustrating experience if the battery goes dead. In the past I would have to go back home and get a drill, often to discover that it had a dead battery, too. To solve the problem I decided to operate a 12-volt drill off my tractor’s battery using 50 ft. of 16-2 lamp cord and 2 clips that attach to the tractor’s battery. I just took the drill case apart and soldered wires to the battery leads.
“Another way I’ve done this is to gut a dead battery and solder wires inside on leads. That way I can still remove the cord and install a good battery when I need to.
“Because many people are switching to higher voltage cordless drills these days, 12-volt drills are cheap and easy to find at flea markets and garage sales.”
“A long time ago my dad taught me a quick and easy way to pull steel posts using a chain and an old steel wagon wheel. I needed to pull some posts recently but didn’t have any kind of wheel. So I tried using a trick that works in a similar way, and just as well.
“I wrap the chain around the post at ground level, then lean a 3-ft. long treated 4 by 4 board against the post at about a 45-degree angle. Then I drape the chain up and over the top of the board and use a truck to pull the chain. As the board is pulled, it straightens up and pulls upward on the post. No more straining my back trying to pull posts out.
“Joe Campoli submitted a nice idea in your last issue. He labeled his tire pressure gauge so he knows the recommended pressures for all his tires. However, I wonder how long it will take before the labels fade or wear off from handling the gauge.
“Instead, I use a white paint marker to mark the pressure directly on the wheel next to the valve stem on all my machines.
Since I can never remember what length windshield wiper is on my cars and truck - particularly when some wipers require a different length for driver and passenger sides - I use the same idea to mark the length directly on the wiper blade.”
“We replaced the original handle on our push broom with a long, adjustable paint roller handle. It consists of two telescoping tubes and can be easily shortened or lengthened by turning a ‘twist lock’ knob. The handle adjusts from 4 to 8 ft. long, making it easy to use whether you’re short or tall. It threads into the top of the broom just like the original broom handle.
“We use this broom in our garage and also to push snow off our driveway, so it gets a lot of use.”
Paul recently sent FARM SHOW drawings of a new-style clamping device he came up with that makes use of 2 vice grips.
“It lets you hold 2 materials together in any position so you can then weld or glue them in place. Works great for everything from gluing wood pieces together to welding pipes and other projects.” The device consists of a pair of vice grips connected together with 2 directional swivels. The angle between the vices is adjustable by means of a metal center plate with a vertical threaded bolt running through each end. To change the angle of the materials, Miller loosens a pair of wing nuts and adjusts the position of the center plate, then retightens the wing nuts.
“My 1982 Vermeer Super F 205 round baler has a lot of chains on it including a big 10-ft. long, #80 chain that drives the main roller and belts. The baler came with an automatic oiler, but dirt often got into the oil.
“To solve the problem, I replaced the baler’s oiler with a 1-quart plastic oil bottle mounted on a metal bracket, filled it with used oil, and punched a small hole in the lid. While baling I turned the bottle upside down and a drop of oil comes out every second or two.
“The baler’s sealed bearings used to heat up so I replaced them with greaseable bearings and give them a shot of grease every hour or two. I use a laser light monitor to check the bearings’ temperature. Now I have to replace the bearings only about once every 5 years.
“I had trouble finding bearings and driveshaft U-joints for my 1985 General Motors K-30 1-ton, front wheel drive pickup because GM doesn’t make the parts any more. Then I discovered Inland Truck Parts and Service of Ft. Worth, Texas (ph 800 700-2557). They supply a wide variety of drive system parts for GM pickups that are no longer available from the company.
“My shop has a 10-ft. high ceiling, and whenever there’s a lot of equipment inside there’s no room for a big floor fan to blow smoke away as I’m welding. To solve the problem I buy small 20-in. box fans and hang them from the rafters.”
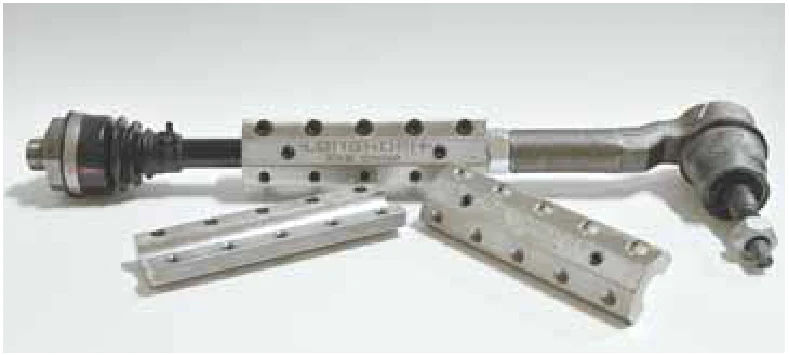
Tie rods are known to be a weak link in the otherwise reliable GM Duramax pickup, but Longhorn Fab Shop has an answer. Their bolt-on sleeves make it easy to toughen up the tie rods.
“There are other sleeves on the market, but they thread onto the tie rod,” says Manfred Schreyer, Longhorn Fab Shop.
“People often realize they have a tie rod issue after putting on new wheels and tires and getting them aligned. Threading on tie rods means having to get another realignment.” Shreyer notes that flexing under hard loads can often be enough to snap the factory installed tie rods in two. Beefing them up is essential, especially if off-roading, sled pulling or drag racing. Longhorn’s clamshell-shaped sleeves are priced at $179.17. Offered in either steel or stainless steel, no disassembly of the front end is needed. The sleeves are machined from solid stock and fit directly over the stock tie rods on 2001 to 2016 GM Duramax trucks. Installation takes less than 15 min. It requires no special tools or skills. Simply place the two halves over the tie rod and line up the machined holes. Insert and tighten the 10 allen head bolts and snug down the smaller set screws to keep the sleeve from moving around. Contact: FARM SHOW Followup, Longhorn Fab Shop, LLC, 11788 Air Hill Rd., Brookville, Ohio 45309 (ph 855 797-8478; [email protected]; www.longhornfabshop.com).
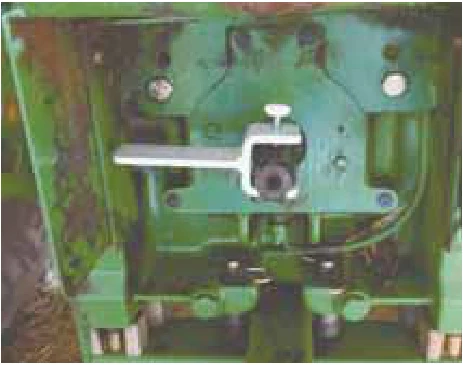
When a pto is hard to turn it can make hooking up implements a frustrating and time consuming task. Roy Noel solved the problem by designing and patenting a tool. The Piketon, Ohio, farmer started working on a prototype at age 75 after purchasing a Deere 6230 tractor in 2009 that had a pto shaft, which was much harder to turn than his older tractor. It took a good 20 min. to turn the shaft and line up his baler before he was hooked up and ready to go to work.
“Now I can hook up in just 10 seconds with this wrench,” Noel says.
“It turns the pto shaft with enough leverage to line it up to the implement. I’ve sold quite a few in the area.” The Y-shaped wrench is about 5 in. long and has a thumbscrew to tighten it on the shaft. He turns the wrench handle to line the pto shaft up with the splines on the driveshaft of a baler, bushhog or other piece of equipment. Once the implement is on, the thumbscrew is loosened and the wrench removed. Noel said he tested the prototype in 2010 to make sure it worked well before he applied for a patent. He began the patent process in 2011 and was issued a full patent (#9,009,943) 3 years later. Noel had some wrenches manufactured and has them for sale at $25 each (plus shipping), but is more interested in selling his patent to a manufacturer. Contact him for more information. Contact: FARM SHOW Followup, Roy Noel, 14 Dutch Run Rd., Piketon, Ohio 45661 (ph 740 289-2851; [email protected]).
Accurate Diesel is a Michigan company marketing a relatively simple fix for a leaking head on a Powerstroke 6.0 Diesel. Owner Tim Wagner gives credit to his friend Mike, who owns a diesel repair shop, for coming up with the idea and making it a reality.
“As 6.0L Powerstroke engines age, cylinder heads can crack and leak diesel fuel into the cooling system,” Wagner says.
“That happens because fuel pressure is greater than the cooling system pressure, so diesel fuel migrates into the coolant when there’s a small crack. The owner first notices it with a strong smell of diesel fuel in the cab and then, after popping the hood, he sees the coolant tank overflowing with diesel fuel.” Replacing a leaking cylinder head can cost $3,000 to $4,000 or more in a repair shop but Wagner’s company, Accurate Diesel, has a simpler and far less costly solution.
“My friend’s idea was to install a steel sleeve the entire length of the injector bore to completely seal off the cracked area and completely separate the diesel fuel and coolant,” says Wagner.
“Our kit includes the sleeve and a slightly smaller injector body that goes inside the sleeve.” The kit also includes instructions for identifying which cylinder is leaking. Wagner says a large percentage of the time the people have to fix the 3rd cylinder from the front on the passenger side. Wagner began marketing the product in 2012 and says it’s been very well accepted. The basic questions he gets when people inquire about the kit include ‘Is this a permanent fix, can I do the work myself, does it require special tools, and how long does it take to install?’ Wagner says “When I tell them the repair kit does fix the problem permanently and can be installed in 3 to 4 hrs. without any special tools, that pretty much seals the deal, especially when they learn the cost is about $400.”
The sleeve is sealed into the head with a retaining compound and never needs replacing. Wagner says anyone comfortable with changing a 6.0 injector should be able to effectively complete the repair. He’s also proud to say the kit was selected as one of the 20 most innovative new products in the automotive industry for 2015 by Motor Magazine.
“The idea behind the kit is to completely repair the leaking cylinder and make the engine whole again,” says Wagner.
“There are thousands of Powerstrokes on farms and in commercial operations across the country, so having an inexpensive repair to make them whole again is very satisfying.” Accurate Diesel sells many other parts and components for diesel engines on its website. Contact: FARM SHOW Followup, Accurate Diesel, 10973 N. Cedar Crest Trail, Bitely, Mich. 49309 (ph 231 660-1689; www.accuratediesel.com; [email protected]).
Bob Halaska has a simple way to fix rusted out cars. Just fill the holes with spray foam insulation. When the rust on his 1975 Jeep Cherokee got too bad, he enlisted the help of a son-in-law who has a spray-foam insulation business.
“It probably took $20 worth of foam to fill up the wheel wells, under fenders and cover the underside front and back. The only area we stayed away from was the muffler.” Not only did the foam fill in rusted areas, but it also quieted down road noise. Over time Halaska found that it appears to keep moisture away from rusting areas.
“Rust was starting to show up around the antenna mount, but is hasn’t gotten any worse since we foamed the area,” says Halaska. Halaska used an angle grinder to grind away excess foam on the exterior and sculpt the foamed underside as well.
“I sprayed everything with gray undercoat and then spray painted surface areas to match the Jeep,” he says.
“The undercoat spray didn’t stand up very well, so I’m going to try body putty over the foam and then paint it.” While the gray undercoat didn’t last, the foam itself stood up well to weather and the road. Halaska has since used the foam on 2 other family vehicles, including a well-worn Grand Caravan.
“My daughter was driving a car with floor panels so rusted that you could almost see the roadway,” he says.
“We layered the underfloor with chicken wire and then spray foamed it. It stopped rusting and quieted down as well.” Halaska notes that even the wiring benefits from the spray foam. Not only does the foam prevent corrosion, but it also holds the wires in place.
“Once it has been foamed, the wire connections and fasteners can’t come loose,” he says. Contact: FARM SHOW Followup, Bob Halaska, N1712 Catherine Way, Waupaca, Wis. 54981 (ph 715 258-9573; [email protected]).
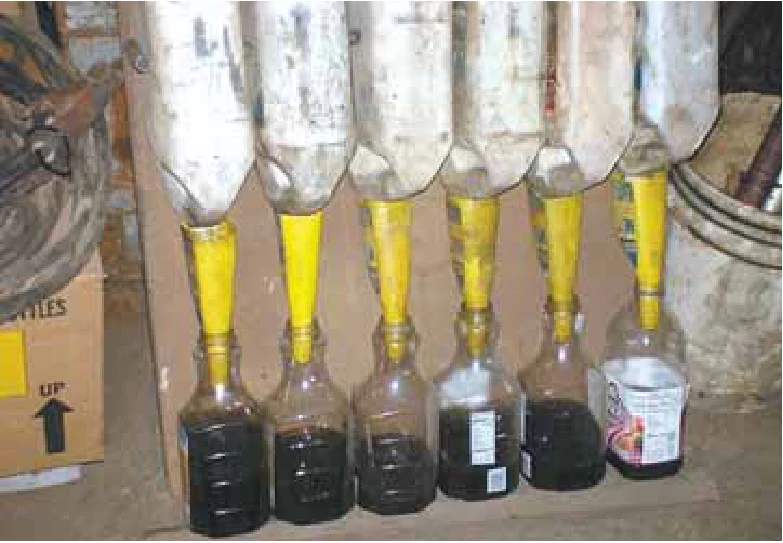
“I built this oil draining device to collect leftover oil from plastic oil jugs,” says Ron Paustian, Eau Claire, Mich. He cuts the bottom off 1-pint plastic fuel additive containers and turns them upside down to serve as funnels. The containers are placed in a row, held in place by a pair of long screws that extend about 4 in. out of a piece of plywood. The necks of the funnels are inserted into empty 64 oz. plastic orange juice bottles. More screws are used to hold a row of upside down oil jugs in place above the funnels.
“I’ve got 3 different plywood sheets set up for 1-gal., 2-gal. and 1-quart oil jugs. I let the jugs drain for a day or two to provide plenty of time for all the oil to drain out. The discarded oil jugs are completely dry when they go to the landfill,” says Paustian.
“I save the oil jugs I use during the spring, summer and fall and drain them out over the winter. It’s surprising how much oil I can collect with this system. I even have one set up for STP, which drains out real slow.
“I use orange juice bottles to collect the oil because they’re clear and it’s easy to see how much oil is in them. I write on masking tape to indicate what kind of oil is in each bottle.” Contact: FARM SHOW Followup, Ron “Skinny” Paustian, 6404 Old Pipestone Road, Eau Claire, Mich. 49111 (ph 269 461-6449; [email protected]).
Bob Strawhacker was driving his Kubota 9580 tractor down the road when the left front wheel and stub axle flew out about 6 ft. into the roadway.
“We had to spend more than $1,700 on parts to repair it,” he says. Two years later, the same thing happened when the right front wheel and axle started to come off.
“I decided to find the problem and make a change,” he says. Upon removal and inspection, he discovered that only one snap ring secured the axle to the wheel.
“Each time the wheel and axle fell off it was because the snap ring had come loose, even though the tractor had been in the shop for front bearings just a few years before,” he says. To solve the problem, he added a second snap ring 5/8 of an inch inside the original one and used a tapered bearing cone as a hardened spacer.
“With the ends of the axle shaft previously center drilled, it was fairly easy to mount the shaft in the lathe and cut a new groove for the second snap ring that’s 1/8 in. thick by about 2 in. in diameter.
“I now feel confident that our front wheels and axle will stay in place. It’s certainly not a good feeling when they don’t,” notes Strawhacker. Contact: FARM SHOW Followup, Bob Strawhacker, 20054 135th Ave., Mediapolis, Iowa 52637 (ph 319 985-2598; [email protected]).
“I made a conversion kit for my log splitter to bend iron. It takes just seconds to switch from a splitter to a bender and works great,” says Larry Gruenberger, Slinger, Wis.
“The kit adapts to the splitter’s wedge so I get a perfect 90 degree bend every time.” Gruenberger drilled 2 holes in the wedge and then bolted a homemade head onto it. He also fabricated a square steel block and a 90-degree V-block. The metal is placed between the square block and the V-block, which is held in place by a steel back plate with a pair of guides welded onto it.To convert back to splitting wood, Gruenberger just unbolts the bender from the wedge.
“The splitter has 34 tons of pressure so it can do some heavy-duty bending,” says Gruenberger.
“Because the metal to be bent rests on the splitter beam, the bend line is automatically perpendicular to the metal so no pre-measuring is necessary. It results in a perfect 90-degree bend every time.
“It works fast. I made the kit 4 years ago when I needed about 25 metal brackets to fasten onto the facia on my house. The brackets held 2 by 6’s on edge so workers on the roof wouldn’t slip off. Each bracket required 3 bends, but I was able to bend all the brackets in only about 20 min.” Contact: FARM SHOW Followup, Larry Gruenberger, 3824 Sherman Rd., Slinger, Wis. 53086 (ph 262 878-1559 or 262 305-8595).
This new timer tracks rpm’s, hours in operation and displays the time. It has quick manual resets and an easy-to-read LCD screen. The Resettable Maintenance Timer was originally designed for motocross bikes and other off road use. However, it can work on any fuel injected and carbureted 2 and 4-stroke engines from 1 to 8 cylinders. It can measure up to 19,999 rpm’s and track up to 99,999 hrs. The timer mounts to any flat surface with a peel-n-stick backing or optional aluminum mounting kit. The 5-mode screen displays a non-resettable hour meter for total operating hours, resettable operating hours for current use, current rpm’s, maximum rpm’s reached during current operation and the clock time in either 12 or 24-hour mode. The current rpm meter can be adjusted for pulses per revolution and readjusted while the motor is operating. The maximum rpm reading automatically resets after the engine stops and is not restarted in less than 30 sec. Installation is simple. Mount the unit in the desired location for easy viewing. Route the black lead to a spark plug wire or to the coil, depending on application. Wrap the red wire that extends out of the black lead around a spark plug wire or around the spark plug cap on “coil in cap” units. The Tach/Hour Meter/Clock comes with a 5-year battery and is priced at $44.95. The optional mounting bracket is priced at $14.95. Contact: FARM SHOW Followup, Works Connection, 4130 Product Dr., Cameron Park, Calif. 95682 (ph 530 642-9488; www.worksconnection.com).
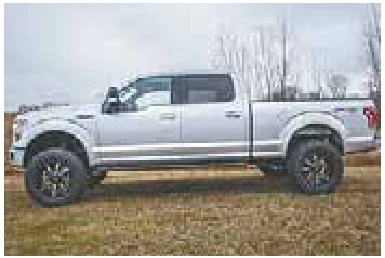
There are probably a dozen companies waiting to sell you pickup lift kit components, but one we hear a lot about is BDS Suspension. Truck repair specialist Chris Nielsen says his customers modify their vehicles with BDS products for mud racing, hill climbing and other off-road antics. Nielsen says the company has kits for just about any truck made, but two that he’s most familiar with are those for Dodge Ram and Ford trucks. For Dodge Ram trucks, BDS Suspension has teamed with Fox Racing to offer a 6-in. coil-over lift kit that replaces the front strut and uses Fox long-travel coil-over shocks. Fox says their shocks provide more suspension travel to take advantage of the extra height and improve the ride on the road or in rough country. The shocks can be adjusted for stiffness so you can tune the ride to your liking. They also have a remote reservoir that provides extra fluid capacity to dissipate heat. The basic BDS kit has everything except wheels and tires to lift your ride to roll on 35 or 37-in. tires. Do-it-yourselfers can handle the work in about 10 hrs. with the aid of good tools, a sturdy truck lift, and a heated shop. Some torching and metal trimming is required and two people definitely make the job go smoother. BDS suspensions don’t work on 2013 model year trucks and newer with self-leveling air suspension. BDS offers a 4-in. high-clearance lift kit for F-150 Ford Raptor pickups and recently announced IFD and C/O lift systems for new 2016 Ford F-150s. The Raptor kit is engineered to clear 37-in. tires and take full advantage of the Fox bypass rollover front shocks and the the rear 2 1/2-in. piggyback reservoir shocks. Its one piece 1/4-in. thick crossmembers reposition the lower A-arms. Ductile-iron steering knuckles reposition front tie-rod mounts and integrate with the A-arms. A 4-in. block and U-bolt kit levels the rear. The kit includes all mounting hardware. BDS Kits include a “No Fine Print Warranty” and a 5-year, 60,000-mile PLUS drivetrain warranty. The company also offers suspension kits for Chevy, GMS, Jeep, Geo, Mazda, Suzuki, and Toyota vehicles. Pricing varies and can be found on the company website. Contact: Farm Show Followup, BDS Suspension, 491 West Garfield Ave., Coldwater, Mich 49036 (ph 517 279-2135; www.bds-suspension.com).
When it comes to handling big 55-gal. drums, Ron Paustian has pretty much figured it out. He recently sent FARM SHOW photos of several different drum lifters and tools he’s come up with to make handling drums an easier job. His lifters can lift drums either vertically or horizontally using a chain attached to an overhead crane or forklift. He also has a drum tipper tool that’s used to stand a drum up by hand and a bung cap tool that eliminates the need for a wrench.
“I collect used oil from farmers in our area, who store the oil in 55-gal. drums. I used to have to maneuver drums onto pallets by hand or wrestle them into the back of a pickup,” says Paustian. He used the fuel tank strap from a 1970’s International cab-over semi truck and a 2-in.
“load-securing” ratchet strap to make a handy drum lifter that lifts the drum vertically. The tank strap surrounds about 3/4 of the drum and is attached to a short length of ratchet strap, which Paustian cut down to 30 in. long. He looped one end of the ratchet strap to the tank strap and bolted the other end to a metal loop already on the tank strap. He then welded three 3-ft. lengths of chain spaced equal distances apart onto the tank straps. A big washer welded on where the chains meet at the top serves as a hook. The strap is placed just below the drum’s top rib and tightened up using the tank strap’s closing device. It consists of a 4-ft. long chain with a big washer welded onto the middle and a pair of curved metal brackets welded onto both ends. The brackets fit against the lips at both ends of the drum and tighten as the drum is raised. It works like a big prybar and lets Paustian grab onto a 55-gal. drum that lays horizontally and stand it up by hand. It consists of a long pipe with 2 short pieces of 3/4-in. angle iron spaced about 10 in. apart. One angle iron is welded onto the end of the pipe and serves as a stabilizer. The operator catches one angle iron on the drum’s lip and then raises the pipe. A washer welded onto one end of the tool makes it easy to hang up for storage. Two different size pieces of flat metal are welded onto the ends of a pipe. One piece fits 2-in. bungs and the other 3/4-in. bungs. The operator inserts the metal piece into the bung and then rotates the pipe to open or close the cap.
Contact: FARM SHOW Followup, Ron “Skinny” Paustian, 6404 Old Pipestone Road, Eau Claire, Mich. 49111 (ph 269 461-6449; [email protected]).