Practical ideas from FARM SHOW MagazineSubscribe · Free issue · Send us your shop tip
Subscribe to FARM SHOW
Issues / Vol. 40, No. 2 (2016)

Vol. 40, No. 2 (2016)

Money-Saving Repairs & Maintenance Shortcuts · Printed section pp. 36–39

40 selected entries · Complete text of selected entries

This issue’s section includes reader tips and feature-length shop stories. Held items and editorial notices are not reproduced.

Archive text: prices, coupons, availability and contact details reflect the original publication, not current offers. Reader methods are not universal instructions; follow manufacturer guidance and proper safety practices.

Reader shop tips

From the archive · Full text
Reader shop tip

Victor E. Leppke

Victor E. Leppke, Minneota, Minn.

“Since retiring I’ve been restoring old tractors for a hobby. I recently needed some 2 1/8-in. fuel glass gaskets, which is the size most old tractors use. I went to my Deere dealer and he told me they would cost $4.06 apiece. I went across the street to Case IH, and they wanted $1.75 apiece for the same thing. Then I checked in Steiner Tractor’s catalog (www.steinertractor.com; ph 800 234-3280) and they sell for 95 cents apiece. With today’s price of corn and beans, every dollar helps. I think Deere is sticking it to farmers.”

From the archive · Full text
Reader shop tip

Bill Crawford

Bill Crawford, Milford, Mich.

“I’ve read with interest a number of articles in FARM SHOW about guys who are venting their plastic fuel cans with tire valves. Instead of going to all that trouble, I drive a nail into the can opposite the spout and simply remove it when pouring. I’ve used this idea for many years and it works great.”

From the archive · Full text
Reader shop tip

John Countryman

John Countryman, ([email protected])

“In your last issue, L.A. Stoehr wrote that his New Holland 2320 tractor wobbles terribly from side to side when going down the road. I have a Massey Ferguson tractor that was doing the same thing every time I hit a bump. The local tractor repair places didn’t have an answer to the problem. One day I was standing in front of the tractor and noticed that the front tires weren’t exactly parallel. I adjusted the tie rods so that both front tires were pointing exactly straight ahead. Lo and behold, no more wobble.”

From the archive · Full text
Reader shop tip

Carl Hatteberg

Carl Hatteberg, Fonda, Iowa

“As regards the reader with the New Holland tractor that wobbles from side to side on the road, his back wheel rims might be out of round. You can adjust the clamps on the wheels to fix. I had this problem on an IH 1066. The wheels were a bit oval-shaped but I was able to adjust them.”

From the archive · Full text
Reader shop tip

Jim Carson

Jim Carson, Bostic, N.C.

“I had problems with my Deere tractor’s synchro range transmission that had problems going into gear or would jump out of the 4 ranges. You can modify the range shifting cam so it will travel further by using a die grinder on one side and welding up the other side of the slot where the roller on the shifter travels. Usually it’s 2nd range that gives the trouble. This fix saves 20 hrs. labor and buying a gear & collar. You can also put brass on the shifting fork where it fits into the shifting collar.”

From the archive · Full text
Reader shop tip

Rex Peterson

Rex Peterson, Plano, Iowa

“To lubricate the roller drive chain on my baler, I used about 3 in. of 2-in. dia. pvc pipe and 2 pvc pipes to make a small reservoir. I drilled a hole in one of the caps to fit a brass valve stem from an old pickup wheel. I removed the valve core. To mount it, I drilled a hole in the chain guard so it’s above the chain. After I finish baling for the day, I remove all the loose hay and put oil in the reservoir and run the baler until all the oil has run through the valve stem onto the roller chain. This method lets oil soak into the chain overnight so it’s ready next time I need it.”

From the archive · Full text
Reader shop tip 1 of 2

Raymond Hornak

Individual tip 1 of 2 from this reader’s published contribution.
Raymond Hornak, New Berlin, Wis.

“When installing parts – such as mounting a water pump on an engine – cut the heads off a couple bolts that are about a half inch longer than required. Lightly screw these ‘studs’ into place to hold gaskets in place and to serve as a lineup tool. After you put the other bolts in, remove the ‘studs’. To make removing them easier, cut slots in the end so you can use a screwdriver to take them out.

From the archive · Full text
Reader shop tip 2 of 2

Raymond Hornak

Individual tip 2 of 2 from this reader’s published contribution.
Raymond Hornak, New Berlin, Wis.

“To keep batteries up to full charge on tractors or trucks parked for long periods of time, I use solar chargers that provide a trickle charge. It lets you park equipment anywhere without worrying about having electric power. I buy the chargers at Northern Tool for about $30 apiece (www.northerntool.com; ph 800 221-0516).”

From the archive · Full text
Reader shop tip 1 of 2

Ron Paustian

Individual tip 1 of 2 from this reader’s published contribution.
Ron Paustian, Eau Claire, Mich.

“To prevent hydraulic hose failure wherever the hoses rub on equipment, we save caulking gun plastic tubes and put them over the hose, using zip ties to hold them in place. These tubes are very durable. If they’re going to be exposed to sunlight, we scuff them up and spray paint them once in place.

From the archive · Full text
Reader shop tip

Gary L. Ahlbrecht

Gary L. Ahlbrecht, Brownton, Minn.

“I collect old tractors and had 3 with stuck engines. Since I mostly work by myself, I came up with a way to ‘unstuck’ the engines that works well.

“First I put diesel fuel and penetrating oil into the engine cylinders for a few weeks.

Then I jack up one side of the tractor and slide a 10-ft. long 2 by 6 under the axle alongside one of the rear wheels, pushing it in so the end of the 2 by 6 is just past the axle. Then I wrap a chain tightly around the tire rim and the 2 by 6, with the 2 by 6 sticking out the back of the tractor. Put the tractor in high gear and then push down on the 2 by 6 to rock the wheel back and forth. If it doesn’t shake the engine loose, add more oil to the cylinders and try it again every few days. This method works great for me.”

From the archive · Full text
Reader shop tip

Jonathan Dean

Jonathan Dean, Baskin, La.

“I had trouble with the shifting mechanism on my International 1066. I removed the floor pan and installed two washers on the pushrod that goes to the shifter to remove slack. It really helped.”

From the archive · Full text
Reader shop tip

Andrew Sewell

Andrew Sewell, North Yorkshire, England

“I’ve got a big batch of keys that I carry around and a friend told me that I could lessen wear and tear on my car’s ignition by taking off some of the load. So I screwed a hook into the dashboard to hold the main bunch of keys and attached a short chain to my car key. The bonus is that the keys don’t hit my knee anymore.”

From the archive · Full text
Reader shop tip 1 of 2

Tom Chaney Sr.

Individual tip 1 of 2 from this reader’s published contribution.
Tom Chaney Sr., Chrisman, Ill.

“I had a used schoolbus windshield that had a few pits in it but was otherwise intact. I was building a repair shop inside my barn and wanted a window looking out into the barn. The windshield made one nice big window.

From the archive · Full text
Reader shop tip 2 of 2

Tom Chaney Sr.

Individual tip 2 of 2 from this reader’s published contribution.
Tom Chaney Sr., Chrisman, Ill.

“When the plastic hood on my Deere X500 lawn tractor shattered, Deere quoted me a price of $700 for a new hood. I didn’t want to spend that much when I figured it could just happen again. So I made my own out of 3/4-in. plywood, screwed together and painted green.”

From the archive · Full text
Reader shop tip

Lynn Olds

Lynn Olds, Lima, Ohio

“A bolt came loose on the chain coupler between the motor and transmission on my Oliver 77 tractor. The bolt holds the coupler to the transmission. There was no room to get in to tighten it so I took the bolt out, tapped it out to the next size up, and used a socket-head bolt with a star washer to hold it together. Worked great and hasn’t come loose again.”

From the archive · Full text
Reader shop tip

Jonathan S. Fisher

Jonathan S. Fisher, Montgomery, Penn.

“Does water leak in at the bottom of your grain bin where it meets the concrete? You can solve the problem with Gaco silicone coating (www.gaco.com; ph 800 331-0196). Just apply 6 in. up the side of the building and onto the surface of the concrete. You may have to apply a few coats to fill in cracks but it works great. It’s widely used for roofing but works on many other surfaces as well.”

From the archive · Full text
Reader shop tip

Richard Wood

Richard Wood, Orting, Wash.

“I put all of my owners manuals in 3-ring notebooks. I cut them up into single sheets so I can put them into plastic document protectors. Keeps everything together and I can look at them with greasy hands.”

From the archive · Full text
Reader shop tip 1 of 5

Herman Vander Vos

Individual tip 1 of 5 from this reader’s published contribution.
Herman Vander Vos, Bozeman, Mont.

“Thanks for printing my ‘worst buy’ report in Vol. 39, No. 6, about the bending of push rods in a Briggs & Stratton engine. Here are some suggestions I received from FARM SHOW readers: “1. Run engine at full speed when working. A slow engine overheats.

From the archive · Full text
Reader shop tip 5 of 5

Herman Vander Vos

Individual tip 5 of 5 from this reader’s published contribution.
Herman Vander Vos, Bozeman, Mont.

5. Don’t use stale gas because it can also gum up valves.

“Thanks to all who responded. I will take their suggestions seriously.”

From the archive · Full text
Reader shop tip

Gary D. Lutzow

Gary D. Lutzow, Bryant, Wis.

“My Hesston 550 round baler wouldn’t cut off twine. I had to crawl under the baler and hit the twine bar to make a cut. I solved the problem by cleaning the gears on the twine bar with a wire brush every morning when I greased the machine. Now it works perfect.”

From the archive · Full text
Reader shop tip

George Burkhardt

George Burkhardt, San Antonio, Texas

“Wooden fascia boards on houses and other buildings tend to rot near corners and intersections. Replacing the boards is time consuming and expensive, and removing the rotted portion of the wood and replacing it with wood filler is only a temporary fix.

“For a permanent fix, remove the rotted wood with the rotary rasp on a drill. Dilute fiberglass resin with one part acetone to 4 parts resin, then add 14 drops of fiberglass hardener for each ounce of total solution (acetone plus resin). Apply the diluted resin liberally to the area of removed wood and let it harden, then apply Bondo body filler to fill the recessed area.

“If you’re working on a vertical surface and want to keep the filler from flowing away, temporarily affix duct tape to the board and then remove it after the filler has hardened. The filler can then be easily sanded and painted. The secret to this permanent fix is the diluted resin. It soaks into the wood, forming a hardened base that the filler adheres to.

“I’ve used this idea on many parts of the fascia boards on my house, some of them relatively large areas. I’ve seen no rot on the treated areas in more than 30 years.”

From the archive · Full text
Reader shop tip

Chuck Hartman

Chuck Hartman, Ishpeming, Mich.

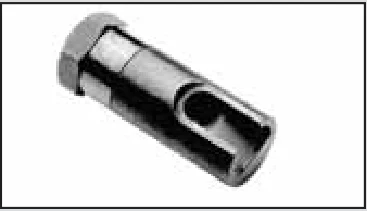
“There’s a grease zerk on my Kawasaki Mule’s driveshaft with less than 3/4 in. of room for access. The dealer says the only way to access it is to remove the vehicle’s fuel tank, which is at least a 2-hr. job. Instead, I went on the internet and found the “THE418 Thexton right angle grease coupler” (www.thexton.com; ph 800 328-6277). It fits snugly on the zerk and works like a charm.

“You connect one end of the coupler to the end of your grease gun’s hose. When you’re done, just disconnect the coupler. The job takes only about 5 min. I can see endless applications for this coupler and recommend using it with a flexible hose extension. I bought the coupler at my local Auto Value store.”

From the archive · Full text
Reader shop tip

Theron R. Wilkins

Theron R. Wilkins, Rupert, Idaho

“I didn’t want to spend the money for a new starter clutch wrench for my Briggs & Stratton Wheeline gas engine, so I made my own. I drilled a series of holes into a metal tube and then welded it to the square stud part of a worn-out starter clutch. The tube goes down into the stud and turns a plastic pulley that’s used to rewind the spring.

“To start the engine I just insert a small metal rod through one of the holes in the tube and then twist the rod. It works good, and I didn’t spend anything to make it.”

From the archive · Full text
Reader shop tip

Moses Stutzman

Moses Stutzman, Stirling, Ontario

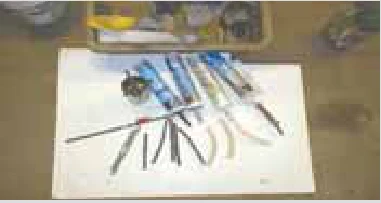
“Your readers might be interested in this vise mounting bracket I made for sharpening chainsaws when working out in the woods.

It consists of 2 pieces of telescoping tubing that slips into any standard 2-in. receiver hitch, allowing you to take the vise with you anywhere.

“My friend came to me with the design and measurements and asked me to make it for him. I used 2 and 1 3/4-in. sq. tubing, with some flat steel plate used for bracing and another plate used to bolt the vise on. The vise can be lifted off and rotated anywhere.

“There’s enough clearance for the pickup’s tailgate to serve as a work table, or you can sit on the tailgate while sharpening the saw.”

From the archive · Full text
Reader shop tip

Jim White

Jim White, Water Valley, Miss.

Jim likes his Kuhn 8-ft. disc mower but says it has one problem.

“When the mower is parked for the winter, moisture will get into the top end of the lift cylinder which eventually causes rust to form and damage the seals. Replacing the seals is time consuming and expensive, because you have to tear the cylinder apart in order to install new seals. And it costs about $100 for the seals, not including labor.

“The mower has a single acting cylinder so when it’s extended the shaft goes all the way down, which leaves a cavity at the top that can trap moisture. You wouldn’t have this problem with a double acting cylinder because the shaft is always covered with oil.” To solve the problem, White unhooks the cylinder from the mower and then retracts the cylinder which leaves the entire shaft covered.

“I don’t have this problem during the summer because as long as the mower is used occasionally, the cylinder will get coated with oil. It’s not a problem limited to just Kuhn disc mowers. My neighbors have had the same trouble with other equipment,” he notes.

Shop feature stories

From the archive · Full text
Feature story

Build Your Own Air Compressor

Featured source: Power Systems & Supply

Buy an air compressor complete or build your own with parts from Power Systems & Supply. The Indiana company offers multiple options.

“We can add a battery charger with a larger engine as well as an electric start,” says John Beiler, Power Systems & Supply.

“We also sell the components of a compressor pump, base frame and belt guard if you have a 10 to 11 hp engine.” Beiler points out that an air tank is also needed. He explains that many of his customers in the Amish community use 500 to 1,000-gal. propane tanks.

“They like the large tanks so they don’t have to start their compressor all the time,” he says.

“The tanks need to be equipped with safety valves to prevent over-pressurizing. They can also be set up with an automatic stop.” Beiler prices the complete compressor at $1,695 with an 11 hp motor and rope start. He notes that it also can be set up to run on propane. Those who have a motor can order the frame for $395, the belt guard for $125 and the air compressor for $595. Beiler says the compressor is imported from China. However, the exporter owns the factory.

“He makes a quality product as he is responsible for quality control,” says Beiler.

“We also can supply an American-made compressor.”

Contact: FARM SHOW Followup, Power Systems & Supply, 10381 South 800 West, Waveland, Ind. 47989 (ph 765 435-3731).

From the archive · Full text
Feature story

Truck-Mounted Workbench Raises Up To 9 Ft. High

Featured source: Albert Schoenenberger

Instead of reaching up from a pickup bed or balancing on a ladder to work on big equipment, Albert Schoenenberger has a portable workbench on back of a service truck that lifts up to 9 ft. in the air. The inspiration for its design came to the Texas farmer at 3 in the morning as he was standing in his pickup bed, struggling to repair a bearing on the top roller of a baler. His 2-ton service truck has a forklift mast on back that lifts a 3 by 8-ft. shop table made of 12-ga. steel. Its drawers are well equipped with socket wrenches, hand tools and air tools to fix machinery or an irrigation system. An air compressor in the truck supplies air to the shop bench. The 14-ga. steel service bed mounts on a 6-in. channel frame, and the forklift mast attaches to the rear of that frame.

“A toggle switch on the workbench activates an electric over hydraulic pump, powered by three 12-volt batteries in the bed, which lifts the bench from ground level up to 9 ft. high,” Schoenenberger says.

“The tailgate made with 1/8-in. deck plate folds down and gives you a place to stand at the workbench.

“I mounted the unit on a 2-ton truck for many uses, mainly for working on equipment,” Schoenenberger says, adding it works for other jobs as well.

“My son, Brent, and I used the bed when we erected a 30 by 40-ft. shop. It was easier than standing on a ladder when fastening sheets of tin.” While he can take credit for the idea, he credits students Russell Eicke, Joel Rocha and Chad Sutton and teacher, Sean Hightower, from Adrian High School for building it. They placed first and won $4,000 worth of tools when they entered it in the Ag Mechanics Show in San Antonio. Contact: FARM SHOW Followup, Albert Schoenenberger, 2721 Fm 1058, Hereford, Texas 79045 (ph 806 289-5341, [email protected]).

From the archive · Full text
Feature story

Labels Save Time Airing Up Tires

Featured source: Joe Campoli

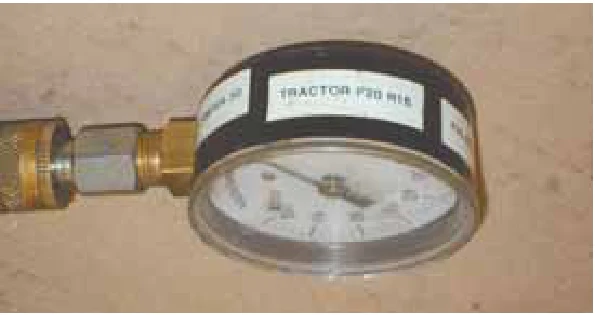
“Between raising a family of 3 children and operating a small business, I have a lot of tires to keep pumped up. To make the job easier I made labels that show the tire pressure needed on all of our vehicles and attached them to my tire pressure gauge. It’s a real time saver and beats trying to locate the specifications on each tire,” says Joe Campoli, JC Metal Fabrication LLC, Mishawaka, Ind.

“I used a handheld Brothers label maker to make the 3/8-in. wide labels. There isn’t a lot of space on the labels so I use abbreviations. For example, ‘Tractor F20 R16’ means our tractor’s front tire needs 20 lbs. of pressure and the rear one 16 lbs.” Contact: FARM SHOW Followup, Joe Campoli, JC Metal Fabrication LLC, 15393 Kelly Road, Mishawaka, Ind. 46544 (ph 574 340-1109; [email protected]).

From the archive · Full text
Feature story

Turn Your Cordless Drill Into A Mobile Drill Press

Featured source: Rapidrill, LLC

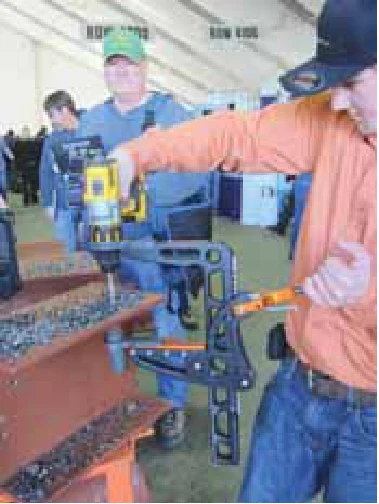
Rapidrill attaches to almost any standard collared cordless drill and turns it into a mobile drill press. It also adds a lot of leverage, allowing you to put large holes through thick steel fast. The Rapidrill can be used on everything from steel plate to C-channel to pipe. It aligns your drill at a right angle to the drilling surface. One end of the frame attaches to the collar of the drill to hold it steady, while a receiver tube at the other end is placed against the material to be drilled. The operator holds the drill with one hand and uses his other hand to pull down on a built-in lever that acts on a gear and sprocket system. According to the company, the design provides your drill with more than 1,000 lbs. of additional force for powerful leverage at a perfect right angle, allowing precise control and making it much easier to drill. As you push down on the lever, it applies about 10 times as much force to the drill bit as you could without it. The company claims you can drill a 1-in. dia. bit through 1/2-in. thick steel in less than 30 seconds, and a 1/2-in. dia. bit through 1/4-in. thick steel in just 10 to 15 seconds. And because you’re drilling at a true right angle, with constant increased pressure, you save on the life of your drill bits. The Rapidrill is available online or at any Fastenal retailer in the U.S. Contact: FARM SHOW Followup, Rapidrill, LLC, Kanarraville, Utah 84742 (ph 855 993-7455; www.rapidrill.com; [email protected]).

From the archive · Full text
Feature story

Roller Chain “Better Than Heavy-Duty”

Featured source: RDM Enterprises

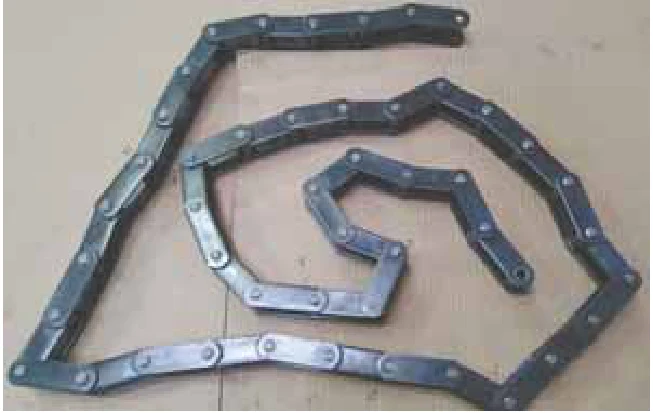
The first standard roller chain off the assembly line at RDM Enterprises is nearly 3,000 lbs. higher in tensile strength than competitive heavy-duty chain. To make the chain, RDM leveraged 25 years of experience in the metal stamping industry. Dustin Russell, RDM Enterprises, says “We expanded into roller chain about 5 years ago when my grandfather and company founder Al Rinke decided to take what we had learned and apply it to making chains.” What RDM came up with was 81x roller chain with a tensile strength of 27,000 lbs. Russell compares that to competitive roller chain marketed as “heavy-duty” chain with a tensile strength of 24,300 lbs.

“Our chain is considered standard duty, but it is actually stronger,” says Russell.

“Initially, we’re marketing it to sawmills and to farmers.” The chain comes in 10-ft. lengths. Each contains about 46 links with a pitch of around 2.6 in. Side links are made out of 1050 heat-treated steel. Each side link has 2 types of bushings and pins. The bushings are made out of 1020 steel that is carbonized and hardened. They’re then heat-treated to 50 Rockwell. The outside bushing is 1 in. long, and the inside bushing is 1 1/4 in. long. The pin inside the bushings is 2 in. long and made with 4140 steel.

“If desired, we can add flights made of 1050 heat-treated steel without welding,” says Russell. Russell suggests the 81x is just the beginning of a new line for RDM.

“I expect we will be expanding our product line and the lengths offered.” Contact: FARM SHOW Followup, RDM Enterprises, 4045 Griswold Rd., Port Huron, Mich. 48060 (ph 810 985-4721; [email protected]; www.rdmenterprises.net ).

From the archive · Full text
Feature story

Nothing Can Stop The “Terminator” Chop Saw

Featured source: John Rutherford

Thirteen years after John Rutherford designed and built the “Terminator” 20-in. abrasive cut-off saw, it continues to cut steel up to 4 in. thick for an Ontario manufacturer. Now retired, FARM SHOW reader Rutherford says building it took plenty of planning and many hours to build using quality, heavy-duty materials. The fabricating plant he worked for cut a lot of steel and had burned out smaller chop saws when attempting to cut large diameter manganese shafting. As the maintenance department manager, known for building things to solve problems, they asked Rutherford to build the metal chop saw. He made sure to build it to endure daily use cutting the hardest manganese steel and to include important safety features. A 10,000-lb. rated wagon spindle supports the saw head, and a machined round steel plate on the spindle serves as a rotor with a brake caliper to lock the head in position. A master brake controls it with an air cylinder operated with a valve handle. Another valve handle locks the vise on the tabletop that holds the steel.

“The vise is mounted on linear ball bearing pillow blocks so it can be lined up and moved sideways to allow for miter cuts,” Rutherford says.

Everything, including the 10 hp motor and 3-phase, 600-volt electrical box, is mounted on a sturdy 1/4-in. wall 2 by 4 structural tubing frame. The arm made of 3 by 6 in. square tubing holds the saw and shield, and swivels 60 degrees in both directions to make miter cuts. The chop saw uses 3/16-in. thick, 20-in. dia. abrasive blades. The handle on the head has the start switch on the side.

“The saw is equipped with safety switches so the saw motor can’t start until the brake and vise are locked,” Rutherford says. The saw shield also comes down to protect the operator from hot sparks. The Terminator has been fairly maintenance-free despite constant use, he adds. He changed the bearings on the spindle shaft about 6 years ago, and the four V-belt drives were changed to timing belt drives to prevent slippage. Rutherford, 71, says he has been designing and building things since he was 14. He’s pleased how one of his biggest creations turned out and to know that it will work for many years to come. Contact: FARM SHOW Followup, John Rutherford, 2 Grey Owl Drive, Elmira, Ontario, Canada N3B 1S3 (ph 519 669-1877; [email protected]).

From the archive · Full text
Feature story

He “Trued Up” Cheap Tires

Featured source: Brian Lazenby

Brian Lazenby turned a bad tire buy into a good investment by making a tire truing machine. The made-in-China, Gladiator brand tires he had ordered online were out of true. Rather than send them back, he fixed them.

“I saved $700 on a set of 5 tires for the 19 1/2-in. wheels I was putting on my truck, but I could feel they were out of round, even driving at low speeds,” says Lazenby.

“When I checked, they were as much as a 1/4 in. out-of-round.” Out-of-round was once a common problem with tires, so much so that tire trimming or truing machines were common. Lazenby’s father recalled having tires trued before using them and suggested he find someone with a tire truing machine. When none could be found within several hundred miles, Lazenby decided to build his own.

“I had an old radial arm saw and an engine hoist and decided to use them,” says Lazenby.

“I built brackets to temporarily attach the radial arm saw head to the vertical leg of the hoist.” Lazenby had recently replaced hubs on his truck. One fit nearly perfect to a 1-ft. length of 4-in. schedule 40 pipe. He bracketed it to the leg of the hoist with a single pin. The pin allowed minimal movement of the pipe.

“I attached a turnbuckle between the hoist base and the pipe so I could level the tire,” explains Lazenby. Once the wheel and tire were mounted, he lowered the saw blade to just barely trim the high area on the tire. He moved it across the tire’s width and rotated the tire as he worked.

“I brought it down a bit more and trimmed again,” says Lazenby. When he was satisfied that the tire was true, he repeated the process on the other tires. He then remounted them on his truck and took it out on the road.

“I ran it up to 85, and it rode as smooth as glass,” he recalls. Lazenby needed the larger wheels and tires to safely and legally haul RV trailers for an Indiana manufacturer. Since truing the tires, he has made multiple trips cross-country with no problems. Whether he buys the same brand in the future and goes through the truing process again depends on how they last. His advice for others is to spend more up front. Check out the tire truing machine in action at www.farmshow.com. Contact: FARM SHOW Followup, Brian Lazenby, 9750 70th St. W., Mojave, Calif. 93501 (ph 805 829-6263; [email protected]).

From the archive · Full text
Feature story

Fuel Pump Repair Business Going Strong Since 1978

Featured source: Terrill Machine, Inc.

“The main skills needed for this business are good eyesight, nimble fingers and being able to do the same thing over and over again without getting bored,” says Feltz Terrill Jr., whose niche company in DeLeon, Texas rebuilds fuel pumps and vacuum advances. They work mostly on mechanical pumps for cars, tractors and commercial equipment made prior to the 1960’s. Most of his customers own vintage vehicles where they want the original equipment repaired, not OEM replacements. Terrill says his main pump expert Brian has probably rebuilt more than 20,000 pumps in the past 10 years.

“We can rebuild any kind of pump, as long as its mechanical and held together with screws,” Terrill says.

“From the late 1960’s on up they’re crimped together, and I can’t do those. All the materials we use inside are modern, so they handle ethanol up to 10 percent. We do pumps for tractors and farm equipment, but our main business is vintage cars and trucks.” Pumps that come to Terrill’s shop range from thoroughly rusted to partially working.

“We usually have to put in a diaphram, a seal and 2 little check valves. Sometimes there’s linkage or a spring that needs replacing, maybe a gasket or 2. We thoroughly clean them and will resurface the casting if its warped. The arm has to be good to make a sound repair. We put in a new mounting gasket with a 1-year warranty and put the pump back together with all new screws. Work is usually done in 2 to 3 weeks.” Terrill says repairing and rebuilding pumps isn’t something just anyone wants to do or has the skills to do.

“My daddy and I got into this because we had access to a big supply of used auto parts. We liked tinkering with old stuff to make it new again. At first we started fixing fuel pumps and water pumps, then people found out about us and it’s just sort of taken care of itself since 1978.” The business still sells other parts for vintage cars and trucks. Terrill says he’s busy enough that he buys more than 100,000 helmet head screws annually for pump repairs. He charges $85 to $95 to repair and rebuild single action fuel pumps and $105 to $115 for double action pumps. Vacuum advances are repaired for $75. Customers pay shipping both ways, and whenever they call, a real voice answers the phone.

“We’ve got a lot of experience, are happy to talk about the work we do, and we charge a fair price,” says Terrill.

“Those are probably the reasons why we’ve been successful.” Contact: FARM SHOW Followup, Terrill Machine, Inc., 1000 Co. Rd. 454, De Leon, Texas 76444 (ph 254 893-2610; [email protected]).

From the archive · Full text
Feature story

Chemical Shuttle Cages Hold Steel

Featured source: David Lehman

“I farm and operate a fabrication and repair shop. I also sell steel. I wanted to store the material neatly without spending a lot of money, so I started using the metal cages on chemical shuttles,” says David Lehman, Tribune, Kansas. His storage rack measures 24 ft. long and consists of 3 sets of double-stacked shuttle cages spaced 4 ft. apart. The upper and lower cages are held together by big metal bands and hose clamps. The cages are made of lightweight 16-ga., 3/4-in. O.D. galvanized tubing and have openings that measure either 8 in. sq. or 6 by 8 in.

“I made sure to pick cages with matching holes so the steel pieces will go all the way through them,” says Lehman.

“The longest pieces I use are 24 ft. long.

“It really works good. I have 6 kids at home and when I saw the economic downturn in agriculture coming, I knew I would need extra income. So I decided to start my welding business.” According to Lehman, shuttle cages are made of lightweight material but they’ll hold a lot of weight as long as the cage stays level.

“If you set the cages on a floor that isn’t completely flat they’ll collapse under the weight of whatever is in them,” notes Lehman. Contact: FARM SHOW Followup, David Lehman, 114 Glick, Tribune, Kansas 67879 (ph 620 376-8562; [email protected]).

From the archive · Full text
Feature story

Anti-Shimmy Device For Narrow Front Tractors

Featured source: Lauris Bailey

“I drive my Deere narrow front-end tractor on paved roads, and the shimmy was really a problem until I figured out how to fix it,” says retired Maine farmer Lauris Bailey.

“Before I built my anti-shimmy device, I tried letting air out of one of the front tires, out of both of the front tires, and I even removed one of the wheels. Nothing worked. It just made the tractor harder to steer at road speed.” Bailey also talked to a tractor mechanic and looked at different aftermarket products to fix the shimmy problem, but couldn’t find a solution. Eventually he designed and built a bracket that mounts between the front wheels and holds a shimmy-shock stabilizer. Bailey says the device keeps a small amount of pressure on both of the wheels and holds them stable, especially when he drives at road speed on paved roads. Bailey’s device doesn’t hinder steering the tractor or cut down on the radius he can turn.

“People have looked at this setup and told me I should’ve patented it a long time ago,” Bailey says.

“It’s really not that difficult to make if a person can cut a piece of flat metal to a template, drill a few holes, and mount it to the front spindle of the tractor.” Bailey says the concept should work on any Deere tractor with a standard narrow front end. He also thinks it would work on Farmall, Oliver, Case and other tractors with narrow fronts.

“I grew up on a farm and have been around tractors and machinery all my life,” says Bailey.

“Fixing the shimmy problem on that 1959 Deere made it a lot easier driving my tractor on paved or gravel roads.” Contact: FARM SHOW Followup, Lauris Bailey, 173 Bailey Hill Road, New Sharon, Maine 04955 (ph 207 778-4005).