Practical ideas from FARM SHOW MagazineSubscribe · Free issue · Send us your shop tip
Subscribe to FARM SHOW
Issues / Vol. 33, No. 1 (2009)

Vol. 33, No. 1 (2009)

Money-Saving Repairs & Maintenance Shortcuts · Printed section pp. 36–39

37 selected entries · Complete text of selected entries

This issue’s section includes reader tips and feature-length shop stories. Held items and editorial notices are not reproduced.

Archive text: prices, coupons, availability and contact details reflect the original publication, not current offers. Reader methods are not universal instructions; follow manufacturer guidance and proper safety practices.

Reader shop tips

From the archive · Full text
Reader shop tip 1 of 2

Ronald Adams

Individual tip 1 of 2 from this reader’s published contribution.
Ronald Adams, Louisville, Miss.

“I had a bearing on the end of a shaft go bad. The dealer said the machine had to be completely torn down to press it off. Instead, I welded a piece of pipe to the bearing and then welded a flat bar across the end of the pipe. I then used two bottle jacks to pull the bearing off. Took me only about two hours.

From the archive · Full text
Reader shop tip 2 of 2

Ronald Adams

Individual tip 2 of 2 from this reader’s published contribution.
Ronald Adams, Louisville, Miss.

“One handy tool in my shop is an old child’s swingset. A chain fall is attached to it to pick up the front end of my riding mower when I need to sharpen the blades. Also makes it easy to pull the deck off.”

From the archive · Full text
Reader shop tip

James Sheets

James Sheets, Marengo, Ohio

To keep the adjusting screws on carburetors from vibrating out of adjustment, Sheets suggests locking them in place with a nut instead of the springs that are normally used.

From the archive · Full text
Reader shop tip

John Porter

John Porter, Albion, Mich.

“Don’t throw old socks away. Fill them with sawdust, tie off the ends, and put them in a plastic bucket. When you want to chink up a cold draft at a door or window – or if you need to soak up a big water or oil spill – you’ll be ready.”

From the archive · Full text
Reader shop tip 1 of 2

Chad Travis

Individual tip 1 of 2 from this reader’s published contribution.
Chad Travis, Drasco, Ark.

“A common problem with front tractor wheel rims is that the lips can get bent, allowing dirt to get under the bead. I use my tractor in the woods to pull logs and also to run a homemade rock picker. So it gets used hard.

“To keep the rim from bending, I take the tire off the rim and then weld a 3/8-in. metal rod inside the lip. I weld one end in place and then bend and hammer on it as needed to fit it into place around the rim, welding as I go. This works well and can be done on most all sizes of wheels. I use a piece of string to measure how long a rod is needed.

From the archive · Full text
Reader shop tip 2 of 2

Chad Travis

Individual tip 2 of 2 from this reader’s published contribution.
Chad Travis, Drasco, Ark.

“I had a problem with tubeless tires leaking at the bead. I solved the problem by applyng bin sealer - normally used to seal feed bins where the metal sections overlap - on the bead before inflating the tire. The sealer squeezes out when inflating the tire, so any excess material can be peeled off with a putty knife and reused. I’ve used this method several times with good results.”

From the archive · Full text
Reader shop tip

Mark Snider

Mark Snider, Cle Elum, Wash.

To adjust nuts on long all-thread bolts, Mark cuts deep sockets in half and welds the two parts of the socket to either end of a piece of heavy-wall pipe. Then he can use an air gun to turn the homemade tool.

“We use tools from Harbor Freight for this because they’re cheap. We also buy their wrenches to cut up and bend to make tools for special applications,” says Snider.

From the archive · Full text
Reader shop tip

Dan Miles

Dan Miles, Dalton, Neb.

“I use small, high-quality pallets from computer equipment shipments to make wheeled dollies for my shop. I buy caster wheels, attach them to the corners, and put all kinds of things on wheels in my shop. It’s much easier to clean and it’s easier to move things around in a packed shop.”

From the archive · Full text
Reader shop tip

Howard L. Marolf

Howard L. Marolf, Montrose, Co.

“I’m retired but work on restoring tractors in my shop. I added an extension to the side of my farm shop to work on tractors in the winter. The walls are made from corrugated fiberglass to let lots of light in and solar heat. It’s a nice work space.”

From the archive · Full text
Reader shop tip

Neal Darsby

Neal Darsby, Red Level, Alabama

“I took a large poultry house fan and built a frame on wheels for it that lets me wheel it around the farm. It provides great ventilation in the summer when working on equipment in the shop, and I also use it in the barn when flies are bad. The horses love it.”

From the archive · Full text
Reader shop tip

James Turner

James Turner, Rector, Ark.

“I came up with a way to keep water from getting into a padlock and freezing during cold weather. I cover the padlock with a sandwich bag, zipping the bag shut as far as I can.”

From the archive · Full text
Reader shop tip

Duwayne Bakker

Duwayne Bakker, Riverton, Wyoming

“Those crank jacks everyone uses take forever to raise. Here’s a way to crank up a jack quickly and easily. I weld a 1/2-in. drive socket to the jack and use an electric drill to crank it up.”

From the archive · Full text
Reader shop tip

Al Smith

Al Smith, Springfield, Vt.

“I came up with a way to fix the 4-WD gearshift lever on my 1995 Ford F-150 pickup. One day the lever wouldn’t move so I pushed it with my foot and unfortunately broke the aluminum metal plate around it. So I bolted the rod and transmission lever to a 1/4-in. thick steel plate. Works great and now the lever never pops out of 4-WD, even in rough 4-wheeling conditions.”

From the archive · Full text
Reader shop tip 1 of 4

Michael G. Scott

Individual tip 1 of 4 from this reader’s published contribution.
Michael G. Scott, Junction, Texas

“When the engine went out on my 1980 Chevy 1-ton dually pickup, I replaced it with the engine and transmission out of a wrecked 1990 Chevy 3/4-ton. It fit perfect. Later I stripped the wrecked pickup all down for parts.

From the archive · Full text
Reader shop tip 3 of 4

Michael G. Scott

Individual tip 3 of 4 from this reader’s published contribution.
Michael G. Scott, Junction, Texas

“Sometimes I need to weld at the other end of my shop, so I made a 100-ft. long, 220-volt extension cord. I keep the cord coiled up inside a 5-gal. bucket for easy storage. I just plug the cord in and take the other end to my welder or wherever I need it.

From the archive · Full text
Reader shop tip 4 of 4

Michael G. Scott

Individual tip 4 of 4 from this reader’s published contribution.
Michael G. Scott, Junction, Texas

“I use old freezers and refrigerators as storage units in my shed. Each model has a specific use - electrical, plumbing, welding, sur-veying, fencing, truck parts, tractor parts, pesticides and herbicides. The freezers and refrigerators are air tight and clean, and they make it easy to find whatever I need.”

From the archive · Full text
Reader shop tip 1 of 2

Joe Pozsgai

Individual tip 1 of 2 from this reader’s published contribution.
Joe Pozsgai, Capac, Mich.

“I had a piece of machinery in which the articulation pin would often seize up because the grease zerk was hard to reach. To solve the problem I ran a grease gun hose to the fitting, installing a coupler to keep the hose in place. It stays there permanently. Now I can grease the articula-tion joint standing up instead of having to crawl underneath.

From the archive · Full text
Reader shop tip 2 of 2

Joe Pozsgai

Individual tip 2 of 2 from this reader’s published contribution.
Joe Pozsgai, Capac, Mich.

“Another thing I did to make greasing easier was to buy a Lincoln electric grease gun. It really works well and makes greasing zerks a much easier job.”

From the archive · Full text
Reader shop tip

John W. McClain

John W. McClain, Panguitch, Utah

“I have degenerative spine disease as well as asthma and arthritis so my strength and stamina are very limited. I converted a hydraulic engine hoist, using two small wheels and a 2-ton winch, to do all my heavy lifting.”

From the archive · Full text
Reader shop tip

Glenn Sethre

Glenn Sethre, Longview, Wash.

“I first became aware of Teflon thread seal tape in the early 1960’s when it became widely used in the oil fields of western North Dakota and eastern Montana. Since then, I’ve used it in all sorts of applications such as propane and natural gas lines, high and low pressure water fittings - any place there’s a joint.

“Some people say this tape doesn’t work, but I think it’s just a case of not knowing how to use the product. It has to be wrapped in the right direction on the male thread. Wrap the tape in the direction that you turn the female on to the male - the same as a nut on a bolt. On plastic or brass, it’s hard to start the tape on the slippery threads. To solve the problem, I use a hacksaw blade to scratch the threads at a right angle with the teeth of the blade. I do this around the male thread three or four times on most fittings or on pipe. The slight marks left by the blade give the tape something to grip.”

From the archive · Full text
Reader shop tip 1 of 2

Buck Trimble

Individual tip 1 of 2 from this reader’s published contribution.
Buck Trimble, Mt. Sterling, Ky.

“I have arthritis so my hands don’t work as well as they used to. To help remove clip pins from the tractor drawbar, I came up with a little tool that works great when changing implements. It’s especially handy when I’m working with gloves on. The tool is a slim, long neck screwdriver. I used a small propane torch to heat the blade in my vise so I could bend it into a hook.

“The screwdriver I used happened to have a rubber handle so it really works good. The screwdriver’s long stem really comes in handy if I have to reach under the drawbar. I mounted a small I-hook on my tractor’s rear fender so I can keep this tool with the tractor all the time. Most of the time when I pull a clip pin out it stays on the screwdriver. If I drop the pin on the ground I can just reach down and hook it without having to remove my gloves.

From the archive · Full text
Reader shop tip 2 of 2

Buck Trimble

Individual tip 2 of 2 from this reader’s published contribution.
Buck Trimble, Mt. Sterling, Ky.

“Another idea - I mounted a plastic no. 3 coffee can on one of the tractor’s rear fenders, where I keep extra pins and bushings for Cat. I drawbars when I change to different implements. I drilled several 3/8-in. dia. holes in the bottom of the can to let any water drain out. This way I always have the pins and bushings handy and don’t have to look for them when I need them.”

From the archive · Full text
Reader shop tip

W. A. Gibbs

W. A. Gibbs, Elmwood, Tenn.

“The points and condenser on my gas-powered dozer always used to have a short life. To solve the problem I installed a solid state ignition module sold by a company in California (Pertronix Performance Products; ph 909 599-5955; www.pertronix.com). It’s designed to greatly increase spark plug voltage. Now the dozer starts and runs like new.”

Shop feature stories

From the archive · Full text
Feature story

Is Your GM Diesel Hard To Start?

Featured source:

If you’ve got a GMC or Chevy Duramax diesel pickup that tends to stall or is difficult to start, chances are the fuel filter adapter is defective. Replacing it with a new one can cost $450 to $750 - and that doesn’t include the cost of a diagnostic analysis. Instead, you can save money by having the filter adapter completely rebuilt, says Dale Grose, Dmaxwrenchkit.com, Wenatchee, Wash.

His company rebuilds fuel filter adapters for Duramax 6.6-liter diesel engines found on 2001 to 2008 Chevy 2500HD, 3500HD, and C4500 Topkick and Kodiak Duramax models.

“The problem is the fuel filter adapters on these engines were badly engineered, and they all fail eventually,” says Grose.

“The filter adapter begins to leak air which results in a compromised fuel delivery system. Part of the problem is that GM put their filter adapter on the market before ultra low sulfur diesel fuel came on the market, not realizing that the new fuel can cause the adapter to fail.

“Also, to protect the injectors, GM changed the fuel filter to a dual element filter from a single element, which unfortunately increased fuel restriction. The company has never solved the problem so any replacement part you buy, whether it’s from a dealer or a junk yard, will eventually fail because it will have the same design problems.

“I have five years of experience with Duramax diesels and 15 years of experience with diesel and biodiesel fuel systems, so I know exactly what the problems are with these filter adapters and how to fix them.”

Grose charges $250 to have the fuel filter adapter rebuilt and provides a limited lifetime warranty.

Contact: FARM SHOW Followup, Dale Grose, Dmaxwrenchkit.com, P.O. Box 1801, Wenatchee, Wash. 98801 (ph 425 216-9082; [email protected]; www.Dmax wrenchkit.com).

From the archive · Full text
Feature story

Rolling Oil Pan Made From Barrel

Featured source:

Mark Snider, Cle Elum, Wash., made an oil pan on rollers to catch drain oil from engines. It holds about 12 gal. After filling, it can be wheeled out of the way.

He started out by cutting the center out of the top of a 55-gal. barrel, leaving a 1 1/2-in. lip on which he screwed down a 1/4-in. crusher screen.

“I cut down 1 1/2 in. from the top of the barrel and removed it. Then I cut the barrel 8 in. up from the bottom lip,” says Snider.

“Next, I forced the top ring that I had re-moved, over the bottom 8-in. barrel and welded it on. A valve on the side of the pan drains out the oil. To completely empty the barrel, I welded the bung from the top of the barrel to the bottom. Then I made plates and gussets to which I attached small wheels.”

The lid came off a Stoody welding wire tub. A fold-down handle makes it easy to tow around.

Contact: FARM SHOW Followup, Mark Snider, 210 Reed St., Cle Elum, Wash. 98922 (ph 509 674-8051).

From the archive · Full text
Feature story

Magnet Light Sticks Anywhere

Featured source: Striker

Sometimes you’re working in an area that’s so tight it’s difficult to use a flashlight.

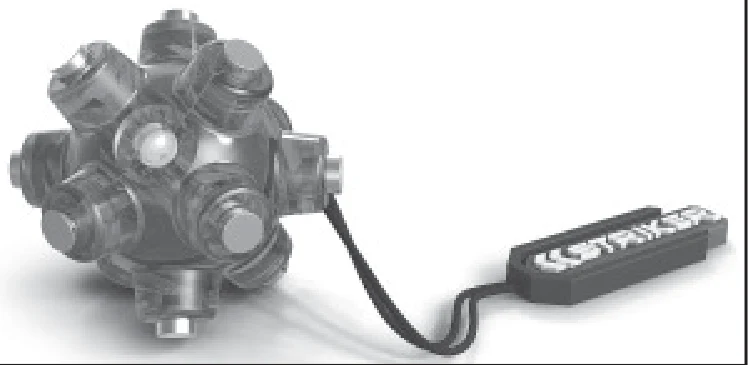
That’s why a North Carolina company came up with this golf ball-size magnetic LED light that mounts anywhere there is metal: on a breaker panel, near an engine or tire, under a sink. or on the back of an appliance that needs to be repaired. A dozen rare earth magnets allow the light to be positioned to light up in any direction. And as a bonus, the magnets can be used to pick up a metal screw or part that has fallen.

Striker says it’s a perfect tool for automotive technicians, electricians, plumbers and HVAC contractors, and, of course, do-it-your-self farmers.

“It will stick to the fridge, making it the go-to flashlight for the whole family, and it’s great to have on camping trips,” the Striker website says.

“The options are endless.”

The intensely bright, wide angle LED light is powered by three alkaline button cell batteries (included) and retails for right at $8.

Contact: FARM SHOW Followup, Striker, 200 Overhill Drive, Suite C, Mooresville, N.C. 28117 (ph 704-658-9332, [email protected]; www.strikerhandtools.com).

From the archive · Full text
Feature story

Epoxy Penetrates, Strengthens Wood

Featured source:

A fast-hardening epoxy product is catching on fast with wood workers, contractors, body repairmen and handymen.

PolyAll 2000 is a two-part polyurethane product that mixes and pours like water and has great penetration. It was developed several years ago by members of the Guild of Automotive Restorers located in Bradford, Ontario.

“They do a lot of work on antique boats and cars with wood bodies,” explains Henry Mengay, a distributor for PolyAll 2000.

“They tried different products and mixes and came up with something to stabilize and larly at his farm - to fill and stabilize rotted windowsills, gate posts, stair railings, the wooden floor in his horse trailer, for fixing furniture and even body work on his Dodge 250. On a deck you can fix any rotted or weak areas. Drill holes, pour PolyAll in and it will PolyAll has a long shelf life even after the container is opened.

Contact: FARM SHOW Followup, PolyAll 2000, P.O. Box 1150, Bradford, Ontario, Canada L3Z2B5 (ph 905 778-9010; [email protected]; www.PolyAll.com).

From the archive · Full text
Feature story

Converting Generators From 6-Volt To 12

Featured source:

No need to switch to an alternator for better starting on an older tractor. G&R Rebuilding will convert your original generator from 6 to 12 volts so everything is original except the starting power.

“We gut the generator and replace the internal components,” says Greg Snow.

“You’ll still have the original generator on your tractor so the appearance won’t change like it would with an alternator.”

The way an otherwise perfectly restored tractor looks with an alternator is one reason his business is booming.

“We’re constantly looking for old generator cores to rebuild,” says Snow.

He usually charges $150 to rebuild the generator and another $50 for a regulator. Often that’s all that’s needed.

“Going from 6 to 12 volts is easy with most tractors other than the Ford N-Series,” he says.

“Most models can use the original 6-volt starter but the way the N-Series starter is built, the drive comes in backward, and with 12 volts it will turn so fast it can tear up the flywheel. With the N-Series, you need to rebuild the starter too.”

While that rebuild can run another $150 to $175, it’s a “clean” rebuild, Snow adds, as no solenoid is needed.

Most 6-volt starters are heavier duty with larger wires than on a 12-volt starter. Snow says the wire size has a lot to do with whether the starter needs to be rebuilt.

In addition to 6 to 12-volt conversions, G&R does general remanufacture of starters, generators and alternators. They also carry a full line of standard replacements for auto, truck, marine, ATV and industrial vehicles. They rebuild all types of DC motors as well.

Snow says the biggest challenge with rebuilding (outside of rust) is finding parts to work with. He says he spends a lot of time trying to track down good quality parts. If he doesn’t have the parts for a rebuild available, he may make them. He makes many of his own bushings and starter posts as well as re-builds drives.

If he can, he will repair damaged parts, such as nose housings for starters. If not, finding the parts can be difficult and expensive when they are found.

“I had a customer who needed a John Deere 70 starter,” he relates.

“I had to pay $370 for an old core out of a scrap yard with no guarantee it would work. Guys who know what they have, know what they can charge.”

Snow says he takes pride in doing the job that he is given and doing it right. He says he has only failed to find a part twice in 28 years.

“You can always send a part off to be made, strengthen old wood. It also works with rusted metal and fiberglass as it penetrates well and sets up much faster than fiberglass resins. It sets up so quickly that it can harden as it pours. It’s good in the field as a quick, yet enduring fix for fiberglass snowmobile and ATV parts. It sets up more slowly when cooled to just above freezing - about 30 minutes - which allows a longer working time. At room temperature it hardens in three minutes.”

Within 10 min. the epoxy is hard enough to saw, sand, drill, paint or do anything else you can do with wood, cement or metal.

Mengay says he uses PolyAll 2000 regu-but it may cost more than it is worth,” he says.

“John Deere 70 nose cones break a lot. I checked with a foundry to see if they could get a housing recast, but tooling cost and startup required a minimum order of $100,000.”

Snow says he is constantly searching for cores and other replacement parts he can buy. He told FARM SHOW he would welcome calls from anyone with parts they were willing to sell. Often all he needs is a part number, such as is found on the tag on all Delco parts. He notes that prices even for cores can vary dramatically from $5 to $100.

Contact: FARM SHOW Followup, G&R Rebuilding, 460 N. Prior Ave., St. Paul, Minn. 55104 (ph 651 644-7743 or 888 210-7743; fax 651 644-2231).

stabilize it, Mengay explains. It penetrates and strengthens the wood and seals against water, contamination, insects, mold and fun-gal damage. It’s also popular with contractors for restoring hard to replace insect damaged or rotted logs in log buildings. It can be colored with powdered, organic dyes and used with fillers like sawdust, sand and metal powders.

“We’re also looking at trying to get involved with disaster work companies, where a lot of the problem is water damage,” Mengay says.

PolyAll 2000 is sold in three sizes: $20/ 8oz., $40/32 oz., and $60/64 oz. (plus S&H).

From the archive · Full text
Feature story

Hand Units “Bend And Hem” Sheet Metal

Featured source: A.G. Zalal

The Duo Bender and Disc-O-Bender are great tools for anyone who works with sheet metal. The Duo Bender bends sheet metal edges into 90 degree legs. The Disc-O-Bender takes edges the rest of the way from 90 degree legs to 180 degree hems. The Mini Disc-O-Bender can even hem curved edges.

“Metal roofing contractors and sheet metal contractors have to use a bender or other hemming device,” says A.G. Zalal, North American Bocker.

“The Duo Bender, Disc-O-Bender and Mini-Disc-O-Bender will bend and hem any length quickly and easily.”

The Duo Bender can be set for legs with a length of up to 14 in. and up to 24 gauge in most materials. Engraved scales on the metal legs make it easy to set and adjust lengths to be folded. Simple one-handed back and forth movements quickly bend the metal into a 90 degree leg.

The working edge of the Disc-O-Bender slips over legs from 3/8-in. to 1 1/4 in. long. Again, it’s simple back and forth movements that bend the leg down to a maximum 180 degree hem. It works on thicknesses of up to 0.031 in. (22 gauge in stainless steel) for common materials. The company promises no damage to painted or coated material.

The Duo-Bender and the Disc-O-Bender are each priced at $950. The Mini Disc-O-Bender is priced at $498.

Contact: FARM SHOW Followup, North American Bocker, 302 West Lane St., Raleigh, N.C. 27603 (ph 919 832-8481 or 888 262-5371; fax 919 832-8493; [email protected]; www.nabocker.com).

From the archive · Full text
Feature story

Windshield Adhesive Great For Many Uses

Featured source:

Roger Gutschmidt turned a 3M product called Urethane Windshield Adhesive into a multi-use product.

“It’s made primarily for adhesively bonding windshields into frames on cars, tractors and combines, but I use it for a lot of other mending jobs as well,” he says.

“It sticks well to rubber, concrete, plastic, wood, leather, steel, aluminum, and glass, of course. Just the other day I repaired my work boots with it. The soles were coming loose from the rest of the boot.”

Another thing it works great for, according to Gutschmidt, is tires. If he has a break or cut on the sidewall or bottom, he uses the adhesive to close the gap.

“If you have a scar on a tire surface, you can also mend it with this product so it’s undetectable,” he points out.

“It dries to the consistency of rubber. Or if you have a pair of overshoes, chest wad-ers, etc., just smear it on the rip or punc-ture, and it will be there to stay. The boots won’t leak. It’s a wonderful product and I’ve used it for years.”

Urethane Windshield Adhesive comes in a caulking tube and costs about $10. It’s available online from any auto supply store such as NAPA.

Contact: FARM SHOW Followup, Gutschmidt Manufacturing LLC, Roger Gutschmidt, 6651 Hwy. 56, Gackle, N. Dak. 58442 (ph 701 698-2310; [email protected]).

From the archive · Full text
Feature story

Hard-To-Find Ford Tractor Parts

Featured source: Red Rock Manufacturing

Red Rock Manufacturing is the place to go for Ford N-Series tractor parts developed by aftermarket companies. Phil Smith started with one product, the Dowden Foot Feed, in 2002 and keeps adding new parts every year. Today there are more than 35 different parts. Recently Red Rock added engine mount adapters for Ford Flathead V-8 and GM V-6 conversions.

“This started as a part time business,” says Smith.

“I still work as a mechanical engineer, but Red Rock is getting busier all the time. The phone still hasn’t stopped ringing after FARM SHOW ran a reader’s ‘best buy’ letter about my Automatic Fuel Shut-Off Valve.”

Smith doesn’t stock used parts; he repro-duces them. Some parts are unique to Ford, while others are universal to most makes of older tractors. Smith says the nature of Ford N’s and their popularity gave birth to lots of aftermarket products.

“These old Fords were pretty basic when they were introduced in the 1940’s and early 1950’s,” he explains.

“Other smaller companies started making accessories for them. Now many are hard to find and often expensive, so I began to reproduce some of them.”

The biggest seller remains the gas gauge, but the product list includes any number of interesting and useful add-ons, like the Sherman transmission re-build kit. It slips between the engine and the stock transmission to give N-Series tractors 12 speeds forward.

“They were easy to add,” explains Smith.

“You just split the tractor and removed a short shaft and slipped in the Sherman. There were a lot of them made. I have a complete rebuild kit with bearings and seals. I also make a replacement for a cast iron shift lever for the Sherman. It was easy to break.”

Some other Red Rock products include FarMech and Arnco parking brake levers, Calhoun Kwik-Hitch drawbars, Greene Engineering Drawbar Locks, Steelcraft Umbrella Holders, Sherman Transmission Cable-to-Lever Kits, and V-drawbars. Often the reproduction parts are designed to outlast the originals. The V-drawbars, for instance, are laser cut from a single piece of steel for added strength.

If Sherman doesn’t have what you’re looking for, he just might add it to his product list.

“We’re always looking for other off brand tractor accessories to replicate,” he says.

“Anyone with an idea should let me know.”

Contact: FARM SHOW Followup, Red Rock Manufacturing, 1117 Park Lane, Pella, Iowa 50219 (ph 641 780-1748; rrm @iowatelecom.net; www.redrockmfg.com).

From the archive · Full text
Feature story

Quick Latch For Farmall M Brakes

Featured source:

Todd Quatier got tired of reaching down to lock the brakes on his Farmall M. He came up with a simple latch that allows him to use his left foot to trigger a lock on the brakes as he steps on them with his right foot.

“I made a couple for my own tractors, and when friends saw them, they wanted them, too,” he says.

“Then I sold a few on eBay and started making five to ten at a time. Pretty soon I was making 20 to 30 at a time during evenings and weekends.”

While Quatier hasn’t given up his day job, he is continuing to sell the parking brake latch for Farmall M and Super M’s. He’s also working on a similar latch for the Farmall H.

Installation of the latches, which he sells for $19.95 (plus $5.95 shipping and handling) is easy. The unit is designed to use existing bolt holes in the transmission cover. Quatier says it takes less than five minutes start to finish.

“Just remove the two bolts and mount the latch,” he says.

“I use slightly longer bolts, but that may not be necessary. I’ve never yet had anyone have a problem with installation or operation.”

Contact: FARM SHOW Followup, Valley View Fabrication, 30539 446th Ave., Mission Hill, S. Dak. 57046 (ph 605 665-2881 (evenings); [email protected]).

From the archive · Full text
Feature story

Farm Shop Made With Highway Guardrails

Featured source:

Richard Stephens built a 40 by 60-ft. shop using 14 and 26-ft. long sections of highway guard rails for the framework.

“A guy stopped by offering used guard rails for sale when a local highway was being re-built. I bought a few, thinking I would use them for cattle feeder skids,” recalls Stephens.

“After looking at them a while, I ordered a whole load.”

He welded them together back-to-back, which created a natural set of flanges. Stood on end, they created ideal surfaces to bolt cross members before putting on siding.

Putting up the shop was not simply a matter of welding guardrails into girders, however. Stephens designed a truss system that he assembled on the ground. It consisted of guard rails, 10-in. dia. log rafters and 2 by 6’s for roof braces. To create strength in the girders and in sidewall braces, splices were always overlaid. In the case of the girders, to get the 40-ft. span, Stephens used four 26 ft. guardrails, i.e. a 26-ft. rail was welded face to face with a 14-ft. rail. Then a second 26-ft. rail was butted to the 14-ft. rail with a second 14-ft. rail butted to the first 26-ft. rail. Once butts and seams were welded, Stephens had an extremely strong 40-ft. beam. Gusset plates made from 3/16-in. steel plate were welded over the seams. They extend up to act as anchor points for vertical supports.

Six trusses were assembled on the ground. Each truss consisted of two uprights, a span, a center post, two rafters and two mid point supports. Stephens then poured cement piers for each upright with steel rebar in it and extending to the surface, where a faceplate was welded in place.

When the first truss was lifted into place, he discovered the weight of the rafters was too great. It bent the gusset plates. He then reinforced each truss where the log rafters and their supports met the guardrail girders.

As additional trusses were lifted into place, Stephens began attaching the 2 by 8-in. sidewall supports, bolting them to the facing flanges. The 2 by 8-in. boards were also spliced with a length of 2 by 8-in. board over-laid and spiked to both ends.

purlins, giving them a flat top for the metal roof to be attached. These were nailed to the rafters. Before the center beam was lifted into place, it was notched to receive the ends of rafter end gusset plates.

“Once we covered the sides and roof with cial steel building,” says Stephens.

“It has stood up well to high winds, and the trusses support a lot of weight.”

Contact: FARM SHOW Followup, Richard Stephens, 14400 N Rock Creek Lane, Haines, Oregon 97833 (ph 541 856-3429).

From the archive · Full text
Feature story

“Tumbler” Restores Rusted Gas Tanks

Featured source:

Anyone who needs to restore a gas tank for an antique car or tractor will be interested in this gas tank “tumbler” built by Scott Farley of Oswego, N.Y. It lets him thoroughly clean out rusted tanks.

“It rotates like a rock tumbler to scour the tank’s interior. When I’m done the tank is in better than new condition,” says Farley.

Farley owns Farley’s Radiator Shop, which offers cleaning and repair of up to 35-gal. fuel tanks. His machine is powered by an industrial electric motor, which belt and chain-drives a 1 1/4-in. dia. shaft that extends about 4 ft. beyond the machine’s frame. A wheel bearing is welded to the end of the shaft and a wood frame attaches to the bearing. The tank being repaired is held to the wood frame by bungee cords.

To use the machine, Farley drops a 24-in. length of heavy chain, along with fine white sandblast sand, into the tank and then rotates the tank at low speed for an hour. Then he turns the tank 45 degrees after emptying it out and refilling it with clean sand. After another hour the entire tank will be scoured clean.

“When finished, the inside of the tank re-sembles that of a sandblasted surface, which the rust-proof coating bonds to easily. The exterior is then sandblasted and coated with polyurethane, which preserves the outside as well,” says Farley.

“This machine is quite labor intensive so it’s not the answer if you can buy a replacement tank cheap. I came up with the idea because customers would come to me with tanks so full of rust they were almost unrepairable, yet they couldn’t find a replacement tank. As far as I know there’s nothing on the market like it.

“In the past we would drain the tank and purge the fumes, then acid dip and steam clean the tanks the best we could. That process removed loose rust and debris, but it would leave behind light rust and pitting. We then applied a coating inside the tank, which unfortunately trapped the rust. In 5 to 10 “Every tank is different so I have to make a new wood frame for each tank, which can be time consuming. If the tank has baffles, I have to cut a hole through the side of the tank to access the area behind the baffle, then weld the baffles back shut again.

Contact: FARM SHOW Followup, Scott Farley, Farley’s Radiator Shop, 263 Ridge Road, Oswego, N.Y. 13126 (ph 315 343-7741; [email protected]; www.farleysradiator.com).

From the archive · Full text
Feature story

Auger Sleeve Reinforces Deere Unloading Auger

Featured source:

“When the unloading auger on my Deere 9650 STS combine got a kink in it, I repaired it with a reinforcing sleeve that fits over the damaged section,” says Roger Gutschmidt of Gackle, N. Dak.

“I’m also installing a transport cradle for extra support.”

He says he believes the area that kinked is a weak spot on Deere combines. His unit had about 1,500 separator hours on it when he had the problem, with a lot of use in corn and soybeans.

“The auger tube had worn thin in that area from all those bushels going through it, and then we had some exceptionally heavy wheat last year,” he says.

“The original sheet metal in that area is only 18 ga., which is thinner than the thickness of a dime. After running about 200,000 plus bu. of grain through it, it ends up being paper thin.”

To solve the problem, Gutschmidt had a special 12 ga., 4-ft. long clamp made at a machine shop in Jamestown, N. Dak. While that was being done, he straightened his auger tube by first positioning his combine so the header of his shop door was just above the damaged area.

“I laid a 2 by 6-in. board on top of the tube and braced a 4 by 4 between it and the header. This gave the auger tube some support when I lifted on the far end of the auger with a hydraulic jack. I jacked up on the tube until the auger was a little past the straight position and pulled out the dents,” he explains.

To remove the dents, Gutschmidt welded several flat washers to the kinked areas, and then used a slide hammer to pull them out.

“My slide hammer is a homemade device. It’s a Vise-Grip pliers with a long rod and a heavy weight that slides back and forth on the rod,” he points out.

“I clamped it onto the washers, pulled out the dents, and then ground the washers off with my 4 1/2-in. grinder. I accidentally made some small holes, but they don’t show because the clamp/sleeve covers them.”

For added strength, Gutschmidt made a 6 by 24-in. reinforcement patch and welded it over the once-kinked area. The patch is 12 ga. sheet metal and wraps around the auger tube up each side of the damaged area. He drilled several holes in the patch to spot weld it to the auger tube.

Once his new 12 ga. by 4-ft. clamp arrived, Gutschmidt removed the auger’s end spout and light bracket, and then slid it on from the end, positioning it over the previously kinked area. He then tightened up the 12 bolts that snugly hold the clamp in place.

He painted his handiwork with matching paint, resulting in a professional looking finished product.

“I wanted it to look like it came from the factory that way,” he says.

Gutschmidt says he can supply other farmers with this type of reinforcement kit, allowing them to install it as either a preventative measure or as an economical repair.

Contact: FARM SHOW Followup, Gutschmidt Manufacturing LLC, Roger Gutschmidt, 6651 Hwy. 56, Gackle, N. Dak. 58442 (ph 701 698-2310; [email protected]).