Practical ideas from FARM SHOW MagazineSubscribe · Free issue · Send us your shop tip
Subscribe to FARM SHOW
Issues / Vol. 26, No. 5 (2002)

Vol. 26, No. 5 (2002)

Money-Saving Repairs & Maintenance Shortcuts · Printed section pp. 38–41

34 selected entries · Complete text of selected entries

This issue’s section includes reader tips and feature-length shop stories. Held items and editorial notices are not reproduced.

Archive text: prices, coupons, availability and contact details reflect the original publication, not current offers. Reader methods are not universal instructions; follow manufacturer guidance and proper safety practices.

Reader shop tips

From the archive · Full text
Reader shop tip

Byrl Cogburn

Byrl Cogburn, De Leon, Texas

“My Deere 435 round baler has dual twine tie arms which allow it to wrap two lines of twine at the same time. It uses a pair of twine ‘brakes’ which hold tension on the baler twine as it’s being wrapped on the bale. There are two of these brakes, one on each side of the baler. These brakes get grooves worn in them over time and don’t hold the proper tension on the twine. I figured out that I could switch the brakes around to their opposite sides and they would pull the twine in a different place on the brake, avoiding the grooved areas. I was right. They work like new now and it didn’t cost me a thing.”

From the archive · Full text
Reader shop tip

John Beechy

John Beechy, Topeka, Indiana

“I like my White 5400 air planter, but I had to replace one of the four 12-volt motors soon after I got it. Later I noticed the motors slowing down. It seemed to me there should be a way to lubricate them. I drilled small holes - using 1/16 and 3/32 in. bits - in each of them in the housing over the shaft and also where the squirrel cage fans pivot. The holes allow me to oil the the shafts occasionally with light oil. I usually oil them when I fill the fertilizer boxes. This has solved the problems with the motors slowing down or freezing up.”

From the archive · Full text
Reader shop tip

Bob Hudspeth

Bob Hudspeth, Era, Texas

“When my gas-powered weed trimmer wouldn’t start one day, I started a normal tune-up process. I put in a new spark plug, cleaned the air filter, and cleaned the carburetor. It still didn’t start so I thought it might be a bad coil. I put a new one in. No good. I removed it and ground the mating surface down to give it a bit more clearance. No good. I checked the carburetor again. As I was putting it back together, I noticed a tan-colored spot about 3/8-in. across on what turned out to be the muffler. Mystified, I probed it with a small screwdriver. To my amazement, I discovered that a wasp had laid an egg in a dab of ‘mud’ in the exhaust port on the muffler. With the muffler plugged, no air or fuel could flow to the combustion chamber in order to fire the engine. I thoroughly cleaned the muffler and it ran like a top.

“Next time one of my little gas engines won’t start, I guess you know what I’ll check first.”

From the archive · Full text
Reader shop tip

Frank Barber

Frank Barber, Decaturville, Tenn.

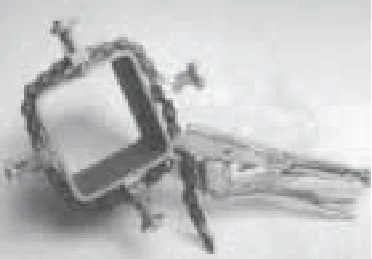
“I designed this line-up clamp out of necessity since I am a 30-year member of a Pipefitter’s union in Chicago. Having to make pipe welds in very confined spaces, we needed a small lightweight clamp. It consists of a pair of locking chain pliers with four movable alignment dogs.

“It will line up round, square, rectangular, hexagon, and other pipe of different diameters. It weighs under 4 lbs. and will work on pipe up to 5 1/2 in. dia. You can go larger by adding more chain and dogs. The extra chain comes in 18-in. lengths.

“We’re selling the tool direct through a company we started, Piddler Tool Co. It’s patent pending and sells for $135 plus $7.50 S&H. An extra length of chain is $10. Each alignment dog is $25 when purchased separately.”

Contact: FARM SHOW Followup, Piddler Tool Co., P.O. Box 295, Decaturville, Tenn. 38329 (ph 866 852-4818 or 815 942-6324).

From the archive · Full text
Reader shop tip 1 of 2

Dan Krenzel

Individual tip 1 of 2 from this reader’s published contribution.
Dan Krenzel, Cullman, Ala.

“Here’s a good use I found for JB Weld. I had a carburetor needle valve with worn-out threads, which caused the screws to wobble. I lightly vaselined the needle shank threads, then cleaned the carburetor threads well and put a small amount of JB Weld into the outer edge of the entry hole and screwed the needle in all the way. Then I built up the area around the screw with more JB Weld. After setting, the JB Weld held it nice and tight but the vaseline kept the needle from locking in place. Worked great.

From the archive · Full text
Reader shop tip 2 of 2

Dan Krenzel

Individual tip 2 of 2 from this reader’s published contribution.
Dan Krenzel, Cullman, Ala.

“I have a lot of small engines to keep tuned and I came up with an idea that saves a lot of neck bending and frustration. When I set the idler and gas needle valves, I always leave the set screw so the slot in the screw head is straight up and down. It sure makes a difference when I have to readjust since I know just how to insert the screw driver blade without searching for the slot. And the 1/4 turn from any position to straight up and down doesn’t make any significant difference in how the engine runs.”

From the archive · Full text
Reader shop tip

Marvin Finger

Marvin Finger, Rozel, Kan.

“When putting new rings on a motor that has removable cylinder blocks, I use two large worm screw clamps. I fasten them together and squeeze the rings in as I lower the cylinder block down. Two sets of clamps make it go faster. Just repeat the process for each piston as there are two pistons per block. This idea saves you from having to take the bottom pan gasket off, and lots of labor.”

From the archive · Full text
Reader shop tip

Thomas Empfield

Thomas Empfield, Indiana, Penn.

“Our battery charger is very easy to drag all over the farm since we mounted it on an old golf bag cart. Golf carts are designed to roll easily over uneven ground, which makes them perfect for farm use.”

From the archive · Full text
Reader shop tip

Edward Binsfeld

Edward Binsfeld, Little Chute, Wis.

“Before putting nuts and bolts in a coffee can or jar, put a shop towel in and then put the nuts and bolts on top of it. Then you can just pull the towel out with the nuts on it and set on a flat surface. When you’re done, you pick up the towel and put it back in the can. No mess and it’s quick.”

From the archive · Full text
Reader shop tip

David Gaskell

David Gaskell, Horton, Kan.

“I developed this adjustable roller stand for use in moving material into and out of a power saw. Multiple roller stands can be used as needed, depending on what you’re cutting. I made it from an old trailer jack. I first cut it down to the right length, and then welded it to a used 20-in. truck rim. A 16-in. roller attaches to the top. With a turn of the crank, a full load of materials can be adjusted to the desired height. Very handy.”

From the archive · Full text
Reader shop tip

Ernest Marolf

Ernest Marolf, Muscatine, Iowa

“I made a cargo carrier for my tractor that fits over the rear axle. It can be used to carry a tool box or bag of seed. There’s a 2 by 6 at the bottom with a pair of L-shaped brackets that hold it to the axle. A platform made of two 2 by 4’s rests on top. A couple of upright brackets hold a 1 by 12 up just inside the tire. I use rubber tie downs to hold cargo in place.”

From the archive · Full text
Reader shop tip

Lewis Leon Dick

Lewis Leon Dick, Mt. Hope, Kan.

“I’ve always had a problem with straw going around the end of the cylinder bars on combine cylinders. The result is that a hole gets worn through the metal in the side of the combine and you have to patch the holes. I’ve seen this happen on different makes of conventional combines.

“I found a way to eliminate the problem by welding 1 by 1 1/2-in. strips of 1/4-in. thick metal to each end of the concave. These small metal risers keep straw from going past the ends of the bars.”

From the archive · Full text
Reader shop tip

James O. Bass

James O. Bass, Vineland, N.J.

“Here’s an idea that makes it easier to pull tires off garden tractor wheels. I use a 12-in. piece of 3/4-in. all-thread bolt. It feeds up through a 1-in. hole in the top of my work bench and then through one of the holes in the wheel. Lets you quickly tighten the wheel down to make it easy to pull off the tire.”

From the archive · Full text
Reader shop tip

Donald L. Enterline

Donald L. Enterline, Jamestown, Penn.

“When you need to really secure a nut so it won’t come loose, just turn the nut onto the bolt a couple turns and then hit with a hammer to egg shape it a bit, then tighten it down. Won’t come off.”

From the archive · Full text
Reader shop tip

Francis B. Haines

Francis B. Haines, Galesville, Wis.

“I carry a dishwashing liquid bottle behind the seat of my pickup and also keep a bottle in the shop and in my tractors. It contains water with 25 percent dish soap. Works great to clean hands in the field or wherever I am.”

From the archive · Full text
Reader shop tip

Myron D. Hebbert

Myron D. Hebbert, Chadron, Neb.

“I use castor oil as a rim sealant on tubeless tires. It’s good for the rubber and makes any tire easier to dismount. Also helps prevent rim rust. I’ve used this idea ever since tubeless tires first came on the market. Just brush it on.

“One time someone suggested using transmission oil the same way but I think that would ruin a tire for patching and other future uses.”

From the archive · Full text
Reader shop tip

Larry Zenz

Larry Zenz, Parks, Ark

“While cleaning up after an ice storm, I came up with an easy way to splice broken fence wire. I stretch the wires so they overlap about 1 1/2 in. and then bend up about a 3/4-in. long piece at the end of each wire. I slip a washer over the ends, bend the wires back, then run a 1/4-in. bolt through the washer with a 1/4-in. washer on each side. Tighten it down and you’re done. The splice will hold till the cows come home!”

From the archive · Full text
Reader shop tip

Donald Winkler

Donald Winkler, North Platte, Neb.

“Our oldest son bought a used arc welder from the maintenance department of a local factory. It was a large D.C. welding generator driven by a 220-volt, 3-phase A.C. motor. They sold it cheap because it didn’t work properly. The problem was that the company had crossed the 220-volt input wires, which caused the armature to run backward. As a result it wouldn’t excite the generator fields. They tried using a car battery to excite the generator. This caused the generator to produce a D.C. welding current, but because the armature was rotating in the wrong direction, the commutator brushes arced terribly.

“Our son, John, pulled the A.C. motor armature off the common shaft that it shared with the D.C. armature. Then he coupled the shaft to a 4-cyl. Jeep engine and mounted everything on a 4-wheel trailer. The result is a portable gas-driven, D.C. welder. It has a lot of power and runs a strong, smooth bead.”

From the archive · Full text
Reader shop tip

Dave Woodwell

Dave Woodwell, Las Cruces, New Mexico

“I’ve had lower back problems for years, so wheelbarrows aren’t a very friendly tool for me. The lifting isn’t much of a problem. It’s the steadying of loose loads or going over uneven terrain. One wrong twist and I’m out of business for a week.

“I noticed some new wheelbarrows with two wheels at our local hardware store. I decided to modify my 3-cu. ft. wheelbarrow.

“I bought a second wheel and replaced the existing axle with a new, longer one that supports the two wheels. I used 1 by 3/16-in. flat stock to make braces, and a 24-in. length of 5/8-in. dia. steel rod to make the new axle. Holes were drilled in the ends of the axle to accommodate cotter pins. I cut the flat stock in half and drilled 5/8-in. dia. holes in one end and 1/4-in. dia. holes in the other. I bent the upper end of the braces to conform to the shape of the wheelbarrow and bolted them on. The lower ends of the braces mount on the axle inside the cotter pins. Braces probably aren’t necessary, but they sure make it look nice and stable. I’ve carried three bags of cement at a time with no problem.”

From the archive · Full text
Reader shop tip

Kenny Brandt

Kenny Brandt, 32748 I. Ave., Hubbard, Iowa 50122 (ph 641 864-3283)

“My John Deere B loader tractor, which is equipped with a narrow front end, steered hard. The conventional way to add power steering would have been to add a power steering pump and belt-drive it by adding a double pulley to the fan shaft. But to do that I would have had to remove the gas tank and radiator.

“Instead I replaced the original generator with a 12-volt alternator and mounted a double-grooved pulley on it. I went to a junkyard and found an old Pontiac power steering pump, which I mounted on the opposite side of the tractor using homemade brackets. It drives off the alternator. Then I mounted a Charlin hydraulic motor on the tractor’s steering shaft, just in front of the steering wheel. I drilled a hole through the steering shaft and bolted the motor to it.

Hydraulic hoses run from the pump to the motor.

“I bought the pulley new and spent about $25 on belts. I already had the Charlin hydraulic motor. My total cost was only about $75. Now I can steer the tractor with just one finger, even with a load on it.

“

From the archive · Full text
Reader shop tip

W.A. Gibbs

W.A. Gibbs, Elmwood, Tenn.

“I built this simple but easy-to-use puller using a 6-ton hydraulic jack. It’s amazingly handy to use.

“It consists of two 3/8-in. dia. all-thread bolts, which serve as spacers, connected together by a 1-ft. length of 3/8-in. thick flat stock. The all-thread bolts are bolted to a bearing separator. I used the system recently to remove a worn-out sealed bearing on a lawn mower deck. I turned the deck upside down, then clamped the bearing separator to the bearing housing and placed the jack on top of the deck’s shaft. To remove the bearing, I simply raise the jack to apply hydraulic pressure and push the shaft out.

“I also made a pair of long spacer arms that I use with the same setup. I recently used them to remove a hydraulic pump from my bull dozer when I had to rebuild the automatic transmission on it. The pump was down inside the transmission case and there was no way to get down in there and get hold of two bolts that keep the pump in place. I bolted the spacer arms to the pump. Then I placed a piece of wood across the top of the transmission case and set the jack on top of it.”

From the archive · Full text
Reader shop tip

Curtis Heinen

Curtis Heinen, C&D Developments, Box 269, Craik, Sask., Canada S0G 0V0 (ph 306 734-2728)

“Our new Grease Saver is an easy-to-use grease gun attachment that holds any standard grease needle firmly in place, making it easy to lubricate bearings. It consists of a s p e c i a l l y - designed sleeve that fits over a standard needle. You insert the needle into the grease gun fitting, slide the sleeve over the needle, and then use an allen screw on the sleeve to lock the needle in place. The easy-lock design prevents grease from pushing past the fitting so the grease gets to your bearings, not on your hands. The needle can be held in place with one hand, making it easy to operate the grease gun. Sells for $19.95 (Canadian) including S&H.”

From the archive · Full text
Reader shop tip

TeamWork Ag & Industrial Ltd.

TeamWork Ag & Industrial Ltd., Box 399, Ogema, Sask., Canada S0C 1Y0 (ph 306 459-2704)

“Our new Autostep makes it easy to work under the hood on pickups and trucks. It consists of a metal frame and platform that simply slips over one of the vehicle’s front tires. The platform measures 8 1/2 by 32 in. The unit can be used on any vehicle with a maximum 16-in. dia. wheel. Folds up to 6 in. for easy storage. Sells for $84.95 plus S&H.”

From the archive · Full text
Reader shop tip

Rodono Industries

Rodono Industries, Ltd., Rt. 1, Clive, Alberta, Canada T0C 0Y0 (ph 403 784- 3864; fax 403 784-2402)

“Our new pto speed reducer is designed to allow larger tractors with 1,000 rpm pto’s to run equipment at 540 rpm’s. It requires 800 rpm’s on the input shaft to provide 540 rpm’s on the output shaft. This enables a large tractor to run at less than full engine speed while operating the 540 machine at full rpm’s.

“The speed reducer uses a double chain coupler on the input shaft to simplify the alignment. Input couplers are available in either 1 3/4 or 1 3/8-in. dia. splines. The output shaft is 1 3/8-in. diameter.

“The gearbox is a high horsepower unit that weighs 195 lbs. so it needs to be rigidly mounted to the tractor. To simplify mounting, the gearbox is supplied with an attached steel base plate that can be drilled or welded as needed. The gearbox can also be special ordered for use as a speed increaser. Sells for $1,800 (Canadian) plus S&H.”

From the archive · Full text
Reader shop tip

Smith Tool

Smith Tool, 2505 S. Custer, Wichita, Kansas 67212 (ph 316 942-8632; fax 316 942-7738; Website

www.smithtool info.com): “Our new two-in-one Rivet Tool is designed to remove and replace both standard round-head and countersunk rivets. It allows you to replace sickle sections right on the machine. A two-way reversible anvil insert allows the tool to replace both types of rivets quickly and easily. The unit comes with a variety of parts including riveter screw, riveter sleeve, anvil, punch sleeve, and punch.

“It’s the ideal tool for anyone who has several machines with varying sickle section fasteners. The narrow body design fits all sickles including new double tooth sections. The tool comes complete with all parts and instructions.

“Sells for $69.42 plus S&H.”

Shop feature stories

From the archive · Full text
Feature story

New Cleaner Pulls Oil Stains Out Of Concrete

Featured source:

You can clean oil, grease, antifreeze, and other messy fluids from concrete with Pour-N-Restore, from Edgewater Industries, Spring Lake Michigan.

The product will also clean greasy stains from wood, tile, grout, paving blocks, and fiberglass. In most cases, the residues are completely removed, so the surface will hold paint or adhesives.

The company says Pour-N-Restore is a biodegradable citrus-based formula that combines the properties of a liquid degreaser with a dry absorbent. To use, clean up loose debris and scrape off any buildup. Then pour the liquid product over the stain so it extends an inch or so beyond the edge. Then just leave it for at least three hours and be sure it’s dry before proceeding. Cooler temperatures or low ventilation may extend drying times to 24 hours or more. Scrubbing is not recommended.

When Pour-N-Restore is completely dry, you sweep up the remaining powder. Tougher, deeper stains may take two applications or more.

A quart of Pour-N-Restore, enough to clean a 3-ft. diameter stain, sells for $9.95. A gallon is $29.95.

Pour-N-Restore is finding its way into automotive and building supply stores. If you can’t find it locally, contact Edgewater Industries for a dealer, or order directly from their Website.

Contact: FARM SHOW Followup, Pour-N-Restore, Edgewater Industries, 18570 Trimble Ct., Spring Lake, Mich. 49456 (ph toll-free 877 609-3343 or 616 846-7939; fax 616 846-1473; Website: www.pour-n-restore.com).

From the archive · Full text
Feature story

Track Turns Any Torch Into Straight-Line Cutter

Featured source:

Anyone can use a hand-held torch to cut a perfectly straight line through steel plate using this new “track torch”.

Kyle Palumbo, Welding Contractors, Union Bridge, Md., sells the “RK Torchmaster”, a 4-wheeled “tractor” that attaches to the torch. It measures 6 in. wide by 8 in. long and is fitted with four grooved steel wheels that ride on top of a piece of 6-in. channel iron which the buyer supplies. The Torchmaster is powered by a gear drive DC motor that runs on standard 110-volt electricity. A control box clamps onto the torch’s on-off lever, which is normally thumb-controlled, and is used to regulate the tractor’s speed as it goes down the track.

“It cuts a perfectly straight line which is virtually impossible to do freehand. It’s much less expensive than other commercial track torches because it doesn’t have a built-in track and torch,” says Palumbo.

“I came up with the idea a few years ago for use in my farm repair shop and have even hauled it in my service truck out to farms. It works so well that I decided to manufacture units for sale.

“The machine travels at infinitely variable speeds from 6 to 160 inches per minute in both forward and reverse. The speed you use depends on the thickness of the material you’re cutting. The torch can be adjusted up or down to fit any handheld cutting torch.”

Sells for $495 plus S&H. Contact: FARM SHOW Followup, Kyle Palumbo, Welding Contractors, Box 452, Union Bridge, Md. 21791 (ph 410 775-7003).

From the archive · Full text
Feature story

Angle Finder Tool

Featured source:

Whether you’re a woodworker, metalworker, or both, you’ll probably find a lot of ways to use this new “Angle Finder”.

The easy-to-use tool lets you accurately read any inside or outside angle directly from a scale. Or you can use it as a template to transfer a known angle directly to a workpiece, eliminating having to make a separate template.

Figliuzzi says his gauge can also be used to find the center of any cylindrical object, and the adjustable arms make it possible to find the centers of both large and small objects. In addition, it can also function as a miter gauge, a combination square, a bevel gauge, and a construction protractor. Its parallel arm construction also makes it easy to draw parallel lines.

Figliuzzi says it’s an indispensable tool for carpenters, cabinetmakers, pattern makers, boat builders and anyone with a home workshop.

“You may not use it every day. But when you do need to find or transfer an angle, it sure is handy to have one hanging on the wall.

“I also use it if I can’t find my carpenter’s square,” Figliuzzi says.

“You just set it at 90 degrees. The locking knob is sized to make it easy to grip when locking an angle setting.”

The Angle Finder also comes with a Lifetime Warranty and sells for $14.95 plus $4.95 for shipping and handling. Orders received by 2:00 p.m. Central time are shipped the same day.

Contact: FARM SHOW Followup, Joe Figliuzzi, JOEFIG TOOLS, 41502 Hunt Lane NE, Kelliher, Minn. 56650 (ph 218 647-8529 or 218 647-8200; fax 964 301-8057; E-mail: [email protected], Website: www.anglegauge.com).

From the archive · Full text
Feature story

First Class Portable Shop

Featured source:

One of the worst things about not living where you farm is not having easy and quick access to a good farm shop, says David Conlee, Moro, Ore., who farms rented land spread out across 25 miles.

He eliminated the problem by packing his entire shop into a 66-passenger school bus that he can take anywhere.

Behind the driver’s seat down the right side of the bus, there’s a valve grinder and a glass bead machine that he uses to clean and polish parts. Next are four big rollaway toolboxes full of hand tools. Beyond the toolboxes is a 25-ton hydraulic press that’s powered by a hand pump. Toward the rear of the bus, he mounted a set of oxygen and acetylene tanks and hoses, with an anvil right in front of them. Finally, in the back corner next to the anvil and gas welder is a welding table.

Across the aisle from the welding table, Conlee mounted a combination 9-kW generator and 350-amp electric welder, powered by a gasoline engine that’s vented out the side of the bus. He mounted the generator/welder up high in the back corner to make space underneath it for a 210-amp wire welder.

“The rear emergency door gives me easy access to the welding area,” he says. And anything that he can’t lift through the door, he can pick up and swing through with a hand-cranked cherry picker mounted on the rear bumper.

“It was built to go on a service truck, but I modified it slightly to make it fit and work the way I wanted it to,” he says.

Next to the generator, he installed a power panel and a power inverter from an old recreational vehicle.

“If I have access to a 220-volt outlet, I can plug in the entire bus and run my tools off that, rather than the generator. The inverter keeps the batteries charged up while we’re plugged in,” he says.

Moving forward from the welder, there’s a 2 hp grinder on a pedestal and then a floor model drill press. In front of these, located right over the wheel well, is a 5-hp electric-powered air compressor with a 20-gal. horizontal tank.

“This particular bus has an emergency door on left hand side, too. In front of the compressor, just behind the emergency door, is my metal band saw. If I have to, I can swing the saw around and run the stock I’m cutting out through the door,” he says.

In front of the door is a combination metal lathe and milling machine. ‘It’s a full-sized machine,” he says.

“The lathe will swing 12 in. and has a 36-in. bed.”

Ahead of the lathe/mill, he put what he intended to be a reading area.

“I put in a seat from the left side and one from the right side, so they’re facing each other and then put a table between them. By the table, I installed a lighted magnifying lens on a telescoping arm, thinking I could use that to read manuals and directions with my tired old eyes,” he says. The reading table has become more of a low workbench, where he can work on small parts while sitting down.

The bus came with a roof ventilation fan that works great for exhausting gases when Conlee’s welding inside the bus. He wired the bus with outlets every 6 ft. He also installed a refrigerator for keeping food and drinks cool.

“The bus has a 26 by 7 1/2-ft. useable area, with about 6 ft. 3 in. of headroom at the center. I spent quite a bit of time laying it out so everything would work without running into something else. I would set the tools in place, then go home, and sleep on it. The next day, I would bolt it down, or move it to a different location I thought might be better,” he says.

Conlee says it’s important to make sure everything is bolted down securely, too, so it stays put when you you’re headed out over rough ground or have to make sudden stop.

Conlee paid $1,900 for the 1987 bus. It has an International 392 gasoline engine in it with a 5-speed transmission. Conlee added a two-speed rear end salvaged from another old bus, in order to gear it down to a slower speed for driving across farm fields.

Contact: FARM SHOW Followup, David Conlee, Box 174, Moro, Ore. 97039 (ph 541 565-3214; E-mail: [email protected]).

From the archive · Full text
Feature story

Where To Buy Small Parts

Featured source:

After our story in the last issue on West Coast Inventor Supply, a company that specializes in miniature parts for inventors and engineers (ph 949 858-7251), we heard from Bob Stevens at Small Parts Inc., a company based in Miami Lakes, Florida, that has specialized in the tiniest of parts for 35 years.

Bob sent us a catalog detailing the thousands of miniature items the company handles. Everything from square tubing that’s as small as 3/32-in. sq. to tiny bar stock, rods, and tubes. Also, every type of wire, screws, joints, sprockets, gear boxes, couplers, and tools that you could think of. Virtually anything you would find in a hardware store machine shop supply catalog, you can find in the catalog from Small Parts Inc., only in miniature. Even if you don’t need what they have to offer, the catalog is fascinating reading.

For a free catalog, contact: FARM SHOW Followup, Small Parts, Inc., Box 4650 Miami Lakes, Fla. 33014 (ph 800 220-4242; Website: www.smallparts.com).

From the archive · Full text
Feature story

“Hack Into Your Car Or Truck”

Featured source:

Tired of taking your car or truck into the dealer every time that glowing “check engine” light comes on?

One solution is to buy a diagnostic code reader that can “read” the codes out of your vehicle’s on-board computer. But if you’ve got a computer - and you like fooling around with it - you can hack into your car ’s electronics yourself with no special equipment.

There are a variety of programs on the internet for Windows computers. Prices range from a couple hundred dollars and up.

Here are some places to look: • B&B Electronics Manufacturing Company at http://www.autotap.com. The company offers AutoTap scan tool programs for all domestic-built vehicles. The company also hosts http://obdii.com/codes.html, a website that lists the nearly 600 Diagnostic Trouble Codes (DTCs) for all engine diagnostic readers.

• Software For Cars at http://www.softwareforcars.com has a location in the San Diego, California area and one in Nanoose Bay, British Columbia. In addition to diagnostic software, you can search company owner and master mechanic Henry Richter’s website for assistance and E-mail him with specific questions. In the U.S., that address is: Software for Cars, Box 711450, Santee, Calif. 92072. In Canada, Software For Cars, 2770 Shooting Star Place, Nanoose Bay, B.C. V9P 9E4. Or send E-mail to [email protected].

Rinda Technologies Inc. www.rinda.com offers Diacom diagnostic software for GM cars and light trucks, and manufactures diagnostic equipment for the automotive and marine industries. The company has more than a decade of experience in the design and production of hand-held testers, computer software and electronic equipment. To see what types of products and services they offer, visit their website or write to them at Rinda Technologies, Inc., 4563 N. Elston Ave., Chicago Ill. 60630.

• Freescan is a program for some older European and GM cars. It won’t work with 1996 or newer vehicles, but it does work with some models of Camaro and Corvette from the late 1980's and early 1990's. Look at the website to see the exact cars it works with at http://www.andywhittaker.com/ecu/obdii_software.htm.

From the archive · Full text
Feature story

“Conditioner” Boosts Battery Life

Featured source:

No matter how long a lead-acid battery has been in or out of service, this new battery conditioner can extend its life, says IES, Innovative Energy Systems.

As batteries charge and recharge, sulfur begins to harden and crystallize on the surface of the lead plates, creating a permanent insulative barrier. As this barrier becomes thicker, the battery’s ability to accept a charge or deliver energy is greatly decreased.

The “DeSulfator” simply connects to the battery and prevents sulfur buildup by continually sending electronic pulses through the plates.

Once installed, batteries remain charged and the process of sulfation can even be reversed on older batteries.

A unit for batteries that are used regularly sells for $109 plus S&H. A unit for high-capacity batteries sells for $159 plus S&H.

A solar-powered unit sells for $295 plus S&H.

Contact: FARM SHOW Followup, IES, Innovative Energy Systems, Box 70060, Baltimore, Md. 21237 (ph 410 686-3120; fax 410 686-4271; Website: www.desulfator.com).

From the archive · Full text
Feature story

Simple Idea Puts An End To Rust

Featured source:

Rust forms because iron atoms give off electrons. This process allows it to combine with hydrogen and oxygen to form new compounds, one of which is iron oxide, better known as rust. If you can somehow replace the missing electrons in the iron atoms before oxidation begins, rust doesn’t happen.

That’s what Glen Morgan’s new Rust BustR system does. It’s based on a method which has been used for years by the U.S. Navy to keep ships from rusting. While Morgan didn’t invent the idea, he did come up with a simple-to-use version by packaging a zinc-containing metal alloy with a magnet embedded in it. When attached to the surface of a metallic object with an adhesive that conducts electricity, it protects the iron by giving off electrons that would normally have been taken away from the iron. In other words, when you attach Morgan’s device to your car, truck, tractor, tillage tool, etc., it corrodes away while whatever it’s mounted on stays intact.

at It’s easy to install Morgan’s Rust BustR. It’s a simple box that you just stick on the vehicle or implement in a place where it’s not in the way. Under the hood or inside a wheel well works fine.

Rust BustR sells for about $50 plus $10 for shipping anywhere in the U.S. and Canada.

Contact: FARM SHOW Followup, Rust BustR Rust Inhibiting System, GEMCO Enterprises, LLC, Box 1254, Shawnee, Okla. 74802 (ph 405 273-2232; fax 208 978-5105; Website: www.rustbustr.com).

From the archive · Full text
Feature story

Greasable Cultivator Bushings

Featured source:

While Michael Mortell was replacing the bolts that hold the shanks on his IH 4600 field cultivator recently, he figured he could eliminate that chore in the future if he could just figure out a way to lubricate the bushings.

“Most field cultivators don’t even have sleeves in those bushings where the shanks pivot. They run dry and get filled with dirt that wears down the bolts,” he says.

His first thought was to just drill through the top of the bushing, thread the hole and screw in a grease zerk. But they’re made of hardened steel.

“I went through some expensive titanium drill bits before I realized I wasn’t going to be able to do that,” he admits.

Undaunted, he figured there had to be a way to open the bushing up to accept grease.

“I knew I could cut through them with my chop saw, so I used it to cut a slit the width of the blade into the bushing. I cut just deep enough to see sparks flying inside the bushing,” he says.

Then he made a grease zerk of his own design from a short length of 7/16-in. steel rod drilled down the center with a 3/32-in. bit. He tapered the opening of this hole by drilling it out with a slightly larger bit.

He centered the drilled-out rod over the slot cut in the bushing and welded it in place with a wire welder. At the same time, he welded the rest of the slit shut.

Once the shank was mounted back in place, he greased the bushing using a needle point on his grease gun.

Since he already had the shanks off the cultivator, he figures making all 47 of the bushings greasable took only another four or five hours of time.

“The cost was minimal,” he adds.

“Now my field cultivator doesn’t squeak when I use it. If the manufacturer made the shanks greasable, it really wouldn’t cost that much more, and it would eliminate a lot of the wear and tear on the equipment.”

Contact: FARM SHOW Followup, Michael Mortell, Box 184, Franklin Grove, Ill. 61031 (ph 815 456-2096; E-mail: [email protected]).