Practical ideas from FARM SHOW MagazineSubscribe · Free issue · Send us your shop tip
Subscribe to FARM SHOW
Issues / Vol. 38, No. 3 (2014)

Vol. 38, No. 3 (2014)

Money-Saving Repairs & Maintenance Shortcuts · Printed section pp. 36–39

41 selected entries · Complete text of selected entries

This issue’s section includes reader tips and feature-length shop stories. Held items and editorial notices are not reproduced.

Archive text: prices, coupons, availability and contact details reflect the original publication, not current offers. Reader methods are not universal instructions; follow manufacturer guidance and proper safety practices.

Reader shop tips

From the archive · Full text
Reader shop tip

Vance W. Jones

Vance W. Jones, Iron Mountain, Mich.

“When working on my tractors, I discovered that when I’m putting tightly-fitted parts back together, it helps if I put a bit of wax paper between the parts. They come apart a lot easier next time I have to take them apart. After a bit of use, I retighten the bolts and they’ll stay tight.”

From the archive · Full text
Reader shop tip 1 of 2

Martin Gutzmer

Individual tip 1 of 2 from this reader’s published contribution.
Martin Gutzmer, Cambridge, Ill.

“I used to get a lot of flats in my garden tractor tires. I came up with a permanent fix using ‘Fill N Seal’ triple expanding insulation foam. I lift the tire on a jack, rotate it so the valve stem is at the top, and remove the valve stem. Then I fill the tire with foam, and allow it to harden for 2 to 3 days. Then you’re ready to roll.

From the archive · Full text
Reader shop tip 2 of 2

Martin Gutzmer

Individual tip 2 of 2 from this reader’s published contribution.
Martin Gutzmer, Cambridge, Ill.

“Another useful idea I had is adding a ‘through the wall’ air line from my compressor. It runs outside the shop to make it easier to air up tires without having to pull into the shop.”

From the archive · Full text
Reader shop tip

Urie Miller

Urie Miller, Middlebury, Ind.

“I had a broken casting on an old McCormick corn binder and no replacement part was available. So I welded it with a newer smooth-welding nickel electrode, pre-heating the cast iron before welding and peening the weld as it cooled. It’s still holding up after a lot of use.”

From the archive · Full text
Reader shop tip 1 of 2

Chris Haynes

Individual tip 1 of 2 from this reader’s published contribution.
Chris Haynes, Tuscaloosa, Ala.

“I keep all my fuel and fluid funnels, measuring cups, and graduated cylinders for measuring diesel, gas, hydraulic fluid, etc., in a 5-gal. plastic bucket with a lid. This keeps out dust and dirt and keeps insects from building nests in the funnels. They’re always clean and ready to use.

From the archive · Full text
Reader shop tip 2 of 2

Chris Haynes

Individual tip 2 of 2 from this reader’s published contribution.
Chris Haynes, Tuscaloosa, Ala.

“My equipment sheds have dirt floors which create lots of dust on equipment. I buy cheap oil dry clay absorbent and spread it on the floor. Keeps the dust much lower and is easy to rake clean.”

From the archive · Full text
Reader shop tip

Byron Clayton

Byron Clayton, Van Wert, Ohio

“To save room in a small shop, I mounted two grinders on one pedestal back-to-back. We took a large plate, mounted it on a pipe, and mounted the pipe in a large junk tractor hub. One grinder is fitted with a grinder stone and the other a buffer. We put it in a corner with a lock so you can swivel it to use either machine.”

From the archive · Full text
Reader shop tip

Robert Fitch

Robert Fitch, Metropolis, Ill.

“I use a small cement mixer to clean rust out of old tractor fuel tanks. Simply attach the tank with wire to the open end of the mixer and then add soap and water and about a dozen nuts, then let it tumble. It’ll clean the tank as bright as new on the inside.”

From the archive · Full text
Reader shop tip

Joe Germuga, Jr.

Joe Germuga, Jr., Rochester, N.Y.

“I bought a kerosene-fired Protemp shop heater to use in the winter. It works great, but one thing I don’t like is that it uses the fuel tank as a base to stand on. I didn’t want to drag it around or let it set on the concrete floor, so I decided to use some shop scrap and a pair of wheels to make a rolling base for the heater. Makes it easy to move around just where you need it without damaging the tank.”

From the archive · Full text
Reader shop tip

Howard Neitzke

Howard Neitzke, Brethren, Mich.

“Putting small parts in zip lock bags can be difficult. To hold a zip lock-type bag open, just turn the top edge inside out and flatten out the bottom. It’ll stand right up. Check it out!”

From the archive · Full text
Reader shop tip

Connor Bishop

Connor Bishop, Guilford, Conn.

“I was tired of getting the cables tangled while welding, so I laid the power and ground cables out on the ground side by side and zip-tied them together every 3 to 5 ft. I left a couple extra feet loose on the end so they’re free to move around the work area. No more twisted cables.”

From the archive · Full text
Reader shop tip

Wes Koebrick

Wes Koebrick, Charles City, Iowa

“Here’s a simple shop air filter idea that works well for me. I built a rack over the top of my welding bench that holds 4 cheap 20-in. fans, lying facedown over the top of 4 furnace filters. The fans draw air up through the filters, keeping air – and the walls of my shop – clean. You can tell how well the idea works by looking at the filter lying at one end of the rack that doesn’t have a fan on top of it. That filter stays white.”

From the archive · Full text
Reader shop tip

Andrew Sewell

Andrew Sewell, North Yorkshire, England

“A friend of mine needed a decent-sized tractor to power a pto-powered mobile dryer, but he didn’t have one to spare. However, he had an old unused truck with plenty of power, but no pto output. So he cut the back out of the differential and attached a pto shaft. The only problem is that the truck radiator gets clogged up with dirt, causing overheating.”

From the archive · Full text
Reader shop tip

Roger Gutschmidt

Roger Gutschmidt, Gackle, N. Dak.

“A customer brought me a 7-in. dia. by 35-ft. Brandt grain auger equipped with a Honda gas engine. He said the auger vibrated a lot and that after running empty for 10 min. or so it would lock up and kill the engine.

“I figured the problem had to be with either the auger flighting, the bearings on the top shaft, the drive chain, or the gearbox.

“The first thing I did was take the gearbox apart. I thought for sure I’d find a broken gear or a bad bearing, but when I drained the oil and examined everything it all looked fine. Then I removed the auger flighting, pulling all 35 ft. out of the tube. I examined the entire length of the auger on my hands and knees, expecting to find broken welds and loose auger flighting, but everything looked good. Then I rolled the tube on a nice, flat surface to check for any bends, but it was perfectly straight.

“I also used a flashlight to look inside the auger tube from both ends to see if there were any obstructions or dents I had missed, but found none.

“So I put it back together, started the engine, and engaged the drive belt. The auger vibrated so much I thought it was going to fly apart. Now I was really stumped. I started asking around at other repair shops, friends, and anyone else I could think of as to why this auger was vibrating so badly.

“I finally pulled the auger flighting out one more time and really looked it over carefully, thinking that maybe I had overlooked something obvious the first time. I still found nothing, so I put it all back together again. I even put new bearings, races and seals in the gearbox.

“I was at the end of my rope. I had put more than 15 hrs. of my time into this project but still hadn’t figured it out. I finally had to tell the customer to come and get it. I’ve been doing welding and repair work for more than 40 years but had never run across anything like this.

“Well, the customer took the auger to a nearby competitor’s repair shop. He removed the auger flighting and made new welds between all the existing welds along the entire length of the auger. I asked myself, ‘Why would you do that?’ when it was clearly evident that sufficient welds were already there. And I thought if those welds were necessary, why didn’t the factory weld it that way?

“He told the customer that based on his experience, this welding procedure takes care of such vibration problems. Vibration like this is especially bad on big swing augers. He does this welding trick, and it takes care of the problem every time.

“Well, that was a new one to me. I would never have thought of doing that. So now those welds are spaced every 6 in. on both sides the entire length of the auger, instead of 12 in. I’m still in denial, and can’t believe this welding job did the trick. But the auger doesn’t vibrate any more and the problem is solved. I’m dumbfounded and hope I don’t run into my competitor any time soon because he’ll certainly rub it in. These are the kind of repair problems that keep one humble.”

From the archive · Full text
Reader shop tip

Ron Cole

Ron Cole, Clive, Alberta

“When we put up silage in late summer there’s always a lot of chaff blowing around that plugs up the radiator on our truck, making it difficult to keep the truck’s engine cool.

“So we went to a salvage yard and bought two used electric fans for small cars. There wasn’t room to mount the fans behind the truck’s grill, so instead we bolted them to the bumper and wired them to a switch in the cab. The fans blow air back toward the radiator and solved the problem.”

From the archive · Full text
Reader shop tip

Roger Gutschmidt

Roger Gutschmidt, Gackle, N.Dak.

“This winter I painted the rubber belts on my round baler with Herculiner truck bed liner.

That stuff sticks to anything you put it on. Now the belts are nice and rough again and will grip hay better for starting bales. The problem was that the belts get so glazed and worn that they work poorly even though they are still intact.

“I had originally painted the belts 10 years ago. A lot of the Herculiner coating was still on there, but they were ready for a second coat. It’s easy to do, but don’t get it on your hands. It takes about 2 weeks for it to wear off.”

From the archive · Full text
Reader shop tip

George Proseus, Jr.

George Proseus, Jr., Altmar, N.Y.

“About 4 years ago the oil seals on the pto shaft on my 1980 Bush Hog mower started leaking. Installing new seals would have required removing the gearbox and shield – a big job. Instead, I bought some lightweight grease – the kind used to lubricate CV joints in cars - and filled the gearbox with it. It solved the problem. I used about 4 tubes of grease at a cost of about $3 per tube.”

From the archive · Full text
Reader shop tip

Alan Borud

Alan Borud, Wisconsin Dells, Wis.

“I set 3-pt. mounted implements and my snowplow down on cheap furniture dollies. Makes it easy to move the equipment around my shop, and it also makes it easy to position them for hookup.”

From the archive · Full text
Reader shop tip

Carlos Bahler

Carlos Bahler, Fairbury, Ill.

“I bought a 55-gal. drum cart from Northern Tool that’s fitted with an oil meter and pump (ph 800 221-0516; www.northerntool.com). The cart comes with a 50-ft. hose on a reel. Makes changing oil a quick and easy job.”

From the archive · Full text
Reader shop tip

Lock and Lube LLC

Lock and Lube LLC, (ph 603 795-2298; www.locknlube.com)

Their LockNLube grease gun coupler comes with a unique sliding sleeve that’s activated by a thumb lever. The unit’s 4 spring-steel jaws lock onto the grease zerk. With the jaws locked onto the zerk a leak-proof seal is created, preventing the coupler from coming loose and breaking the seal, says the company. Activating the trigger releases the coupler from the zerk. The LockNLube fits most standard grease guns and comes with a 30-day money back guarantee. It sells for $29.95 including S&H in the U.S.

From the archive · Full text
Reader shop tip

Arlo Greenberg

Arlo Greenberg, Elk River, Minn.

“I replaced the tiny plastic wheels on my Lincoln arc welder with much bigger garden tractor tires. They make the welder a lot easier to pull over obstacles on my shop floor, such as pipes, cables, etc., and also work great to pull the welder over rough ground.

“A metal rod that runs through existing holes on back of the welder serves as an axle.”

From the archive · Full text
Reader shop tip

Wess Cornelius

Wess Cornelius, Winlock, Wash.

“The bearings on the spindles on my Toro riding mower froze up due to corrosion. A new spindle would have cost about $90. Instead, I removed the spindles and then used a grinder fitted with a 3/32-in. cutting wheel to cut 4 corroded bolts out of them. I replaced the corroded bolts with 4 new bolts and nuts, and also installed new bearings. My total cost was only $12.”

From the archive · Full text
Reader shop tip

L. Richard DeBoer

L. Richard DeBoer, Mansfield Center, Conn.

“In regard to Bill Mitchell, Tuscumbia, Ala., in your last issue (Vol. 38, No. 2), who was having trouble keeping his Ford 642 tractor running after it gets hot, I have an engine in a Deere lawn tractor that did the same thing. The exhaust valve would stick when warmed up. I reamed out the guide and solved the problem. Still using it today with no problem.”

From the archive · Full text
Reader shop tip

Ron Zeigler

Ron Zeigler, Boonville, N.Y.

Here’s another take on what might be happening with Bill Mitchell’s Ford tractor.

“We had a Ford tractor engine that did the same thing. Our local tractor repairman told us to drain the gas tank and take the fuel valve out of the bottom of the tank. Sure enough, the screen on the valve was plugged. After cleaning it we had no more problems. Apparently what was happening is that small particles of rust would gather around the screen from the vacuum pressure and eventually plug it, stalling the engine. Once the engine stalled it would lose its vacuum and some of the rust would release so the tractor would start again.”

From the archive · Full text
Reader shop tip

Phillip Belcher

Phillip Belcher, Weaubleau, Mo.

“In regard to Mr. Mitchell’s problem with his Ford 642, I have a 861 Ford that had the same problem when I bought it used. I solved the problem by making sure the fuel tank is sealed properly. The cap on my fuel tank had a hole in it and that allowed heated gasoline vapors to escape. I plugged the hole and that fixed the problem.”

Shop feature stories

From the archive · Full text
Feature story

Power Steering Repair

Featured source: Kenneth Sprick

Minnesota handyman Ken Sprick did a double take when he heard that repairing the power steering pump on his 35-year-old 990 David Brown tractor would cost $500 or more.

“That was way more than I wanted to spend,” says Sprick.

“So instead I figured out a way to repair the hydrostatic pump with off-the-shelf parts.” Sprick bought a hydraulic pump from a local retailer and built brackets to mount it on the tractor.

“It worked for awhile,” Sprick said, “but it wasn’t supplying enough oil to the orbital valve.” Sprick then replaced the orbital valve with a new one that he bought at another retailer.

“Plumbing it in wasn’t the easiest job in the world,” Sprick says, “especially since it needed a small oil storage tank.” Instead of purchasing a new tank, Sprick used an existing stainless steel tank from a small submersible water pump that he bought at an auction.

“I welded some fittings on the tank, plumbed it to the valve, and it worked really well,” says Sprick.

“The whole set up cost me only about $200, so I thought it was a very economical repair. I’ve probably got the only stainless steel oil reservoir in the country,” Sprick says. When he mounted the homemade system on his tractor he used a spring-loaded idler pulley on the belt that drives the pump. Contact: FARM SHOW Followup, Kenneth Sprick, 59565 390th Ave., Zumbro Falls, Minn. 55991 (ph 507 753-2337; [email protected]).

From the archive · Full text
Feature story

Fender Fix For Deere 7530 Tractor

Featured source: Roger Gutschmidt

“About 4 years ago I bought a new Deere 7530 MFWD tractor to replace my Deere 7810, which I really liked,” says Roger Gutschmidt, who discovered as soon as he started using the 7530 that there were several things he disliked about his new tractor. But one problem, above all, stood out.

“The rear fenders stick out so far to the back that they obstruct my view when pulling my rock picker or sickle mower. I can’t see the forks or the sicklebar at all from the seat unless I raise the air seat up all the way and sit on an old Sears Roebuck catalog. That’s not how I want to operate an expensive farm tractor.

“After I complained to Deere, one of our local service techs told me the 20 Series tractors are just as bad and that everyone complains about them. The problem was caused by the way Deere moved their cabs forward.

“To solve the problem, I first tried extending the hitch on my rock picker 15 in., but that wasn’t enough. So last year I took off the right rear fender. That did the trick but the tire would throw mud on the cab windows.

“Last winter I decided to look into putting a new right rear fender on the tractor by fitting a fender from a 7810 to the 7530. The 7810 fender cost $423. The rear fender housing, which holds the taillight lens, was $277. The taillight lens was $50 and the underside metal shield that protects the wires was $51. Total: $801. So if I couldn’t make it work it would have been an expensive experiment.

“But fortunately, I was able to figure it out. I held the 7810 fender against the 7530 wheel well and saw that it was an almost perfect fit as far as the curvature goes. I positioned it so bolts could be put through the attachment lips on each part. The fender also had to be low enough to allow the right-hand side door to open without hitting. I had to do some cutting on the back taillight assembly to get it to fit. I first made a pattern out of cardboard to get the fit right. After getting it into place, I installed the shield on the underside to protect the wires, and then installed the top fender light from the 7530 on the new fender.

“One last thing to note is that the fender had a switch mounted on it for controlling up and down of the 3-pt. arms. I did not reinstall that since there was also one on the left hand fender.

“The replacement fender solved my visibility problem. I don’t think I’ll do the other side. I might get some strange looks from people, but I just need a tractor that works. I don’t care about the cosmetics. When I go to sell the tractor I’ll be able to put the original fender back on.” Gutschmidt named a couple other things he doesn’t like about his Deere 7530.

“Because the cab is positioned further forward, the hood got shorter, which means the radiator is jammed so close to the engine there’s no room to blow out dirt or dust. No wonder these engines overheat.

“I have had hydraulic coupler issues, too. Deere replaced them 3 times before I got a set that finally holds the hoses in without popping out the first time I hit the lever. It was frustrating, and messy, having the hoses pop out all the time.” Contact: FARM SHOW Followup, Roger Gutschmidt, Gutschmidt Mfg., LLC, 6651 Hwy. 56, Gackle, N. Dak. 58442, (ph 701 698-2310; [email protected]).

From the archive · Full text
Feature story

Vent For Plastic Fuel Cans

Featured source: Brent Gill

“I despise those ‘safe nozzles’ found on fuel cans because they’re such a pain to deal with, so I came up with my own vent for plastic fuel cans,” says Brent Gill, Springville, Calif. He drilled a hole in the top of the can that’s the same size as a tubeless tire stem. He pushed a length of wire through the hole and then out the filler spout hole. He removed the valve cap and core from a tire valve stem and threaded it onto the end of the wire, then pulled the stem out through the vent hole.

“The hole I drilled is small enough that the larger bottom section of the stem’s valve could be pulled through,” says Gill.

“I put a washer on top of the can and then pulled the valve through the washer. Even when the can is tipped over, fuel won’t leak out. With the core valve removed, it’s easy to fill a tank because the air rushes in through the valve once the cap has been removed.” Contact: FARM SHOW Followup, Brent Gill, 33979 Globe Dr., Springville, Calif. 93265 (ph 559 359-4197; [email protected]).

From the archive · Full text
Feature story

24-Toolbox Workbench Ready For Any Task

Featured source: Dan Mooney

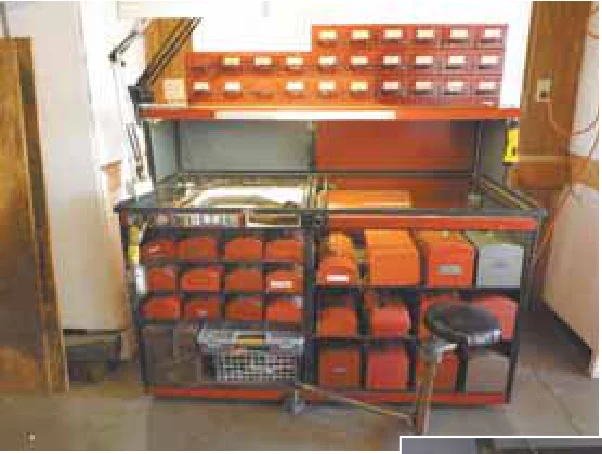
Dan Mooney’s organized “Super Bench” has shelves that hold 24 toolboxes — each containing tools for specific tasks such as electrical, metal or general repair — so Mooney can grab the box he needs for whatever job he’s doing on his Carson City, Nevada, acreage. At the top of the bench are 26 slide-out drawers that hold a variety of small parts, screws, bolts, nuts, etc. Each drawer has a big handle so it’s easy to pull out and take to a job. But his bench is more than just a storage area. At 5 ft. long by 30 in. deep with a 38-in. tall work surface, the compact design is packed with handy features. An air compressor hose (with a gauge mounted next to it) and trouble light cord are on spring-wound rollers that pull out for easy use when needed. Likewise, the suction hose of a vacuum system nests in a coiling cage.

Mooney built the compact workbench to fit in his two-car garage. It’s made out of angle iron, plate steel and sheet metal, and mounted on heavy-duty wheels for mobility. He can add to the size of the bench top by pulling out a sliding shelf. The bench is well lit with fluorescent tube lights under the 1/4-in. plate steel hood above the bench. He has a magnification lamp available when needed. Finally, Mooney can work comfortably, seated on an attached mobile dentist stool that he obtained when his dentist remodeled. If he were to build it again, Mooney says he would use larger wheels and lighter materials, such as aluminum alloy, to make the bench easier to move around. He would also use LED lighting.

“The unit has been in constant use for over 25 years,” Mooney says.

“I have found it to be invaluable as a systemic solution to increasing the efficiency of various jobs around the farm and household. It also may be of use in schools, manufacturing and other settings that require a more efficient and consistent maintenance schedule.” Contact: FARM SHOW Followup, Dan Mooney, Nevada Forge, 156 Tahoe Dr., Carson City, Nevada 89703 (ph 775 882-5705; [email protected]).

From the archive · Full text
Feature story

Old Olivers Start Faster With Gear Reduction Starters

Featured source: Eric Rego

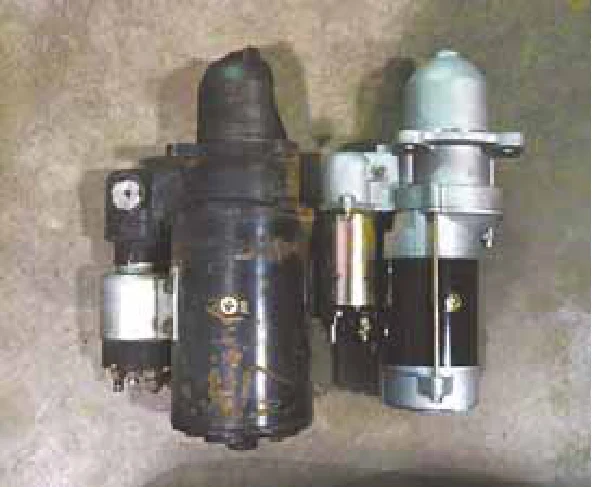
Get a gear reduction starter from Maple Springs Farm and your Oliver won’t grind down the battery on a cold morning. The modern style starter gives the extra cranking speed needed to turn over the engine without running down the battery.

“In the winter we rely on our Olivers to plow our driveway and periodically move equipment in the dead of winter,” explains Eric Rego, Maple Springs Farms.

“We don’t always have the luxury of waiting for a block heater to warm an engine. We began looking for a solution to provide better all around starting.” What Rego and his dad Bob found was a gear reduction starter that fits their older Olivers. After posting a video about it on YouTube, orders began coming in, and now they offer starters for all Waukesha and Perkins-powered Olivers and Whites. That includes the Fleetlines (77’s and 88’s) up to the early Whites. They offer both 10-tooth and 13-tooth starters. Rego explains that gear reduction starters create more pinion shaft torque for a given amount of energy input. A faster spin-up can be achieved since the armature mass and inertia are smaller than direct drive starters. They also weigh less.

Not all gear reduction starters are the same, warns Rego. Even the same company can have different grades of starters.

“What separates our product from others is that each starter is bench-tested for performance here at our company,” he says. Maple Springs Farm has also done back-to-back, on-vehicle application testing and has benchmarked a 10 to 20 percent increase in cranking speed with their starters. Rego says their starters really shine with diesels and engines that have been over-bored or have high compression.

“A 20 percent difference in speed can make a tremendous difference in generating a higher in-cylinder, light-off temperature during the compression stroke on a diesel,” says Rego.

“This means a diesel engine will fire faster at a given temperature and will start without a starting aid at a lower ambient air temperature.” He adds that small displacement gas engines benefit as well from gear reduction starters. Faster cranking speeds improve fuel atomization for easier ignition and even choke-free starts in some situations. The Oliver Gear Reduction Starter is priced at $224.95, including shipping. Maple Springs Farm also carries remanufactured starters and other parts for Olivers, as well as gasket sets and overhaul kits for Ford tractors, including a spin-on filter adapter for 2N, 8N and 9N Fords.

“In addition, we do urethane castings to reproduce plastic and rubber parts for Olivers,” says Rego.

“We also do hard-to-find Oliver sheet metal parts, including hoods, side panels and more, as well as other parts and products.” A video at www.farmshow.com compares a stock starter to the gear reduction starter. Contact: FARM SHOW Followup, Maple Springs Farm, 1828 County Road PB, Verona, Wis. 53593 (ph 608 658-2072; [email protected]; http://stores.ebay.com/Maple-Springs-Farm).

From the archive · Full text
Feature story

Pressurized Lube Pump

Featured source: Don Sandell

Poor access to gear lube ports isn’t a problem for Don Sandell since he built a pressurized container out of 4-in. dia. pvc pipe. It’s handy and the right size for people who don’t like hauling around the big 5-gal. buckets with pumps. The 2-ft. tall container holds about 4 quarts of lube and works great to fill the side ports on the row unit gear boxes on his corn head, Sandell says. He drilled and tapped the top pvc cap for a pressure gauge, sprayer camlock fitting and tire valve stem, then used pvc glue to seal the fittings and the caps at both ends. A section of sprayer hose is fitted to the bottom and connected to a ball valve attached to one leg of a wire stand. Sandell clamped a piece of brake line to the hose and bent the line slightly to access the gear lube ports. To use it, remove the plug in the camlock fitting, fill with oil, close it and pressurize the container with a compressor connected to the valve stem.

“I keep the pressure at only 40 lbs.,” Sandell says, then he opens the ball valve to get the lube flowing. Too much pressure could blow it apart, he warns. H e n o t e s that he first made a unit with threaded caps, but it leaked air, so he recommends securely gluing caps instead.

“It’s just a quick, easy way for filling gearboxes with a side port,” he says, and cost him less than $30 to make, buying new fittings and using scraps he had on hand. Contact: FARM SHOW Followup, Don Sandell, 2222 310th St., Fort Dodge, Iowa 50501 (ph 515 547-2379; [email protected]).

From the archive · Full text
Feature story

Rolling 12-Volt Power Provider

Featured source: Steven Zook

If you need portable 12-volt power, Glendale Repair has a simple solution with their handy 2-wheel power unit. Owner Steven Zook married a 4-hp. Honda engine to an alternator and mounted it on a 2-wheel push cart. Although they sell it as a portable battery charger, it finds lots of uses, says Zook.

“A welding shop in the area uses theirs for welding,” he says.

“A tractor repair shop has one just to jump-start tractors. A lot of our customers just use them around the farm, in the woods when logging, or at construction sites.” Zook built his first one for use in his own shop. After 7 years and multiple redesigns, he is pleased with what has evolved. He uses larger pulleys to run the alternator at a good rate of speed so the unit always runs cool. The heavy-duty unit is priced at $1,080. A 12-volt carry unit is available for the same price. Glendale also offers a carry-style 12/24-volt unit with a 6 1/2 hp. Honda engine. Zook asks customers to call for pricing on that unit. Contact: FARM SHOW Followup, Glendale Repair LLC, 241A Williams Run Rd., Christiana, Penn. 17509 (ph 610 593-2942).

From the archive · Full text
Feature story

Simple Fix For Diesel “Blowby”

Featured source: David Luttrell

David Luttrell says he fixed the “blowby” problem on his 1975 Ford 4400 industrial diesel engine with just a little creative plumbing.

“Whenever the tractor sat idling for a few minutes, it would leave a puddle of oil and nasty residue on the ground,” Luttrell says.

“One day I was talking to my father, who was an engineer, and I asked him about plumbing the breather tube line back into the engine. He suggested giving it a try because with all his experience working with engines, he didn’t see why it wouldn’t work.” Luttrell first cut the breather tube shorter. Then he plumbed a solid line back and into the air intake behind the air filter. He says that simple fix solved the problem of oil and blowby smoke and the tractor has run great for the past 5 years.

“I thought when I first ran the tractor after I plumbed the line that it sounded different that it did before,” Luttrell says, “and I guess that would make sense since air, smoke and oil from the breather tube was making a full circle back to the intake. However, the engine didn’t misfire; it seems to have just as much power as it did before, but all the smoke and oil is gone.” Luttrell bought the 4400 from an equipment auction in Pennsylvania with the understanding that it had a bad engine.

“The auctioneer told me the tractor was owned by the county and that it was used for mowing road ditches. They wanted to get rid of it because they thought the engine needed to be overhauled,” Luttrell says.

“I started the tractor on the lot and it sounded fine, so I took a chance and bought it.”

“I’ve used the tractor 5 years for loader work and heavy lifting and it runs just fine,” says Luttrell, who never overhauled the engine after making the fix.

“I change the oil, the oil filter and air filter regularly and beyond that, it’s never caused me a nickel’s worth of problems.” Contact: FARM SHOW Followup, David Luttrell, 568 County Road 1074, Mountain Home, Ark., 72653 (ph 870 421-5063).

From the archive · Full text
Feature story

Powder-Coat Extends Life Of Metal Parts

Featured source: Chris Borning

Chris Borning makes a good living powder-coating all kinds of metal objects – big and small – for farms and other industries. As a motocross racer in high school, he discovered powder-coated parts looked better and the finish lasted longer than paint. He went on to launch his business, C&L Powder Coating. He says his customers like the speed of the process and the durability of the coating.

“As soon as the coated part comes out of the curing oven and cools, it is ready to go,” says Borning. Powder coating is a multi-step process. Older parts may be sandblasted, while new parts often go through an acid wash process. Then the powder is electrostatically charged to stick to the bare metal as it is applied. When the part goes into the oven, the powder liquefies and bonds to the surface.

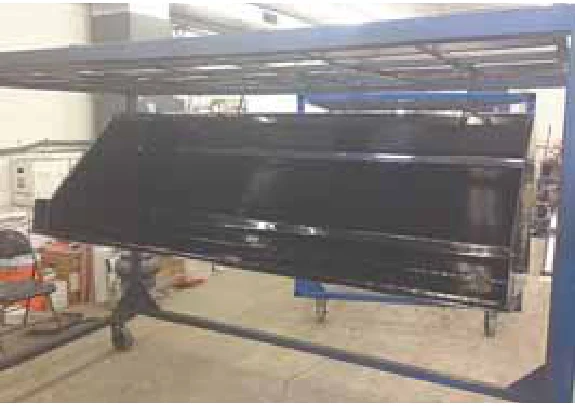
“The cure time is 10 min. at around 400°F," explains Borning. "Actual time in the oven depends on the thickness of the metal. Curing is achieved when the entire part reaches the required temperature for the full time." The size of the oven can be the limiting factor. C&L started out in 2009 with a 6 by 6 by 10-ft. oven. This past summer they added an 8 by 8 by 22-ft. oven to handle bigger jobs, like a request to coat 6 Deere tractor wheels.

"The farmer had planned to get them painted, but decided to go with powder coating," says Borning. "We sandblasted them and applied a primer, top coat and clear coat. I put a 1-year warranty on the finish, but I expect he won't have to touch those wheels for 20 years." Borning explains that the number of coats and the powder used can depend on how the product will be used and where. He won't do an automotive wheel if the customer doesn't agree to all the proper steps. "Wheels take a lot of abuse and often don't get cleaned," he says. "If you don't go with the primer, color coat and top coat, you're asking for failure." Different powders offer different features, such as UV protection with polyurethanes, and rust and acid protection with epoxies. "We may use an epoxy primer with a poly topcoat," says Borning. "Acids won't eat through the epoxy, and you get the color you want with the poly, plus UV protection to keep it from fading." Color choices used to be limited, but that has changed. "One powder manufacturer has more than 6,500 colors," says Borning. "You can even get special textures like wrinkles." Special colors can also add to the cost.

He notes that the yellow for the Deere tractor wheels costs around $9/lb. Each job is bid accordingly. The Deere wheels were approximately $150 each. Limiting factors to powder coating are the thickness of the part and the ability to hold it at the right temperature. Borning suggests that FARM SHOW readers interested in powder-coating should give him a call to discuss size, expected use and shipping. If considering other powder coaters, he recommends comparing the steps they follow and coats they recommend. He points out that not all powder-coating is the same. "I have a regular customer from Illinois who ships parts for us to coat," says Borning. "He went through 5 different powder-coating operations before he tried us and was satisfied. It is a matter of quality and the time the operator is willing to put into the job." Contact: FARM SHOW Followup, C&L Powder Coating, LLC; 279 4th St., P.O. Box 136, Echo, Minn. 56237 (ph 507 828-1233; [email protected]; www.clpowdercoating.com).

From the archive · Full text
Feature story

Simple Way To Sand Inside Cylinders

Featured source: Robert Wallrath

“It works great for polishing the inside of any hole,” says Robert Wallrath, Houston, Texas, who came up with this sanding attachment for his 1/2-in. cordless drill. It consists of an 8-in. long, 1/2-in. dia. wooden dowel rod that fits into the drill chuck.

“The end of the dowel rod has a saw cut that’s deep enough to slip in a strip of 2-in. wide coated sandpaper,” says Wallrath.

“The sandpaper wraps itself around the rod, and centrifugal force pushes it out as the dowel turns. It actually does a nicer job than using a file. Works great for removing corrosion from inside a cylinder that covers the tines on my garden rototiller, for example, and for cleaning out corroded brake calipers and other jobs.” Contact: FARM SHOW Followup, Robert O. Wallrath, 7244 Nodding Pines Ln., Houston, Texas 77044 (ph 713 614-5538).

From the archive · Full text
Feature story

“Swamp Cooler” Built From Old Furnace

Featured source: Gary Eberspacher

“To cool off on hot days while working in my shop, I converted an old furnace into an evaporative ‘swamp cooler’ that simply hooks up to a garden hose that feeds cool well water into it,” says Gary Eberspacher, Milford, Neb. The wheeled unit operates on standard 110-volt electricity. He started with an old house furnace and cut the heating chamber and sheet metal off just above the squirrel cage fan. He used angle iron to make an angled frame and mounted it above the fan, filling in the sides and top of the frame with leftover sheet metal from the furnace. He mounted a used cooling coil from a heating and air conditioning shop in front of the fan. Cool water runs through the cooler and then out through another hose that runs out to his lawn tractor sprinkler.

“It does a great job. Depending on how hot it is outside, I can lower the temperature 10 to 15 degrees in my small 20 by 30-ft. shop,” says Eberspacher.

“I raise my shop’s garage door just enough so I can slip the hoses under it, and I use a switch mounted on the cooler to turn it on or off. The hoses hook up to pipe fittings that I had a local shop solder onto the cooler.”

There’s no way to drain the cooling coil, so before winter sets in Eberspacher pumps antifreeze through it to make sure it doesn’t freeze up. Contact: FARM SHOW Followup, Gary Eberspacher, 402 North F Street, Milford, Neb. 68405 (ph 402 761-2712; [email protected]).