From the archive · Full text
Reader shop tip
Delbert Hayes
“After reading about it in FARM SHOW, I’ve been using a mixture of 50/50 automatic transmission fluid and acetone to free up rusted parts. It’s the best penetrating fluid ever.”
Money-Saving Repairs & Maintenance Shortcuts · Printed section pp. 36–39
37 selected entries · Complete text of selected entries
This issue’s section includes reader tips and feature-length shop stories. Held items and editorial notices are not reproduced.
“After reading about it in FARM SHOW, I’ve been using a mixture of 50/50 automatic transmission fluid and acetone to free up rusted parts. It’s the best penetrating fluid ever.”
“I had to install hard plastic seals on the 3-pt. arms of a Deere 2030 tractor at the lower end of the transmission case. The seals were hard to handle so I put some oil in a small soup can and carefully heated the can with a propane torch to bring the oil to a boil. Then I dipped each plastic ring in the can with a pair of needle nose pliers and swished them around for a minute or two. At that point the seal would become pliable enough to insert into the transmission housing casting. I would pinch to make a half moon shape and insert quickly, then reform into a circle shape and insert the pin.”
“Finding good used rims for older tractors can be quite a challenge. When I needed a set for the front of my little Allis tractor I couldn’t see paying $70 or more for new ones. I found some 15-in. aluminum Ford ‘donut’ spare tire rims that have the same bolt pattern as the steel tractor rims. The ribbed tires from the old rims would have fit these rims but I left the auto tires in place. Nice thing about these rims is that they won’t rust out and they’re very cheap.”
“I’ve found that if I spray Tremclad or Rustoleum paint on the inside of my loader bucket it’ll prevent snow from sticking. Snow slides out like the bucket is lined with plastic.”
“I machine adaptors from 6061 aluminum to adapt 3⁄4 and 1-in. return lines from post pounders to the tractor (returns such as fill plug openings). Post pounders return a lot of fluid each time the pounder is activated. Foreign tractor sizes are usually metric and some domestic brands also have metric threads. I can make almost any size adapter if I have the size and thread size. Prices vary but are around $40 plus postage.”
“When installing a starter on a tractor, I needed a special wrench. Rather than try to buy one, I used an acetylene torch to bend a 9/16 box end wrench to fit the situation. Worked great.”
“One of the most useful tools in my shop is a wire wheel buffer I made from a 1⁄2 hp electric motor and a 6-in. dia. wire wheel. I use it to buff rust off metal parts, and for other cleanup jobs.”
“The fuel sender unit in the tank of my skid steer loader went bad. There were too many large, stiff hydraulic hoses above the tank to allow removal of the unit. So I just keep a 30-in. length of 1⁄4-in. copper tubing beside the seat and use it as a dipstick to check fuel level.”
“I save time when changing chisel points by first tack welding the head of each bolt to the front of each chisel point. That way, when I put the impact wrench on the nut behind the shank, the bolt won’t spin on the opposite side.”
“Before you decide a 2-cycle engine you’re attempting to get started needs a new carburetor, put Sea Foam in the tank and spray some into the air intake. Then try to start. If it starts, spray more Sea Foam into the air intake until the motor almost stalls out. Sea Foam also works wonders on 4-cycle engines.
“I work on heavy equipment and frequently you are in a situation where an impact air wrench isn’t an option so you must use a wrench. If the nut is dead tight, fit the best wrench you can on the nut, tension it a bit, and then tap the wrench with a hammer. I’ve been surprised how often this works.”
“Here’s a modification I make to all my vice grips pliers to make them easier to unlock. I weld a short piece of metal rod to the locking lever so it extends out the end. Even if you have gloves on, you can easily unlock them.”
“I had a problem with twine wrapping around the rotor on our bale processor. I first tried using a hot iron to cut through the twine to get it off. But that won’t work on bales wrapped with sisal twine.
“So what I did was to take a motor and rotary blade off a meat slicer. I bolted on a handle. The rotor slices quickly through both plastic and sisal twine. I just have to keep a sharpener handy because occasionally the blade hits metal. Saves lots of time and aggravation.”
“The control valves on cutting torches wear smooth as they get older, which makes them slippery and therefore harder to turn especially if you’re wearing greasy gloves. To solve the problem I converted the round valve on my torch into a square one, simply by mounting a 2-in. sq., 3/8-in. thick brass plate over the valve.
“I drilled and tapped one edge of the plate so I could install a set screw and used a hole saw to make a hole in the middle of the plate big enough to fit over the valve. The set screw tightened the plate to the valve. The square valve is a lot easier to turn, even when I’m wearing greasy gloves. A steel or aluminum plate would also work.
“Here’s something scary that happened in my shop. The abrasive wheel on my shop grinder exploded. Part of it veered off the tool’s guard shield with such force that it stuck in my shop door. I still haven’t found the rest of the wheel.”
“If your combine bounces down the road after the tires get a flat spot from sitting overnight, leave the header down a little. It’ll help smooth out the ride.
“I had a hydraulic-operated hog trailer with a tire that ran crooked, and it would ruin the wheel bearing about every 3 months or so. I finally solved the problem by filling the bearing cap with 90-weight oil. Now whenever I fix bearings I always put oil in the caps.”
“When the gearbox stripped on my Kawasaki Mule utility vehicle, I bought new gears and a shim kit in order to repair it. However, none of the spacers in the kit was the right size. Some were too thin and some too thick.
“To solve the problem, I took a thick washer and super glued it to a metal plate in my lathe. I turned the washer down to the right thickness, and then used a propane torch to heat the washer and break the bond with the glue so I could remove the washer from the faceplate. After popping the washer off, it fit beautifully.”
“I keep several 55 and 30-gal. barrels in my shop where I can roll them anywhere and set them on end next to any repair project. The barrels hold tools and parts at a comfortable working height and within easy reach.
“One of the handiest features of my farm shop are the four tie-downs in the floor. Each tie-down consists of a 6-in. dia. well casing with a 1-in. dia. bar inside it that’s embedded in the shop’s concrete floor. We can straighten almost anything by tying it to the bar with a chain and then using a hydraulic floor jack. When not in use a simple cover keeps dirt out.”
“I installed an I-beam in my barn above a drive-in bay and then mounted a chain hoist on the beam. I use the hoist to lift and hold ATV’s, trailers, and other equipment when painting, repairing, or changing tires.”
“Inox injector lubricant, which I bought from a company in California, is a great lubricant for all kinds of cables. Unfortunately, I’m on my last bottle. I should have bought a whole case because now I can’t find the product anywhere.
“I miss this product a lot. I have just about a teaspoon left and every time I go to use it I have to ask myself, ‘is this cable really worth using up my last precious drops of lubricant?’ It comes in a tube with a needle injector that makes it easy to use in tight places, and it only takes a drop or two to get the job done. Does anyone know where to buy it, or have the recipe to replenish my supply?”
“Here’s an easy way to fix a string trimmer head. Drill 4 or 6 small holes around the circumference of the head, then cut a string for each hole about 6 in. long. Run a string through each hole and tie a knot firmly in one end.”
“If you have a wood miter saw that you don’t use a lot, you can easily convert it to a metal chop saw. Just take off the dust bag and replace the original miter saw blade with a metal chop saw blade. Be sure to use the same size blade. I made this conversion years ago and it works good.”
“Our new SmartGlove has a lot of unique features that make it perfect for any tough job. An LED light is attached inside a pocket between the thumb and pointer finger. By pressing down on the pocket, you can shine the light directly on your working area. There’s a powerful magnet at the top of the glove to hold small parts and can also be used to hold the gloves together when they’re not being worn. Or to stick the gloves to a toolbox so they won’t get lost.
“The back side of the glove is made from spandex and the front side from a patented no slip, bio-grip fabric. The glove is oil and water-resistant. Its pointer finger is equipped with a touch screen-friendly fingertip, so you can use a smartphone, cell phone or touch pad computer without having to remove the glove. All the fingertips have guards. The thumb area of the glove is fitted with a Terry Cloth Eyebrow sweat wipe, and the top has a Velcro strap that offers carpal protection.
“The glove is available in orange, blue and black. Sells for $29.99 plus S&H.”
Need a replacement part, but don’t know the part number? Instead of getting on the phone and trying to describe the whatchamacallit, take a video, post it on YouTube, and send a link to the company. That’s what Bill Kreitzer did when he needed a new valve for a faucet. Thanks to the company’s lifetime warranty, he received a free part within a couple of weeks.
“They always say a picture is worth a thousand words. It was so easy to videotape the part. I used an iPhone that has an app that lets you choose where to send videos, including one to upload to YouTube,” Kreitzer said. He saved the video as a private upload on YouTube and emailed the website link to the company’s customer service. He didn’t attach the video, he explained, because most businesses won’t open email attachments because of potential viruses. But they can safely open a YouTube site. Choosing the private option ensures his 14-second video won’t be available to others who don’t know the address. People who don’t have a smart phone can upload video from a camera to YouTube.
“If you don’t know how, ask a grandkid,” Kreitzer suggests. Go to www.farmshow.com to see his video. Contact: FARM SHOW Followup, Kreitzer Farms, P.O. Box 1, Elliott, Ill. 60933 (ph 217 781-4367; [email protected]).
“I recently came up with this homemade repair tool that makes it easier to remove the blade bar from the gearbox on a bush hog mower,” says Chad Travis, Drasco, Ark.
“I do some repair work for neighbors, and when a man brought me a bush hog to be repaired I could see right away that in order to replace the bearings inside the gearbox, the gearbox would first have to be removed from the mower’s cutter deck. A 2 1/2-in. wide by 1 1/2-in. deep blade bar attaches to the gearbox and has to be removed before you can remove the gearbox. The blade bar is attached to the driveshaft with a large key that goes into one side of a collar. However, the blade bar can easily become seized on the driveshaft, and it takes lots of power to remove it. An ordinary wheel bearing puller can’t do the job.” To solve the problem, he turned the bush hog’s deck upside down. Then he made a U-shaped “blade bar puller” out of 2 pieces of 3/4-in. thick plate steel. Each piece is 18 in. wide and about 16 in. high. The 2 plates set vertically on top of the deck and fit under the blade bar. A pair of rectangular holes near the top of each plate are used to hold a pair of bar stocks made from 1 1/4 by 2 1/4-in. bar stock. Then he places a 30-ton hydraulic bottle jack under each bar stock – one on each side of the blade bar. Since the deck is made from light gauge material, he sets the jack on a piece of 1/2-in. thick plate, which spreads the force out. Pumping the jack pushes the blade bar off the driveshaft.
“The jacks push both bar stocks straight up, which lift the plates up to pull the blade bar off the driveshaft. Once I got everything in place it was easy to do. It took less than 10 min. to get the blade bar off,” says Travis.
“Cutting out the material and getting everything set up took the most time.” Contact: FARM SHOW Followup, Chad Travis, 574 Greers Ferrard, Drasco, Ark. 72530 (ph 870 668-3400).
Instead of using an electric motor to pump solvent, this new portable parts washer uses your existing air compressor.
“It saves on the cost of replacing electric motors, which can easily plug up with grease that gets inside the bearings and impeller,” says inventor Mark Cain, noting that the new washer easily rolls around the shop. The parts washer is equipped with a 34 by 20-in. wash tank with a hinged metal lid that’s kept open by a spring. The wash tank mounts above a 5-gal. pressure tank mounted on 4 caster wheels. A 10-gal. solvent tank mounts above the wash tank, which contains a metal screen used to separate dirt and grease from the part. A regulator valve mounted underneath the wash tank hooks up to your air compressor and is used to control the solvent flow. After pouring solvent in the wash tank, simply hook up the compressor to the regulator valve, and then open a valve to put the solvent under pressure. The solvent is forced through a hollow wash wand equipped with long bristles.
“It results in better flow, and the long bristles let you get down inside the parts and do a better job of cleaning them,” says Cain.
“After the part has been washed you can use the unit’s air gun to dry it off.” Sells for $499 plus S&H. Contact: FARM SHOW Followup, Badboy Blasters, Inc., 1720 Wallace Ave. N.E., Canton, Ohio 44705 (ph 330 454-2699 or 330 413-5262; [email protected]; www.badboyblasters.com).
When the tie rod wore out on Darrell Cooper’s Ford F-250 pickup, he replaced it. But instead of paying to have the front end aligned, he came up with a tool to adjust the toe-in himself.
“It lets me know how much I need to adjust the end of the tie rod so that it fits snug. I know how many turns I need to make so the tires will be in alignment and won’t wear prematurely,” says Cooper. The tool consists of a 27-in. long, 5/8-in. dia. threaded rod that fits inside a 44-in. length of 1-in. O.D. threaded pvc pipe. A nut and washer serves as a spacer and allows the threaded rod to be adjusted in and out. To use the tool, Cooper measures the distance between the 2 front tires before he removes the tie rod end, then threads the rod into the pipe. Then he places the pipe end of the tool against one tire and the threaded rod against the other.
“I used it for the first time last year and it worked perfectly. I think the same idea would also work on other pickup brands,” says Cooper.
“The distance between the front sides of both tires should be about 1/16 in. shorter than between the back sides so the vehicle will drive true. If you install an aftermarket tie rod brand the threads might not be exactly the same as on the original tie rod. In that case you’d want to measure everything before you remove the original tie rod ends, so that you can get pretty close to the original measurement.”
“I made a small attachment for my shop anvil that holds my cutting torch exactly where I want it. Works great when I’m forging small parts, because I always have access to heat while I’m working,” says Robert Stone, Seymour, Mo. The one-piece attachment slips over the horn of the anvil and rests on top of it. It consists of an L-shaped angle iron bracket with 2 small tabs that hold the torch in place. The tabs are made from 3/32-in. material and are 3/4 in. wide and about 1-in. long. One tab slips into the base area of the torch, between two hoses that supply oxygen and acetylene, while the other tab slips into a space in the torch head. Contact: FARM SHOW Followup, Robert L. Stone, 1504 Dillon Rd., Seymour, Mo. 65746 (ph 417 767-4395).
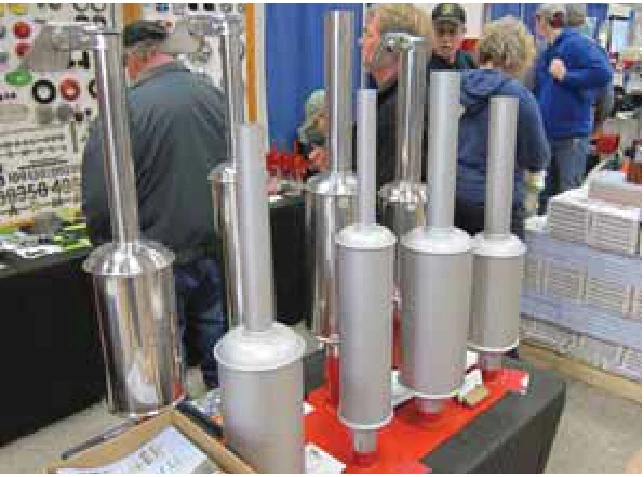
You can dress up an old Farmall with these shiny new “restoration quality” mufflers, says Steiner Tractor Parts, Inc. Mufflers are available for Farmall models made from 1939 to 1963 and are available in 2 different styles: aluminized steel and polished stainless steel.
“You can’t buy mufflers like these anywhere else, and they’re affordably priced,” says Dan Steiner.
“They have the same dimensions as the original mufflers. Not only do these mufflers look the same, they’re baffled just like the originals so they also sound the same. The IH logo and part number is stamped into the side of the muffler.” According to Steiner, the original Farmall tractor used a muffler made by the MacKenzie company in Youngstown, Ohio.
“They made a muffler with a tall ‘hat’ on top of the body. At some point in time, IH switched to mufflers made by the Donaldson company. Those mufflers had the same IH part numbers, but they had a flat hat that greatly altered the look.
“We make our mufflers using the original MacKenzie blueprint. We use a high temperature paint on both muffler styles so the paint won’t bubble or become discolored over time.” IH never offered a stainless steel muffler, but Steiner says they decided to make one just for its looks.
“We tell people it gives you an excuse to wear sunglasses when you’re driving the tractor,” he notes. Prices range from $46.95 to $69.95 plus S&H for an aluminized steel muffler and $108.50 to $124.95 plus S&H for a stainless steel muffler.
“We also plan to offer a comprehensive line of original style mufflers for other tractor brands and models,” notes Steiner. Contact: FARM SHOW Followup, Steiner Tractor Parts, Inc., 1660 South M-13, Lennon, Mich. 48449 (ph 800 234-3280; [email protected]; www.steinertractor.com).
Darrell Terry built his first tire tool to take a 3-wheeler tire off the rim. It didn’t take long to figure out that his simple design would also work on the tires in his trucking fleet as well as the tires on his Farmall H tractor.
“It works good on thicker sided wheels,” says the retired Buffalo, Texas, fleet owner.
“It doesn’t work as well with aluminum wheels. You have to have air in the tire to make it work.” He uses leverage with his design that he calls a Tire Break Down. It’s made of round and square tubing. The tire is placed on the “feet,” and the handle is secured with a bolt to one of six holes according to the tire width. A lever slips between the rim and the tire. By pushing the handle down, the lever breaks the tire’s seal. Turn the tire over and repeat to break the seal on the other side.
“You don’t need a hammer to knock off the bead,” Terry says, noting he made his first tool about 25 years ago when he couldn’t find anyone with tools to take a 3-wheeler tire off the rim. Since then, he made more, including one for his brother’s mechanic shop. After the bead is broken, Terry lifts the wheel up and sets it on top of the Tire Break Down, secures it with a bolt on a flanged pipe, and uses a tool to pull the tire off the rim one side at a time. It’s about waist high and convenient for working, he notes, adding that the tool’s feet need to be bolted or secured somehow to the floor so it doesn’t wobble.
“It’s cheap and easy to make and would work real good on a farm,” Terry says. Contact: FARM SHOW Followup, Darrell Terry, 13069 FM 831, Buffalo, Texas 75831 (ph 903 322-6127).
Cummins 3.3L industrial engines work great to repower smaller gas and diesel-powered vehicles, according to Jacob Kraybill, Cedar Grove Mechanics. He has used them to repower both a Ford Ranger and Toyota Tundra. He uses larger, heavy-duty Cummins diesels to repower full-size trucks, too.
“I use Cummins because I used to work in a diesel repair shop and had connections to surplus engines,” explains Kraybill.
“I think the 3.3L Cummins is the best fit for a diesel in a small pickup that I’ve seen. It’s a little lighter and higher speed engine than some.” When Kraybill repowered the Ranger, he used a Cummins that came to him in pieces due to a factory defect. He retained the diesel flywheel and built an adapter ring to connect it with the flywheel from the Ranger’s original gas engine. This allowed him to also use the Ranger’s pressure plate and bell housing on the transmission. He built his own engine mounts and mounted the accessories, such as power steering and vacuum pump. He also added an intercooler from an International truck with a 466 cu. in. engine. He had to chop it short to fit on front of the Cummins.
“Eventually I had to go with a racing pressure plate and clutch kit, as the original couldn’t handle the torque,” says Kraybill.
“I ran the Ranger for 30,000 to 35,000 miles and got 30 to 31 mpg before selling it.” Kraybill’s next repower was the Toyota, which he did for a friend in Alberta, Canada. This time he went with a new Cummins. Again, he fabricated an adapter ring for the diesel-to-gas flywheel conversion. However, he immediately replaced the pressure plate and clutch. Eventually, he swapped out the light transmission for a heavier transmission designed for a 6-cylinder engine. He also added a water-methanol injection system instead of an intercooler.
“I did the Toyota in October 2011, and my friend says he’s getting around 29 to 30 mpg with it,” says Kraybill. In the case of the full-size Ford 250’s he repowered, Kraybill used 5.9L Cummins diesels. In one case, he kept the original transmission. He used an adapter kit, engine mounts, transmission controller and harness, as well as additional parts from Diesel Conversion Specialists (www.dieselconversion.com). On the second repower, he replaced the PowerStroke 6L engine as well as the transmission. This time he used the Cummins engine and a Dodge transmission and transfer case.
“In the newer body style Fords, there’s a lot more room under the hood,” says Kraybill.
“You just mount the engine and transmission and hook up the drivelines and linkage. That works the nicest, and it saves a lot of time and money.” Contact: FARM SHOW Followup, Cedar Grove Mechanics, 7997 Manito Lake Rd., Fortuna, Mo. 65034 (ph 573 723-0699; [email protected]).
Do you have a truck with too much play in the steering from rough roads and off-road travel? You can fix the problem with heavy-duty steering components from Borgeson Universal Co. The company offers bolt-in replacement assemblies for most model years of Ford, Chevy and Dodge full-size trucks. Similar components are available for Jeeps and older model cars. Components include steering shafts, remanufactured steering boxes, vibration reducers, couplers, adapters and more.
“OEM type shafts are usually done with low bidder mentality,” explains Jeff Grantmeyer, sales manager, Borgeson Universal Co.
“Stampings and bearings are not always made to last the life of vehicles, especially if they get heavy use and travel rough roads. All that vibration feeds back to the shaft and creates play in the bearings.” Borgeson has been in business since 1914, specializing in universal joints. Grantmeyer explains that when the company owners got involved in street rodding, they heard from fellow street rodders about poor quality steering shafts.
“We adapted our process for machining universal joints out of 1.5-in. billet steel,” says Grantmeyer.
“It makes a stronger universal joint, and we can tolerance our yokes to bearings down to 1/1000 of an inch for radial play. We couple two universal joints to a heavy-duty, telescopic shaft assembly. The telescoping meets safety requirements for collapsibility plus it offers a point to absorb chassis flex.” Grantmeyer says attention to detail “builds a better mousetrap”. The assemblies are treated for 350 ft./lb. of torque. The company also heard about problems 1994 to 2002 Dodge truck owners had with steering box distortion. The distorted casting would allow the shaft to “walk around” in the bottom of the box, creating more play. Grantmeyer warns that a remanufactured box has probably only been resealed to eliminate leaks. However, if the distortion remains, the problem will recur.
“We adapted a Delphi 680 steering box, not used for production vehicles until 2006, as a direct bolt-in box,” says Grantmeyer.
“This gives us a heavier box with a larger bearing for more support on the shaft.” Borgeson parts are widely distributed at specialty 4-WD shops as well as specialty chains like Summit Racing. They also sell parts direct. In addition, Borgeson offers a wide variety of power steering conversion kits and components, as well as Saginaw manual steering gears and gearboxes. Borgeson recently bought Saginaw and all tooling, drawings and manufacturing rights.
“Manual steering gearboxes are largely used for forklifts, airport ground support equipment and some tractors,” says Grantmeyer.
“We offer it for classic cars and for Chevy trucks from 1968 to 1978 and for Jeeps from 1972 to 1995.” Heavy-duty steering shafts range from $198 to $284. Dodge truck steering boxes range from $429 to $509. Contact: FARM SHOW Followup, Borgeson Universal Co., 91 Technology Park Dr., Torrington, Conn. 06790 (ph 860 482-8283; [email protected]; www.borgeson.com).
Tim Steele found a good sideline business cleaning engines and other metal parts with his bead blaster. He uses #80 glass beads to remove rust, oxidation and corrosion without damaging the metal.
“Unlike sand blasting, which can wear away metal, glass bead blasting leaves the metal unaffected,” says Steele.
“I can work with pieces nearly 3 ft. long and 2 ft. deep. I’ve done exhaust manifolds, carburetors, flywheels, generator casings – anything that’s metal.” Cleaning with the glass beads is time consuming, notes Steele. He prices his work at $40/hour, whether for parts cleaning and preparation or actual blasting. Hoods and covers are $100 or more just for blasting.
“When finished, exterior covers come out with a satin finish, suitable for sanding and polishing,” says Steele. He’ll do an entire motorcycle engine for $250, excluding exterior covers, if he doesn’t have to clean them first. Shipping is not included.
“If the parts arrive dirt and grease free, all I have to do is to chase all the threads and plug all the holes,” says Steele.
“The job will be much cheaper than if I have to clean them of grease and dirt as well.” Steele does a lot of work with engines, but says he’s available to bead blast a wide variety of parts, including tractor parts. Contact: FARM SHOW Followup, Timothy Steele, 404 Stokes Airport Rd., Front Royal, Va. 22630 (ph 850 419-4521; [email protected]).
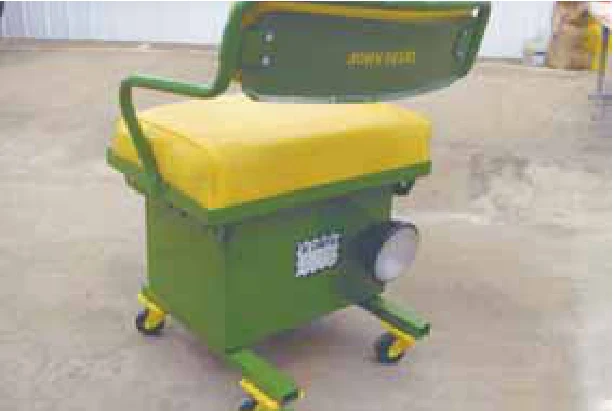
Old tractor seats make nifty low-cost rolling shop chairs, says Verne Schlueter, Arlington, Minn., who mounted the seat and battery box off an old Deere tractor on a set of swivel caster wheels.
“I keep it in my workshop where it makes a great conversation piece,” says Schlueter. He welded swivel wheel brackets onto lengths of 1/2 by 2-in. tubing, which he bolted to the bottom of the battery box. He repainted the seat frame and battery box and mounted decals and a small headlight on back.
“I store odds and ends in the box and simply lift up the seat cushion for access,” says Schlueter.
“The seat is actually off a Deere 49B tractor and was still in good shape. The light is just for decoration.” Contact: FARM SHOW Followup, Verne Schlueter, 25804 431st Ave., Arlington, Minn. 55307 (ph 507 964-5641).
Abilene Machine has been helping convert Deere 3010, 3020, 4010 and 4020 diesel tractors from 24-volt to 12-volt for years. They recently introduced a new 24-volt to 12-volt conversion kit that includes a gear reduction starter developed especially for these tractors. The kit includes an internally regulated 10-volt alternator with pulley and mounting bracket, 12-volt starter, safety relay and installation instructions. All the components are new.
“The kit sells for less than what it normally costs to have your old starter rebuilt, and the shipping cost to return the core is eliminated,” says Jay Russell, Abilene Machine.
“We also offer the starter individually for units that are 12 volt-ready. In comparison to the original 40-lb. starter, our gear reduction starter only weighs 20 lbs. and turns over faster and with more torque.” The 24-volt to 12-volt conversion kit sells for $495 plus S&H. The gear reduction starter sells for $250 plus S&H. Contact: FARM SHOW Followup, Abilene Machine, P.O. Box 129, Abilene, Kan. 67410 (ph 800 255-0337; [email protected]; www.AbileneMachine.com).