Practical ideas from FARM SHOW MagazineSubscribe · Free issue · Send us your shop tip
Subscribe to FARM SHOW
Issues / Vol. 26, No. 6 (2002)

Vol. 26, No. 6 (2002)

Money-Saving Repairs & Maintenance Shortcuts · Printed section pp. 38–41

31 selected entries · Complete text of selected entries

This issue’s section includes reader tips and feature-length shop stories. Held items and editorial notices are not reproduced.

Archive text: prices, coupons, availability and contact details reflect the original publication, not current offers. Reader methods are not universal instructions; follow manufacturer guidance and proper safety practices.

Reader shop tips

From the archive · Full text
Reader shop tip

Charles Starnes

Charles Starnes, Waldo, Ark.

“This is a simple idea but has saved me time and the aggravation of having to search for spray tubes when they get knocked off a can of WD40 or another type of spray can. Now when I first use a spray can with a tube, I apply a drop of Super Glue to the spray tube to seal it in place. After it sets, you can carry the can by the tube if you wish.”

From the archive · Full text
Reader shop tip

Jerry Seidel

Jerry Seidel, Belle Rive, Ill.

“I use a leaf blower to clean air filters. It works better and faster than an air compressor because of the larger flow of air. Also, the pressure is never so high that it damages the paper filter element.”

From the archive · Full text
Reader shop tip

Gene Boyes

Gene Boyes, Tamarack, Minn.

Gene came up with this light for his own use and it worked so well he decided to patent it and try to bring it to market.

The light is floor-mounted so there’s no need to find a place to hang it up or clamp it. Its long arm allows the light to focus exactly where needed, eliminating a person working the shadow of his own body. Two back wheels make it easy to move. The light can go more than 10 ft. up in the air, reach out 5 ft., or extend down to the ground.

Gene’s looking for a manufacturer.

From the archive · Full text
Reader shop tip

Robert McIlmoil

Robert McIlmoil, Hamilton, Ill.

“I just read the letter in your last issue from Curt Kallal, Des Moines, Iowa, about his Chevy Silverado with a noisy transfer case. Mine had the same problem and the dealer got ahold of GM and they said there is a problem with the lubricant inside the case. They drained and flushed it out, then replaced it with an updated lube, and the problem was fixed.”

From the archive · Full text
Reader shop tip 1 of 2

W.A. Gibbs

Individual tip 1 of 2 from this reader’s published contribution.
W.A. Gibbs, Elmwood, Tenn.

“When one of the bolts broke in on one side of the front part of the engine housing on my Deere 1530 tractor, I found that I couldn’t drill the bolt off. I tightened the other bolts, but they wouldn’t stay tight so I had a problem. The engine housing was connected to the tractor’s steering sector, so removing it would have been a lot of work. To solve the problem, I used a pair of 7-in. channel irons to hold the engine block and transmission together. One channel iron bolts to the block and the other to the transmission. The channel irons are connected by a pair of long bolts that are used to draw the engine housing and transmission tight together. It equalizes pressure on both sides of the engine and transmission, so the bolts on the channel irons have no pressure on them at all. All the pressure is on the original side-mounted bolts.

From the archive · Full text
Reader shop tip 2 of 2

W.A. Gibbs

Individual tip 2 of 2 from this reader’s published contribution.
W.A. Gibbs, Elmwood, Tenn.

“When the hydraulic track adjuster on my bull dozer blew its packing, I fixed it by installing a pair of metal plates that hold the track in place and keep it at just the right tightness. Four bolts - two of them on top of the hydraulic adjuster and two of them below - keep each plate in place on both ends of the track adjuster.”

From the archive · Full text
Reader shop tip 1 of 2

Jason Breeding

Individual tip 1 of 2 from this reader’s published contribution.
Jason Breeding, Sendia, Ga.

“I built a maintenance pit in the floor of my 40 by 40-ft. shop. It’s 5 ft. deep and 12 ft. long by by 3 ft., 4 in. wide. I built a frame of 4 by 4-in. angle iron around the top edge to pour the slab against. It cost only $350 more than a plain flat slab but it has already paid for itself in ease of maintenance on trucks, tractors, ATV’s, and equipment.

From the archive · Full text
Reader shop tip 2 of 2

Jason Breeding

Individual tip 2 of 2 from this reader’s published contribution.
Jason Breeding, Sendia, Ga.

“The fuel level sending unit in my 1998 Dodge 2500 diesel was erratic. It would drop to ‘empty’ repeatedly while I was driving and make the warning chime sound. It is a common problem with these trucks. I removed the tank and sending unit on both my truck and my brother’s and slightly modified the pivot arm in the float with a 10 cent retainer clip to fix the problem.”

From the archive · Full text
Reader shop tip 1 of 2

Charles Hoyt

Individual tip 1 of 2 from this reader’s published contribution.
Charles Hoyt, Medina, Ohio

“When I bought a used Ford 9N tractor, it was equipped with a pto-driven hydraulic pump. I wanted the tractor to have two hydraulic systems so I installed a power steering pump that’s belt-driven off the tractor’s alternator. I made a double pulley out of piece of aluminum and put two different size grooves in it - a 5/8-in. wide one for the alternator belt and a 1/2-in. wide one for the power steering pump.

“I also installed a selector valve between the original valve and the tractor ’s 3-pt. lift cylinder. The selector valve allows me to switch between using the 3-pt. hitch or the tractor’s hydraulic outlets. I use the pto-driven pump to operate my log splitter and the power steering pump to operate a front-mount snowplow. That way when I push the clutch in I don’t have to worry about killing the hydraulics to whatever implement I’m using. I also use the pto-driven pump to operate the 3-pt. lift cylinder and a boom. I mounted a pilot-operated check valve on the head end of the cylinder so if a hose breaks or a valve leaks, the cylinder stays put.

From the archive · Full text
Reader shop tip 2 of 2

Charles Hoyt

Individual tip 2 of 2 from this reader’s published contribution.
Charles Hoyt, Medina, Ohio

“I made my own wood burning stove and mounted a heat exchanger inside the stove pipe. I use it to heat my 32 by 28-ft. shop building which has an 11-ft. high ceiling, as well as a 12-ft. wide, 28-ft. long area where ductwork from the furnace goes. The stove is hooked up to a 100,000 btu fuel oil furnace in my shop and automatically shuts the furnace off to save on fuel bills.

“The heat exchanger was made from an old freon tank which I got from a neighbor. I cut the tank down and lined it with firebrick to make it airtight, then mounted the milk cooler fan on the back side of it. I put a nipple on the bottom and top of the unit. Heat coming up from the stove goes around inside the freon tank and out the stove pipe. A thermostat switch is wired to the smokestack so as soon as the smokestack gets hot it turns the milk cooler fan on.

“To heat up my shop, first I start up the fuel oil furnace. Then I start building up a fire in the wood stove. Once the fire gets going good, it’ll automatically shut off the furnace.”

From the archive · Full text
Reader shop tip

David Dowling

David Dowling, Lohrville, Iowa

“To drain the engine oil on my Case 1640 combine, I cut a 1 1/2-in. dia. hole in the sheet metal guard under the radiator. Then, while standing on the ground, I insert a slotted hydraulic jack handle onto the drain plug.”

From the archive · Full text
Reader shop tip

Eldon Wait

Eldon Wait, Seaside, Ore.

“Here’s an idea I use to store drop cords, hoses or anything else that can be coiled up. It takes up very little space. On a post or wall, drive nails every 8 or 10 inches vertically. Make an 8 or 10-in. loop of baling twine and fasten it to each nail. Then just loop the twine around the coil and hang it back on the nail. Different types of coiled products can be mingled together.”

From the archive · Full text
Reader shop tip

Kevin Yutani

Kevin Yutani, Constant Velocity of Ocala, Inc., 1706 N. Magnolia Ave., Suite 304, Ocala, Fla. 34475 ph 800 889-2953 or 352 351-9557; E-mail

[email protected]; Website: www.cvaxles.com: “My company specializes in making, repairing, and rebuilding specialized drivetrain components for a wide variety of industrial applications. We think farmers might benefit from our services, too. In particular we specialize in Constant Velocity (CV) driveshafts, which are ideal for pto applications. CV driveshafts reduce the loping effect that happens with universal joint shafts while delivering more power to the driven end.

“CV shafts can be designed to work in areas where conventional pto shafts can’t be used because they can handle extreme angles without binding up. We can make shafts sized to work with most agricultural equipment, including tractors, mowers, etc. We can design CV shafts for individuals who need just one shaft or for companies needing shafts for production units.”

From the archive · Full text
Reader shop tip 1 of 2

Bud A. Beaston II

Individual tip 1 of 2 from this reader’s published contribution.
Bud A. Beaston II, Skiatook, Okla.

“When I purchased my Mig welder, it didn’t have any wheels. To solve the problem, I mounted four lawn mower wheels on a homemade metal frame equipped with a swivel tongue. I mounted my Hobart welder on top of the frame and added an extra 100 ft. of extension cord to the welder. The cart allows me to use the welder anywhere inside my 56 by 80-ft. shop as well as in an adjoining barn. The wheels roll right over extension cords, air hoses, or welding leads.

From the archive · Full text
Reader shop tip 2 of 2

Bud A. Beaston II

Individual tip 2 of 2 from this reader’s published contribution.
Bud A. Beaston II, Skiatook, Okla.

“I had problems in my small shop area with dust. To solve the problem, I built a cover for my bench grinder that goes around the entire grinder except for on front. There’s enough room for me to access both ends of the grinder. At the back bottom part of the cover, I drilled a hole and mounted a muffler pipe that goes down through the bench that the grinder sits on. I hooked up a shop vacuum on back of the muffler pipe and wired a pigtail into the switch on the grinder. Then I plugged the vacuum into the switch so that whenever the grinder is being used, dust is automatically drawn into the vacuum canister. If I need to disconnect the vacuum for other uses, I can easily remove it from the muffler pipe.”

From the archive · Full text
Reader shop tip

Dale Conrady

Dale Conrady, Hettick, Ill.

“I needed to pull a pilot bearing out of the engine in my Deere 2020 tractor, but I didn’t have the special tool that’s normally used for this kind of job. I came up with a quick fix by grinding down part of a 3/8-in. dia. bolt just below the head, leaving a square ‘shoulder’ that hooks onto the bearing. Then I screwed a nut and washer onto the other end of the bolt. By grabbing the nut and washer with a crowbar I was able to pull the bearing out.”

From the archive · Full text
Reader shop tip

Jeff Schott

Jeff Schott, Omega Drives, 35 Trottier Bay, Winnipeg, Manitoba, Canada R3T 3R3 (ph 204 453-2477)

“Our company supplies pto drivelines and right angle parallel gearboxes to OEM manufacturers, and our diverse inventory also allows us to supply prototype and aftermarket products for the agricultural market. Because of our extensive inventory we’re able to offer fast off-the-shelf service.

“Our employees are highly knowledgeable about specific products and will take the time to investigate what the customer’s problem is and suggest different ways to solve it. We’ve helped farmers, custom fabricators, and original equipment manufacturers develop new solutions for existing products and also help them with new ideas still in the concept stage. We have a complete range of pto shafts and gearboxes, with ratios that range from 1:1 to 1 to 4.46 and horsepower ranges from 15 to 230 at 1,000 rpm’s.”

From the archive · Full text
Reader shop tip

Clifford Brandenberger

Clifford Brandenberger, Beecher City, Ill.

Clifford mounted a salvaged furnace fan on a homemade, 4-legged wooden stand. The stand rides on two wheels on back and has a handle on front, making it easy to move around. Clifford spends a lot of time in his shop, and keeping cool on hot days is important. The fan puts out a good blast of air.

From the archive · Full text
Reader shop tip

Smith Tool

Smith Tool, 2505 S. Custer, Wichita, Kansas 67212 (ph 316 942-8632; fax 316 942-7738; Website

www.smithtoolinfo .com): “Our new two-in-one Rivet Tool is designed to remove and replace both standard round-head and countersunk rivets. It allows you to replace sickle sections right on the machine. A two-way reversible anvil insert allows the tool to replace both types of rivets quickly and easily. The unit comes with a variety of parts including riveter screw, riveter sleeve, anvil, punch sleeve, and punch.

“It’s the ideal tool for anyone who has several machines with varying sickle section fasteners. The narrow body design fits all sickles including new double tooth sections. The tool comes complete with all parts and instructions.

“Sells for $69.42 plus S&H.”

From the archive · Full text
Reader shop tip

Carl Marley

Carl Marley, Nokomis, Ill.

He converted his acetylene welder to a propane model by removing the original oxygen tank and replacing it with a 20-lb. barbeque grill-sized propane bottle that he already had.

He needed to raise the smaller bottle up in order to keep the connecting hoses up at about the original length. To do this, he made a perch for the camper bottle out of a 2-ft. length of 10-in. dia. PVC pipe. The lightweight PVC pipe reduces the cart’s total weight and makes it easier to handle.

A ring at the bottom of the propane bottle fits snugly into the top of the PVC pipe, and a chain across the front part of the bottle keeps it in place.

“It works good. Switching from acetylene to propane saves me a lot of money,” says Marley.

“I could have used a taller propane bottle but I already had the smaller tank so I didn’t have to spend the money for a new one. When I made the switch I had to install a different cutting tip on the torch. It really cuts good. I recently used it to straighten out a bent harrow mounted on back of my field cultivator.”

From the archive · Full text
Reader shop tip

Chad Burnett

Chad Burnett, Bruce’s Welding, Girard, Ill. 62640 (ph 217 627-2241)

“We built a small 2-wheeled trailer that’s equipped with a hand-operated, pivoting boom. It works great for a variety of reach-and-lift jobs. The boom mounts at the center of the trailer just ahead of the wheels and is equipped with a hand-cranked winch and cable. The boom can be rotated by removing a steel pin and grabbing a handle.

“We built it for a local hog confinement operator who uses it to pick up dead hogs and load them into a dumpster. The axle is rated to handle up to 3,500 lbs.”

Shop feature stories

From the archive · Full text
Feature story

Cross-Drilled Rotors “Stop Faster, Last Longer”

Featured source:

If the performance of the brakes in your pickup, SUV, or car is not what you’d like, you might want to take a look at the idea of using cross-drilled - or slotted - rotors.

Cross-drilled brakes originated in racing to help dissipate heat and gases that build up under brake pads. The theory was that as the pads and rotor heated up, gases would build up under the pads and prevent them from getting a firm grip on the rotor.

It has since been proven, according to some manufacturers, that cross-drilled rotors run cooler and that both rotors and pads last longer.

Several manufacturers produce either slotted or cross-drilled rotors.

Jesse Ramirez, Brembo North America; says brake pads last up to 10 percent longer when used with crossed drilled rotors. The biggest advantage, particularly to people with pickups or SUVs, is the shortened stopping distance which can be decreased by as much as 25 percent, depending on the vehicle application.

“If you use your brakes a lot while driving, such as in pulling a trailer in rugged terrain or up and down mountain roads, you may have noticed the brakes fading once they get hot,” he says.

“Heat dissipation with cross drilled rotors means there’s less chance of brake failure due to heat buildup.”

Ramirez says cross-drilling doesn’ t improve braking on drum brakes. He cautions that cross-drilling should not be a do-it-yourself project.

“If the rotor is not designed properly, drilling or slotting them can cause brake failure. We’ve seen cases where pieces of the rotor just break off.”

Brembo’s top-of-the-line cross-drilled or slotted cadmium plated rotors range from $129 to $435 per set. Non-plated rotors start at around $100 less. You can order from several manufacturers through the Brake Warehouse at www.brakewarehouse.net or they can be ordered through most auto parts stores.

Contact: FARM SHOW Follow-up, Jesse Ramirez, Brembo North America 1585 Sunflower Ave., Costa Mesa, Calif. 92626 (ph 800 325-3994; Website: www.brembo.com).

From the archive · Full text
Feature story

Top Cylinder Lubricator Adds Life To Engines

Featured source:

The concept of top cylinder lubrication has been around for years, but for older engines, it may be more important now than ever, says Floyd Andrus, Florence, Mass., who sells an add-on lubrication kit.

“Today’s gasoline fuels don’t contain the amount of lubrication that fuels had prior to the days of unleaded gasoline,” he says. Couple that with the growing interest in vintage cars, truck, tractors and farm equipment.

“All of those older engines can benefit from top cylinder lubrication, “ he says.

Andrus got into the lube business when he bought out the remaining inventory of Ampco Automotive and Marine.

The lubricators work by atomizing small quantities of oil into the fuel-air mix in the intake manifold.

“The oil has a higher flash point than fuel, so it doesn’t burn,” he explains.

“Instead, it rides into the cylinder with the fuel and clings to the valves, valve guides, valve seats and rings.”

In cars, pickups and trucks, the lubricator mounts under the hood on the firewall. It consists of a reservoir to hold the oil, a copper line from the reservoir to the intake manifold, and an atomizer to inject oil into the manifold. There’s also a needle valve to regulate the flow of oil.

Most of his customers install them on restored vehicles and tractors.

“I sell a lot of lubricators to farm people in the far North who need engines to turn over easier and start in very cold conditions. Also, I find that the antique and collectible engines do better with them. Flat head Fords, in particular, really need the extra lubrication. During WWII, Ford Motor Company endorsed it. In fact, it was one of the few aftermarket add-ones that Ford ever allowed,” he says.

Andrus says besides vintage car, truck and tractor owners, he also sells top cylinder lubricators for engines fueled with LP or compressed natural gas (CNG).

“These fuels burn cleaner than gasoline, but they burn hotter, too. They have a lot of valve problems as a result.

In a car, top cylinder lubricators will use about a quart of oil for every 1,000 miles driven, depending on how one drives and how much of the time the engine is idling.

Andrus still has about 26,000 top cylinder lubricators for sale, in three sizes. The 1-quart model sells for $49.95. A 2-quart model sells for $59.95.

Contact: FARM SHOW Follow-up, Floyd Andrus, Ampco Top Cylinder Lubricators, Box 60006, Florence, Mass. 01062 (ph 413 586-0978; fax 413 586-1020; E-mail: [email protected]; Website: www.ampcolubes.com).

From the archive · Full text
Feature story

Jig Makes Pipe Welding Easier

Featured source:

Anyone who has ever tried to tach weld a nipple fitting onto a steel pipe or tank knows it can be tricky. You have to hold the fitting with one hand and at the same time tach weld it into place with the other, all the time keeping the fitting level. A new welding jig makes the job a lot easier. The Align-O-Let can be used on pipe from 1/2 to 2 in. in diameter.

“It lets you work with your hands free and takes all the guesswork out of welding on pipe,” says inventor John Davio, Whitecourt, Alberta.

The tool is shaped like a small sawhorse. There’s a 2-in. dia. opening in the middle, with a thumb screw on one side and a leveling bubble on the other side. You insert the fitting you want to weld through the opening and use the thumb screw to tighten it down. Then you adjust the jig as needed and make a couple of tach welds to hold it in place.

“It makes a very tedious fitting job much easier,” says Davio.

“It works just as well on flat surfaces as it does on pipes, so you can also use it to weld fittings and spigots onto fuel tanks, water tanks, etc. It also works great for welding threaded fittings onto hydraulic cylinders where the hose hooks onto the cylinder.

“The tool is made of a composite material with a melting temperature of 500 degrees F., so as you tach weld the electrical current can’t go through the tool and cause it to weld itself to the pipe. Sparks from the welder will just bounce off the tool without sticking to it.”

Davio says the Align-O-Let can also be used to help you cut out the hole in the pipe where you plan to install the fitting.

“The tool makes it much easier to find top dead center and mark where to cut the hole,” he says.

Sells for $59 (U.S.) including S&H. Contact: FARM SHOW Followup, John Davio Welding Ltd., 16 Chickadee Drive, Whitecourt, Alberta, Canada T7S 1G3 (ph 780 778-3597).

From the archive · Full text
Feature story

“Gunk Remover” Gives New Life To Water Heaters

Featured source:

Sooner or later, all hot water heaters experience a buildup of mineral sediments in the bottom. The buildup of gunk acts as an insulator that makes the heater element work harder.

Brian Kumer oversees some 150 apartments in Peoria, Ill., and he got tired of constantly replacing water heaters.

“Sometimes I had to buy half a dozen at a time,” he says.

He decided to find a way to get the gunk out of older water heaters before they fail. His “gunk remover” shoots compressed air into the bottom of a water heater via a hose connected to the drain pipe. The compressed air dislodges the buildup of gunk in the bottom of the heater.

The next step is to get the gunk out. He hooks his air compressor up to a faucet and opens the hot water valve. He hooks a garden hose to the water heater drain. Then he shoots compressed air down the hot water pipe, blowing all the hot water and sediment out of the water heater, and into the garden hose which carries it away.

Surprisingly little air pressure is required - only about 10 lbs. Once they’re cleaned out the water heaters work like new, notes Kumer.

Contact: FARM SHOW Followup, Brian Kumer, 2215 W. Willow Knoll, Suite 102, Peoria, Ill. 61614 (ph 309 693-0617).

From the archive · Full text
Feature story

New Paint Lets You “Chrome” Almost Anything

Featured source:

Just about any paintable surface – from fiberglass to steel to wood – can be “chromed” to a mirror-like surface with this new water-based paint called “Fantachrome”.

The company says the three-layer paint produces a durable, long-wearing surface. As painting goes, it’s an easy process, and cleanup is easier still, since all three layers are water-based.

To date, it’s been used on everything from hitches, to bumpers to 20-ft. tall styrofoam stage props.

The first layer is a 2-component base coat that creates a smooth surface. It serves as a primer and reacts chemically with the second layer, which is applied in several steps.

The first step is the application of an activator, followed by a distilled water bath. The third step is the patented Fantachrome coat which is followed by a second distilled water wash, and a compressed air blow-off.

The third layer in the process is a protective two-component top coat. This automotive grade top coat can be put on clear or tinted to any color. Gloss can be varied from chrome-like high gloss to brushed metal matte.

The Fantachrome process costs approximately $1.00 - $5.00 per sq. foot for materials, depending on the surface being coated.

Alsa offers a complete kit that includes everything you need to get started, including all chemicals and a special machine to apply the “chrome” intermediate coat. Standard spray equipment is needed for the base coat and top coat. The entire process can take 48 hours or more, depending on drying time required at various temperatures.

Fantachrome is also available in gold, bronze or copper.

Contact: FARM SHOW Followup, Alsa Corporation, 2640 E. 37th St., Vernon, Calif. 90058 (ph 323 581-5200; fax 323 589-4400; E-mail: [email protected]; Website: http://www.alsacorp.com/fantachrome.html).

From the archive · Full text
Feature story

Hubcap Mike Has the Hubcaps You Need

Featured source:

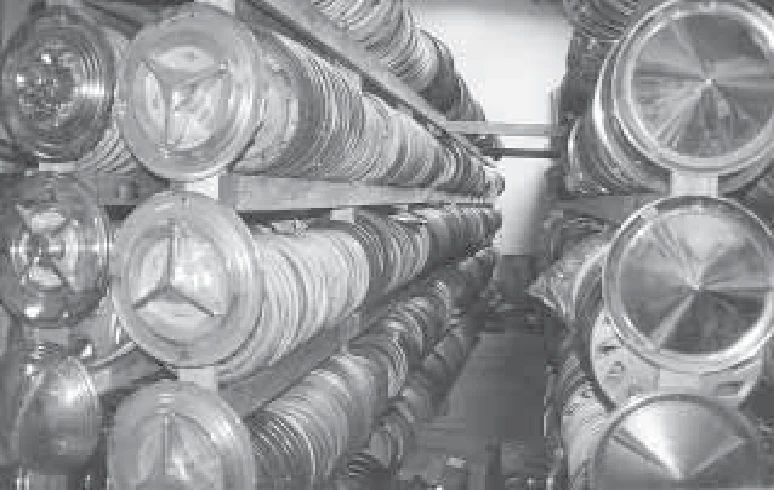
About 20 years ago, Mike Collins bought 200 hubcaps at bargain basement prices from a car dealer. He took them to a swap meet and came home with more than enough jingle in his pocket to make it worthwhile. That was the day his business was born.

Known to most people today as Hubcap Mike, Collins gradually grew his hubcap business to the point where he now ships all over the U.S. and Canada and just about everywhere else in the world, too.

His slogan is “the right hubcap right away.” With some 40,000 hubcaps sorted, labeled and stored, he knows what he has and can usually ship within 24 hours of receiving an order.

He specializes in collectible original caps, mostly ’50s and ’60s Ford and Chevrolet cars and pickups.

“I sell more hubcaps for Chevrolet pickups than just about any other single category,” he says.

Collins has hubcaps for cars and trucks from the 1940's on up. Most of his stock is original equipment, but he also carries reproduction hubcaps for several popular restorable models.

Collins says when it comes to original hubcaps, he only stocks those he finds in very good or excellent condition.

“Most of what I have has been used, but I do have a lot of brand new original stock that we’ve found on old dealership shelves and so on,” he says.

“I make the rounds of the big automotive swap meets and buy the best of what I find being offered there,” he says.

“Many of the people selling there are garage sale buyers who pick up one here, two there, until they have several to sell.”

While he has plenty of 1/2 ton pickup hubcaps for both Ford and Chevy, 3/4 and 1-ton hubcaps are harder to find.

“I have some on hand for 3/4-ton GMC’s but I don’t have any for 1-ton Fords. I find them once in awhile but they’re usually sold within a few days.”

While most of Collins’ customers are restoring a vintage car or just trying to find something reasonably priced for a newer vehicle, he also sells to collectors and even decorators.

“I got a call from a restaurant owner in Florida who wanted some to put on the walls of a room. He didn’t care what shape they were in - he just wanted a hubcap motif. Another customer wanted one of everything I had from Ford. He mounted them in a display, with brass plaques below identifying the vehicles they were made for and the years they were made.”

Prices start around $20 per cap for early vintage reproductions.

“Most of what I sell is priced from $30 to $40 each. The most I ever got for one hubcap was $500, for a 1956 Lincoln Mark II. Those are extremely rare.”

Whether you need hubcaps or have some vintage ones to sell, you can contact him.

Contact: FARM SHOW Followup, Hubcap Mike, 2465 North Batavia Street, Orange, Cal. 92865 (ph 714 685-8801 or toll-free 800 774-6637; fax 714 685-8804).

From the archive · Full text
Feature story

Heat-Saving Shop Divider Curtains

Featured source:

You can lower your shop heating bills with this new shop divider curtain from Rainbow Industries, Inc., S. Vienna, Ohio.

The curtain lets you heat a particular work area instead of the entire building. A wide variety of configurations are available so you can design a layout that meets your needs.

The curtain is made from 13-oz. vinyl-coated nylon. The ends are fitted with pressure sensitive velcro, allowing you to seal the curtain up against the walls of the building. Windows made from transparent vinyl designed into the curtain.

“We can custom make the curtains according to your shop’s size and type of ceiling,” says Joe Schmidt.

“Larger curtains come in sections which eliminates the need to pull the entire curtain, and also provides openings to walk or drive through. The curtain is made of flame retardant material so if a welding spark lands on it, it won’t ignite.”

A solid curtain sells for about $1.75 per sq. ft.; a windowed curtain for about $2.50 per sq. ft.

Contact: FARM SHOW Followup, Rainbow Industries, Inc., Box 506, S. Vienna, Ohio 45369 (ph 800 388-8277).

From the archive · Full text
Feature story

Easy Way To Make PVC Brackets

Featured source:

Steve May, Prairieville, La., wanted extra lights on back of his Massey Ferguson 26 hp tractor so he could work better at night. The tractor has a rollbar, but he couldn’t drill holes in it because that would have weakened it. Instead he came up with an easy way to make brackets out of PVC pipe to support lights spaced about 1 1/2 ft. apart.

He cut off a 3-in. wide PVC pipe and made a slot down one side. Then he heated it to 280 degrees in an oven until the plastic became soft. The soft hot plastic was then wrapped around the rollbar to make a clamp with two ends that are spaced about 1/4 in. apart. Once the material had cooled and hardened he drilled a pair of holes in it. A single bolt pulls the two pieces together tightly around the rollbar.

Contact: FARM SHOW Followup, Steve May, 41464 Ratcliff Dr., Prairieville, La. 70769 (ph 225 622-2246).

From the archive · Full text
Feature story

Low-Cost Pickup-Mounted Crane

Featured source:

“It didn’t cost much to put it together and it can be easily removed when it’s not needed. There’s not much on it that can go wrong,” says Leonard Seltzer, Manhattan, Ill., about his “made it myself” swinging crane that mounts in the bed of his 1978 Chevrolet 3/4-ton pickup.

The crane extends about 13 in. beyond the side of the bed and swivels 270 degrees. It consists of a 1 3/4-in. dia. vertical pipe about 5 ft. 3 in. long, with a 3-ft. long boom made out of 1 1/4-in. dia. pipe welded to it at a 45 degree angle. The vertical pipe rests inside two welded-on angle iron brackets that bolt to the side and floor of the bed. A block and tackle, which hangs off a 3-in. I-bolt that’s welded shut and is equipped with a nylon rope, is used to raise and lower a load.

“It works great for moving small loads up to 200 lbs.,” says Seltzer.

“I use it often to load 5-gal. pails loaded with dirt or sand in and out of the bed. I also use it to lift a 120-lb. gas engine-operated soil-packing machine as well.

“I already had most of the materials and spent a total of only about $5, compared to commercial hydraulic-operated cranes that sell for hundreds of dollars. Commercial cranes bolt permanently to the pickup bed, which can be a problem if you want to drive under a low ceiling. To remove the crane all I do is pull the unit out of the bracket and lay it on the bed or off to the side.”

He welded two lengths of 3/8-in. dia. rebar at the top to help support the horizontal part of the boom. He also welded a piece of 1/4-in. by 1-in. flat strap iron on the boom’s back side for additional strength.

The pickup box that Seltzer uses was originally set up as a portable welding rig, which he converted to a more user-friendly unit.

“With some minor adjustments, my homemade crane would work equally well on a standard pickup bed,” he says.

Contact: FARM SHOW Followup, Leonard Seltzer, 16040 W. Elmwood, Manhattan, Ill. 60442 (ph 815 478-3578).