Practical ideas from FARM SHOW MagazineSubscribe · Free issue · Send us your shop tip
Subscribe to FARM SHOW
Issues / Vol. 36, No. 6 (2012)

Vol. 36, No. 6 (2012)

Money-Saving Repairs & Maintenance Shortcuts · Printed section pp. 36–39

35 selected entries · Complete text of selected entries

This issue’s section includes reader tips and feature-length shop stories. Held items and editorial notices are not reproduced.

Archive text: prices, coupons, availability and contact details reflect the original publication, not current offers. Reader methods are not universal instructions; follow manufacturer guidance and proper safety practices.

Reader shop tips

From the archive · Full text
Reader shop tip

Glenn Negri

Glenn Negri, Ada, Okla.

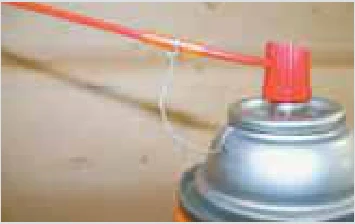
“I got tired of losing those little red straws that come with spray lubricants and cleaners. I came up with a way to wire the straw to the can.

“I first tried baling wire but it was too stiff. So I got some of the thin wire used to hold repair tags at shops. It works perfect. I wrap the wire around the lip at the top of the can, leaving 2 to 3 in. of wire. I slip a small piece of fuel line onto the straw before tying the wire to the straw to help hold it in place.”

From the archive · Full text
Reader shop tip

Harold Tesch

Harold Tesch, Tomahawk, Wis.

“I snowplow with my truck. At times, the plow would pull up patches of grass as well as gravel and stones. I fixed the problem by attaching a pipe to the bottom of the plow – no more damage.”

From the archive · Full text
Reader shop tip

Phil Tilley

Phil Tilley, Aragon, Ga.

“This is a simple idea but handy. I hook up an electric timer to my power tool battery chargers. It’s set for 1 hr. each day so it keeps them charged at all times without burning them out.”

From the archive · Full text
Reader shop tip

James Roxstrom

James Roxstrom, Maple Valley, Wash.

“I mounted a 2-ft. long piece of stove pipe on top of a propane tank in my shop and inserted the burn nozzle off a hand-held weed burner. I can move the stove pipe back and forth as needed to direct heat where needed. It takes off the chill quickly and I didn’t have to buy another piece of equipment.”

From the archive · Full text
Reader shop tip

Butch Mercer

Butch Mercer, Thaxton, Miss.

“In one of your recent issues, a 95-year-old fellow was having difficulty steering his Cub Cadet so he installed thrust bearings on the front axle where the steering mechanism rests. He ground down the axle the thickness of the bearings. He said it works like it has power steering now. I’m 74 and have a brand new Deere 300 that isn’t too bad to steer but I figured it was such an excellent idea that I’d give it a try. I fixed mine at a cost of $58, which included a $40 shop charge for drilling out the axle to press in the sealed bearing. I knew it would work and am very pleased with the results. I recommend this idea for all steering systems. Thanks to the fellow who came up with this idea.”

From the archive · Full text
Reader shop tip

Andrew Sewell

Andrew Sewell, Richmond, England

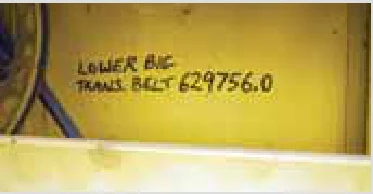
“I spotted this idea on a farm recently. The owner of this combine writes the belt size and parts number right next to each belt on the machine with a permanent marker. Simple, but he says it saves a lot of time when one breaks.”

From the archive · Full text
Reader shop tip

Leslie Green

Leslie Green, Conrad, Iowa

“I was having trouble hitting the hole for the dipstick on my Jeep Cherokee. The hole is hard to see, especially when working in the garage. So, I came up with a simple solution. I just place a Styrofoam cup over the hole, and I have an instant target.”

From the archive · Full text
Reader shop tip

Joe Germuga

Joe Germuga, Rochester, N.Y.

“I came up with a simple way to make a saddle cut on pipes using a chop saw. I made a 33 degree angled jig that sits against the backstop of my saw. You place the pipe on the table against the jig and cut off the corner of the pipe. Then rotate the pipe 180 degrees and cut the other side the same way. You get a clean cut that fits nicely against another piece of pipe. It helps to practice a bit on some scrap pipe and to cut slowly because you’re cutting on the end of the pipe.”

From the archive · Full text
Reader shop tip

Vern Goodwin

Vern Goodwin, Lincoln, Neb.

“I’m a motorcycle mechanic and storage space in my shop is always at a premium. I found myself running out of space so I mounted my shop lights on a shelf that lowers down when I need it to. The shelf is 4 by 8 ft. and is raised and lowered by an electric winch. I put two shop lights on the bottom of the shelf. I used four cables, one on each corner to keep the shelf level. I can lower it down to put small parts and tools on it, and then raise it back up.”

From the archive · Full text
Reader shop tip

David Pidgeon

David Pidgeon, New Haven, Vt.

“Many times when I’m away from my shop I’ve wished I had a vise to use on some job. So, I came up with this vise-mounting bracket that works with any standard 2-in. receiver hitch.

“I welded a 1/4-in. thick steel plate onto the receiver hitch and then bolted a vise base onto the plate. The vise came equipped with an adapter that lets me offset the vise and also change its angle. As a result, I can rotate the vise anywhere I want or lay it down flat on the base.”

From the archive · Full text
Reader shop tip 1 of 3

David McRae

Individual tip 1 of 3 from this reader’s published contribution.
David McRae, Whitehall, Wis.

“I wanted a way to extend the use of hard-to-find tractor tires once they developed breaks in the sidewall. So I made boot inserts out of 10-in. smooth triple-ply belting. I bevel the edge of the cut. Then I bolt the insert over the break using 1 1/2-in. long, 1/4-in. carriage bolts on the inside of the tire, putting the beveled edge against the tire wall.

“If the bevel isn’t smooth enough and seems like it might wear through the tube, I cut a piece of discarded inner tube that’s 2 in. bigger than the boot and bolt it over the top of it. I use a grinder to cut excess bolt threads off to within 1/8 in. of the nut on the outside of the tire. Then I use a ball peen hammer to pound the end of the threads to keep the nut from coming off.

From the archive · Full text
Reader shop tip 2 of 3

David McRae

Individual tip 2 of 3 from this reader’s published contribution.
David McRae, Whitehall, Wis.

If I have a tire with a damaged bead, I line the wheel rim with rubber from another inner tube. It protects the good tube inside the tire from breaks in the bead that could easily wear a hole in the tube.

From the archive · Full text
Reader shop tip 3 of 3

David McRae

Individual tip 3 of 3 from this reader’s published contribution.
David McRae, Whitehall, Wis.

Also, I put an oversize tube in the tire so if it ever gets punctured and has to be patched, the patch doesn’t have to expand too far.”

From the archive · Full text
Reader shop tip

Ernest See

Ernest See, Baker, W. Va.

“We needed to move the wheels out on our Deere 4020 tractor. We tried using heat and an impact wrench, but nothing worked. Then our dealer suggested slipping a piece of pipe over the axle and hammering on it. That worked.”

From the archive · Full text
Reader shop tip

Butch Alcorn

Butch Alcorn, Encampment, Wyo.

“I came up with this handy shirt pocket tool that lets me use wire clips to attach fence wire to T-posts. I start with a 6-in. spike and grind the point off, then drill a 1/8-in. dia. hole about 1 1/2 in. deep into the end of it. A lathe works best for drilling the hole, but if you’re careful you can use a drill press. This tool works great for any wire wrapping job where I’d otherwise have to use pliers. You just slip the end of the wire into it and twist. I painted the tool orange so it’s easier to find if I ever drop it in grass or hay, etc.”

From the archive · Full text
Reader shop tip

Jon Warwick

Jon Warwick, Warwick Ideas, LLC, (ph 601 954-5776; www.stavepress.com)

“Our portable StavePress is designed to gently but firmly hold irregularly shaped wood pieces without damaging the wood grain. It grips the work piece between 2 horizontal rubber-cushioned plates, allowing me to bear down hard with tools without worrying that the wood will be dislodged or damaged.

“The upper pressure plate pivots around a ball joint, allowing it to conform to the shape of the work piece at multiple points which results in less pressure on each point. Works great on irregular-shaped pieces of wood such as rough staves and hand-carved furniture pieces.

“An optional metal base is available that lets you temporarily mount the Stave Press to any firm surface. You use 2 C-clamps to clamp the base down, then slide the Stave Press’s frame onto it and tighten the set screws.

“Sells for $119 plus S&H. The base sells for $29.”

From the archive · Full text
Reader shop tip

Gary Rotruck

Gary Rotruck, Burlington, W. Va.

“I was doing trim work for a local home builder and needed to set kitchen cabinets in place without having to hire someone. So, I used built this ‘cabinet jack’ using pvc tubing and plywood. It mounts on 4 rollers. The legs are made from 4 lengths of 2-in.

dia. pvc pipe that fit over 1 1/2-in. pipe. The 2-in. pipe slides up over the 1 1/2-in. pipe to pre-drilled holes for each cabinet height.

“I can make plans available for a fee if anyone is interested.”

From the archive · Full text
Reader shop tip

Robert Chesney

Robert Chesney, Woodstop, Kan.

“We had a 13 1/2 by 15-in. tire go flat on our New Holland swather. By rolling the flat tire up on a car ramp, we were able to get a jack under the swather’s frame and remove the wheel so we could install a new tube.”

From the archive · Full text
Reader shop tip

Larry Taylor

Larry Taylor, Williamsburg, Ky.

“When the hot water stopped running in our house I was able to solve the problem without having to buy a new water heater by coming up with a way to replace the cold water intake line. Cold water runs through a plastic hose down to the bottom of the water heater and forces hot water to the top. Over time the chlorine eats up the hose and it deteriorates and breaks, and then drops down into the water heater and you can’t get it back out. I couldn’t find any company that replaces those plastic inserts. You can’t put copper in there because it’ll corrode.

“To solve the problem I took a length of 1-in. dia. copper and flared the copper tubing at the top. Then I reamed out the end of a piece of 1/2-in. dia. pvc tubing and slid the copper tubing down into it. The flared top keeps the copper tubing from dropping down into the pvc tubing. Then I connected the cold water back up and the water heater worked as good as new again.”

From the archive · Full text
Reader shop tip 1 of 2

Co-Leash Corp.

Individual tip 1 of 2 from this reader’s published contribution.
Co-Leash Corp., Tampa, Fla. (ph 888 838-2169; www.krypta-glow.com)

Kryptaglow is a glow-in-the-dark fluorescent paint that shines bright for 24 hours after being exposed to light for just 15 min. It can be used on walls, floors, metals, or on just about any properly prepared surface. During the day, the paint is relatively clear, but by applying multiple coats and a white base paint, it’ll shine bright at night. Ranchers can use the paint on fences so cattle don’t bang into them at night when they’re running. It also works great on slow moving vehicles, to light up bumpers and tailgates on pickups, or on tractor wheels as a theft preventative. Comes only in 1-gal. cans. Sells for $350 plus S&H.

From the archive · Full text
Reader shop tip 2 of 2

Co-Leash Corp.

Individual tip 2 of 2 from this reader’s published contribution.
Co-Leash Corp., Tampa, Fla. (ph 888 838-2169; www.krypta-glow.com)

The company also makes a plastic dip for shop tools. It leaves a rubberized coating on the tool that glows in the dark so you don’t lose the tools. Plastic dip sells for $350 per gal. plus S&H.

From the archive · Full text
Reader shop tip

Tim Patterson

Tim Patterson, Gold Plug LLC, 224 New Ventures Dr., Site 9, Bozeman, Mont. 59718, (ph 406 600-3103; [email protected])

He sells a new line of magnetic dipsticks to compliment the company’s magnetic drain plug. The dipsticks are precision CNC machined from billet aluminum. The no. 3003 dipstick is designed to replace and protect many Honda and Briggs & Stratton powered generators including the GX110, GX120, GX140, GX160, and GX200 models. Other lengths are available to cover almost all portable generators, and many other engines.

Shop feature stories

From the archive · Full text
Feature story

Hub Puller Fixes Skid Steers Fast

Featured source:

Replacing seals and bearings on skid steer hubs without damaging the hub is a real challenge. That’s why Jerry Titera developed the Hub Master Hub Puller.

“Mechanics tell me it can often take 30 min. or more to get a hub off normally,” says Titera.

“It takes me 30 sec. to remove a hub. Watch my video and time me. It takes me 2 min. to pop the wheel off and have the hub in my hand.” Titera’s brainstorm came out of frustration. He had a leaky seal on his Bobcat skid steer and tried to get the hub off and failed. The removable hub is a great innovation over other skid steers that still have the hub as a part of the axle. However, it fits so tight that it can be nearly impossible to get free.

“After two nights in the shop I had the rough design for my hub puller, tried it, and it worked,” recalls Titera.

“All I needed to do was to move the hub 1/16 in., and it’s off.” What Titera came up with was a puller plate drilled to match the bolt pattern on the hub. It has a big pin at the center. Once the wheel is removed, he slips the plate with the pin in it onto the bolts and tightens the lug nuts. The pressure of the pin against the axle pops the hub loose. Titera has a patent pending on his invention, which is being produced by Sheyenne Tool & Mfg. of Cooperstown, N. Dak. The puller is powder coated, and the center pin is coated against rust. He has it priced at $395, including S&H and tax.

“I always check back with customers on their satisfaction levels and ask if it was worth the price,” says Titera.

“They tell me it’s worth it for time saved alone.” Currently Titera makes his Hub Puller for 8-in. wheel patterns. He plans to come out with a 10-in. pattern for the new M Series Bobcat. At this time the Hub Puller is only available direct from Titera. Contact: FARM SHOW Followup, Hub Master Inc., 33472 141st Ave., Bagley, Minn. 56621 (ph 218 766-7357; [email protected] ; www.hubmasterinc.com).

From the archive · Full text
Feature story

New Rebuilt Parts For Deere Balers

Featured source:

Years of experience dismantling and rebuilding Deere balers have proven to Nelson Horning that Tucker Fingers in the knotters are nearly always worn and have a lot of play. Horning builds replacement Tucker Shafts for use on Deere 8 series balers and for many other models, including the 24T.

“Deere’s current Tucker Shaft has ball joint ends that tend to wear and result in poor knots,” says Horning.

“Our updated shaft with ball joints sells for $150. The price includes a new spring and a new angle bracket, which is typically worn as well.” Horning says his price is usually 40 to 50 percent less than replacement parts through a Deere dealer. Horning also manufactures new Tucker Fingers made with stainless steel bushings that he sells for $44 each.

“We’ve been working on Deere balers for almost 20 years and have customers in 40 states,” Horning says. At last count he says nearly a thousand farmers have sent him baler parts for repair and refurbishing.

“I started this business back in the early 90’s almost by accident,” Horning says.

“I needed new parts for an old Deere chopper and they wanted $600 for them at the dealership. I bought salvage parts for $200, made some improvements, and they worked just perfect. I did the same with baler parts the next year and things just mushroomed from there,” says Horning. Horning’s experience with balers has also shown him that ejector pans have a lot of play and usually break where the pan is attached with a 7/16-in. pin. He drills new holes and secures the pan with 3/4-in. pins, which makes it a lot tighter. If parts are worn out, Horning has a large supply of replacements. Those he doesn’t have can be made in his shop. His current inventory includes more than 100 different aftermarket parts and thousands of used parts. Most are for Deere balers, although he will work on New Holland machines and plans to expand into discbines soon. Horning also has a knotter rebuilding service where turnaround is 1 to 2 days. He replaces pinion gears, the billhook, the wipershaft, bushing and knife. This service costs $275 to $300 and parts are shipped by Fed-Ex for next day delivery.

“On all our repair jobs we rebuild the parts, clean them and paint them so they’re like new. We’re proud of the service we provide and our customers tell us they’re very satisfied,” Horning says. Contact: FARM SHOW Followup, Nelson Horning, 250 Lovejoy Rd., Penn Yan, N.Y. 14527 (ph 585 526-6705).

From the archive · Full text
Feature story

Sandblaster Made Of “Weldable Plastic”

Featured source:

James Osnes needed a sandblasting cabinet and he had a bunch of “weldable” industrial plastic on hand after helping a neighbor build dog kennels. He decided to use the plastic instead of steel.

“This stuff is fun to work with,” Osnes says about weldable industrial plastic. The sandblaster needed to be large enough to blast tire rims, so he made it 48 in. wide and 30 in. deep. Osnes first looked at commercial sandblasters to make patterns for the hopper. Because the bottom holds most of the weight, Osnes used the thickest plastic scraps (1/4-in.) for the hopper. The plastic cuts easily with any type of saw, he says. He used a Drader Injectiweld to assemble the pieces.

“It’s just like other welding, but this is easier,” Osnes says. The tool feeds a roll of 1/8-in. plastic to the hot tip, and melds it and the plastic pieces together.” He built in a double strength glass viewing window with filament on the inside that can be replaced. He also cut in holes for long rubber gloves to hold items and operate the sandblaster. Osnes operates his unit with a squirrel cage blower off an old woodstove. He uses sand that he screens himself as well as coal slag. The plastic has held up very well with no chipping at all, he says.

“It works good. I’ve used it quite a bit,” Osnes says. Currently he’s restoring a 1957 Chevy Bel Air and a 1929 Chevy pickup and using the sandblaster to clean up parts. Contact: FARM SHOW Followup, James Osnes, 28918 346th Ave., Burke, S. Dak. 57523 (ph 605 775-2548).

From the archive · Full text
Feature story

Bolster Repair Fixes Broken IH 454

Featured source:

Arthur Kidder doesn’t worry about overloading his tractor’s front-mounted forklift anymore. His bolster repair is heavy enough to carry nearly any load.

“I was having my house reroofed, and the crew overloaded my forklift with bundles of shingles,” says Kidder.

“The hydraulic lift on my IH 454 picked it up, but when I tipped it to dump the load, the shifting of the weight was too much for the front end.” The bolster that ran under the front of the engine broke, and the frame twisted on Kidder’s tractor. Finding replacement parts wasn’t easy. He decided to double up on support. He had 3-ft. lengths of 1-in. steel cut to fit over and reinforce the bolster. The wings, as Kidder calls them, are about 3 1/2 in. wide over the bolster where they bolt onto the front of the engine block. At the rear, they are about 9 in. wide where they bolt onto the side of the transmission housing. Contact: FARM SHOW Followup, Arthur B. Kidder, 1788 E. 800 N., La Porte, Ind. 46350 (ph 219 778-2125).

From the archive · Full text
Feature story

Metal Fabricator Markets His Metal-Working Tools

Featured source:

If you do a lot of metal work, Swag Off Road may have the tools you need. Swag specializes in developing add-ons that let you do more with the tools you have. Products include the Portaband Table for use with hand-held metal cutting bandsaws, brake kits and tubing roller dies for Harbor Freight hydraulic brakes, tubing rollers, and more.

“I’m a mechanical engineer by training, and when I need a tool in my metal fabrication shop, I make it,” explains Troy Rutherford, Swag Off Road.

“I’ll make another 10, and if they sell, I put them on my website. Every tool is designed, made and tested here in the U.S. They are designed for the shop/garage fabricator, but are able to withstand industrial use.” Rather than build a tool from scratch, he often takes a low cost, easily available one and enhances it. A good example is the $180 Harbor Freight Tubing Roller, which Rutherford says is in a league of its own based on one simple principle...price.

“We improved it and added dies so it can roll many different shapes and sizes of material,” explains Rutherford.

“It comes with 3 round tube dies, and we offer 19 different sizes and types that include stock round tube dies, square dies and round pipe dies, as well as a universal edge roller for rolling flat bar on edge.” Enhancements to the roller include modified drive axles, center drive roller, and weld-on wings that make rolling larger diameter and heavier-wall materials possible and easy. The company also offers a low-cost tube bender digital readout accurate to 1/10 of a degree. It works on a variety of tube benders – manual, hydraulic and air/hydraulic. Die sets are priced at $164.95. The digital readout is priced at $79.95. Another example of making a good tool better is the Portaband Table. It works with a variety of popular hand-held metal bandsaws and can be adapted to more. It quickly turns a portable bandsaw into a vertical unit. Rutherford offers 4 different models, from a very simple early design to a more refined and feature-filled version. Prices range from $44.95 to $109.95. Accessories include a 15-amp power foot switch, Ryobi Miter Gauge Assembly, and a bolt-on Miter Gauge track. Other Swag Off Road products vary from DIY builder kits for 12 and 20-ton Harbor Freight hydraulic press brakes to a simple wall-mount for disk grinders. To see some of the tools in action, visit www.farmshow.com and link to the videos. Printed information on many of the tools is also available on request. Rutherford asks that a stamped self-addressed envelope be included with requests for a brochure to speed the process. Contact: FARM SHOW Followup, Swag Off Road Inc., 19149 South End Rd., Oregon City, Ore. 97045 (ph 541 915-2775; www.swagoffroad.com).

From the archive · Full text
Feature story

Jibs Make Light Work Of Heavy Lifting

Featured source:

“They work great to lift heavy parts and equipment,” says Andy Hall, who operates an on-farm repair and welding shop on his family’s farm near Butterfield, Minn.

“When we put up a big new shop, the first thing we did was build several jibs like we had in our old shop. I use one of them in the welding shop, my brothers Mike and Tony have 5 in their machine shop, and we’ve got another one in the service bay where we work on cars, trucks and tractors.” The jibs are strategically located throughout four service areas in the 10,000 sq. ft. building. The horizontal arms rotate smoothly on 8-bolt heavy-duty wheel hubs bolted onto the top of vertical posts. They’re positioned to lift and move heavy parts anywhere in the building, yet not interfere with door frames, ceiling fans or another jib.

“We drew up everything to scale on paper before the floor was poured,” says Andy, “and everything worked perfect once they were all in place.” Four of the jibs are the exact same design, with each leg made of 13-in. dia. by 1/2-in. tube steel. Those legs hold a 10-in. by 6-in. I-beam used for the horizontal arm. A 6-ft. support brace is made from 5 by 7-in. tubing. The large jibs are 14 ft. tall. Two other jibs are the same design, but use a smaller I-beam because they lift lighter parts in Tony’s performance machining shop. Mike uses a shorter 8-ft. jib in the room that houses his turning lathe. The base for each of the jibs is a 36-in. dia. plate that’s bolted solidly to the concrete floor with six 3/4-in. machine bolts. Six gussets welded to the plate and to each vertical leg provide lateral support in every direction. Each jib has a 1,300-lb. electric hoist that rides on its horizontal I-beam. The hoists are equipped with a 1 1/2-hp motor and a tethered remote so the brothers can lift and move heavy parts anywhere in the shop. The brothers agree that having several jibs located throughout the shop allows each of them to work independently and not always ask for help anytime something is too heavy to lift by hand. All of the jibs are painted bright red, giving the appearance of giant cranes hovering over tall buildings. They stand out against the white interior shop walls. The jibs cost about $500 apiece for materials and took about 8 hrs. to build.

“They save us a lot of time and let us move heavy parts and pieces anywhere in the shops,” says Andy. Contact: FARM SHOW Followup, Andy Hall, 40133 620th Ave., Butterfield, Minn. 56120 (ph 507 956-2020).

From the archive · Full text
Feature story

Mini Van Repowered With BMW

Featured source:

Jacob Kraybill repowers cars and trucks with Cummins engines on a regular basis, but he’s only repowered a mini van with a BMW engine once. He bought a 1999 Ford Windstar with a blown engine and a bad transmission. The BMW engine, one of fewer than 500 ever made for use in Lincoln Mercury’s, fit perfectly.

“The BMW even has Ford stamped on the valve cover,” says Kraybill.

“I found it in a 1985 Lincoln Continental that I got for the scrap price of $250.” He pulled the engine, got it running and slipped it into the van. It was a 2.4L, inline 6 diesel with turbocharger. He rebuilt the truck’s transmission. While the bolt pattern on the transmission matched up with the engine, Kraybill still had to make an adapter plate to mount the starter that had been in the transmission. He also had to make a new nose cone bushing for the torque converter.

“It had an 11-in. flywheel, flexplate torque converter, overhead cam and timing belt,” recalls Kraybill.

“It was an engine that was way ahead of its time.” The BMW is transverse and was shorter than the original Ford. As a result, he had to carve some space for it on the passenger side and shift the engine and transmission to the driver’s side.

“The redline on those engines was 5,350 rpm’s, extremely high for a diesel, but the Windstar gearing was plenty high for it,” says Kraybill.

“It cruised smoother at 75 mph than it did at 55. I should have reset the turbo as the efficiency never panned out as I had hoped. The best I did was 30 mpg.”

Kraybill says he has slipped Cummins engines into a Toyota pickup, a Ford Ranger and done other repowering, but the Windstar/Lincoln Mercury/BMW was unique. Contact: FARM SHOW Followup, Peter Groves Mechanics, 7997 Manito Lake Rd., Fortuna, Mo. 65034 (ph 573 723-0699).

From the archive · Full text
Feature story

Kit Lets You Bleed Brakes Yourself

Featured source:

Marco Romani says his power brake bleeder kit saves money on brake jobs, and marriages, too!

“Bleeding brakes usually requires someone...often a spouse...sitting in the car pumping the brakes,” says Romani.

“With our Power Bleeder, one guy can do it himself. I’ve had guys tell me it took one big irritation out of their marriage.” The Power Bleeder kit consists of a pressurizer jug with a hand pump and pressure gauge, bleeder tubes, and a hose with a cap fitting to match the brake cylinder reservoir neck. Different makes and models require different caps, but the company has a wide variety to match most domestic and import brands. Romani got the idea for the kit while working on his own brakes. After watching a mechanic with a commercial machine, he knew he could make one simpler and less expensive.

“I built one for myself and then for friends and others,” says Romani.

“The business literally grew out of my garage.” The kit works by pressurizing the system, pushing the fluid out the bleed valve on brake cylinders. Bleeder tubes attached to the cylinder valves carry the fluid to a container for safe disposal. Romani advises checking fluid first to ensure it’s not excessively dirty, as pushing the impurities through may damage or plug lines. If the fluid is dirty, siphon out available fluid instead, and refill with clean fluid before pressurizing and continuing the process.

“Follow vehicle service manual instructions regarding the recommended bleeding sequence,” says Romani. Brake bleeding kits range in price from $54.95 to $99.95, depending on make and model. The company also makes Power Fill kits and Power Extractors for changing crankcase and transmission fluid. Contact: FARM SHOW Followup, Motive Products, 5750 Obata Way, Unit G, Gilroy, Calif. 95020 (ph 408 846-8800; www.motiveproducts.com).

From the archive · Full text
Feature story

Rubber Track Installation Tool

Featured source:

No pry bar is needed when using the Bair Products Rubber Track Installation Kit. New to the market, it makes installing rubber tracks a whole lot easier.

“It usually takes two people to install rubber tracks using large pry bars and sledge hammers to work the tracks onto the undercarriage,” says Tonya Bair.

“It’s especially hard to do with new rubber tracks that are still tight.” The hydraulic-powered tool does the work that pry bars and hammers used to do. It reduces the tension that normally holds the track in place.

“One person can change tracks in 30 min. with our kit and a Porta Power jack to push the track on,” says Bair. Bair’s has two different sized kits for Caterpillar/ASV/Terex small compact loaders. Contact Bair for the correct kit for your loader. The kits are priced at $445.

Contact: FARM SHOW Followup, Bair Products, Inc., 2785 W. 247th St., Louisburg, Kan. 66053 (ph 913 947-3934 or toll free 855 575-5847; [email protected]; www.bairproducts.com).

From the archive · Full text
Feature story

Expert Specializes In Obsolete Parts

Featured source: Greg Stephen

“If you’re looking for rare and hard-to-find tractor parts, I probably have them, know about them, or can tell you where to find them,” says Greg Stephen, who has made antique and unusual parts his business for the past 25 years. Stephen’s storefront is a website called The Old Tractor Company. It’s literally a museum of parts, product and service manuals, rare equipment and collectibles. He sells pistons, emblems, weights, steering wheels, carburetors and just about anything else for rare antique tractors.

“My father started the Stephen Equipment Company in the 1950’s and he enjoyed collecting old stuff,” says Greg, who grew up learning the trade.

“I picked up where he left off 25 years ago and it’s just grown from there,” Stephen says.

“The internet has given us a much wider audience and that’s helped us grow as well.” In addition to collecting and selling rare parts, Stephen’s website is the place to go for discontinued Deere toys. The site offers a selection of Deere AR and Collector’s Edition Model D’s, the unstyled model A on steel wheels, and low volume toys like the GPWT Bronze Replica. Other products are added as Stephen acquires them. If you’ve ever wondered how much an old Deere pocket knife is worth, the value of old sales brochures, or how much you should pay for a Deere dealership sign at auction, Stephen has the answer. He spent several years researching a large field of Deere collectibles from two-cylinder days and has put the information into a book titled Two Cylinder Collectibles. Contact: FARM SHOW Followup, Greg Stephen, The Old Tractor Company, P.O. Box 709, 7460 E. Highway 86, Franktown, Colo. 80116 (ph 303 663-5246; [email protected]; www.theoldtractorcompany.com).

From the archive · Full text
Feature story

Diesel Engine Conversion Experts

Featured source:

This company has been “dieselizing” Toyota, Jeep and Ford Ranger vehicles since 2004. The company guarantees that electronics, accessories, gauges and air conditioning will work just as they did when the vehicle arrived in its shop. Cost of a turnkey conversion is $18,000 to $20,000 and it might require as little as three weeks to almost a year from the time a person makes a deposit on the order until the vehicle is finished. In 2012, Diesel Toys developed a professional “plug-n-play” kit for do-it-yourselfers. Kits are designed for the 2005 and newer Tacomas, Fj Cruisers, and the 2003 and newer 4runners. Parts are designed using state-of-the-art CNC fabrication and provide a truly bolt-in diesel conversion with zero headaches, the company says. The kits are the result of more than 2 years of development. Contact: FARM SHOW Followup, Diesel Toys, Inc., San Antonio, Texas (ph 877 545-8699; www.dieseltoys.com).

Destroked makes components to replace a Powerstroke diesel engine with a Cummins Turbodiesel. Converting a 1999 to 2007 Ford Automatic to a Cummins 89-02 costs just over $6,200 for the parts. A similar conversion for manual shift truck would be just over $3,700. Other kits for different conversions range from $3,300 to $6,600. The kits include adapter plates, a torque converter, exhaust manifold, PCS transmission controller, motor mounts, starter, hoses, signal kit, fuel pump and wiring harness preparation. Some items aren’t supplied, so contact the company for details. The company also supplies components for Allison, Ford and GM transmissions. V-10 gas engines can also be converted to diesel by using several new components from Destroked and sourcing others such as a brake master cylinder, a radiator, intercoller, exhaust, front springs and AC condenser. Contact: FARM SHOW Followup, Destroked, 7245 W. 116 th Place, Broomfield, Colo., 80020 (ph 720 897-7477; www.destroked.com).

This company is the place to go to convert Ford trucks, Broncos, Chevrolet and Jeep vehicles with Cummins diesel engines. The company says a Cummins swap into a 1999 and newer Ford SuperDuty is the easiest conversion because of adequate room in the engine compartment. Many components needed are already on the Cummins engine while others such as motor mounts, alternator regulator, brushing and tachometer kits plus the transmission adapters come from DCS. Full instructions are given with kit components. Older trucks being converted require cutting, torching and re-welding engine supports, equipment brackets and radiator supports. The company has also supplied conversions for Chevy Blazers, Ford Broncos, E Series Ford Vans and Jeep 4BTA’s. DCS sells rebuilt 1994 to 1998 12V Cummins engines and 2003 to 2005 Cummins Common Rail engines. The engines have used turbos, injector pumps and injectors unless otherwise specified. Accessories include reman or used alternators, power steering and AC pumps. Prices vary and are quoted after the application is discussed with a company representative. FARM SHOW Followup, Diesel Conversion Specialists, 2065 Airport Rd., Kalispell, Mont. 59901 (ph 406 755-8878; www.dieselconversion.com). Since the early 1990’s Johnathan Goodwin and his company, H-Line Conversions, Inc., have converted H1 and H2 Hummers from gasoline, 325 hp, 8 to 12 mpg vehicles to eco-friendly biodiesel 650 plus horsepower rigs that get up to 25 mpg. The company has done more than 100 H1 and more than 60 H2 conversions. It does the conversions at its facility and also sells a conversion kit with all components except the drive train to install a Duramax diesel. The basic lower horsepower conversion package is $30,000 and the high performance 850 horsepower package is $51,995. A Hummer can also be converted to a hybrid electric vehicle with a Goodwin Assist kit. Contact: FARM SHOW Followup, H - L i n e C o n v e r s i o n s , ( w w w. hlineconversions.com).

TDC sells parts and components for installing 5.9-liter Cummins turbodiesels into 1973 to 1991 GM solid front axle trucks or SUV’s. It also has conversion parts for 1988 to 2000 GM independent front suspension trucks and SUV’s. Included are motor mounts, cross members, 4BT and 6BT injectors, fuel systems, air intake kits, seals, valve springs, flywheel bolts and washers, AC kits, turbo flanges and other parts needed for trouble-free conversions. Costs for all components are listed on the company’s website. FARM SHOW Followup, Tennessee Diesel Conversions, Knoxville, Tenn. (ph 865 809-7402; www.tndieselpower.com).